|
What's covered? Hide |
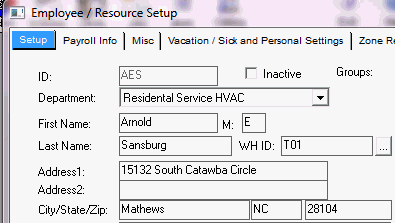
All individuals who work at, and will be paid by, your company must have an employee record. Employees differ from Users in that only people who log in directly to the Back Office version of Servman will have a User ID. (If an employee accesses Servman only through the Mobile interface, a User ID is not necessary.)
All sensitive information is stored on the payroll Info tab of the employee record. This tab has its own security setting to keep this information private.

The above fields are all that are required for the initial setup of Servman, however, to utilize all the features within ServMan, the below fields will be required.
Email Addr 1 - is used for paging order information from the schedule board if you are not on mobile. Contact ServMan Support to set this up for you. If you are not using the paging feature, this can be the employees email address. (Additional email address fields are available on the Misc tab.)
Phone, Pager and Mobile should contain the employee's contact information. These fields are for your information purposes only.
Mobile Device ID and Mobile Password - If you are on a mobile platform, you will assign each tech a numeric, sequential mobile ID (and optionally, a password).
Use Quotes - check this box if you want quotes to be shown on the tech's mobile device and have them appear in the dropdown for quotes.
Download to Mobile - check this box to download scheduled orders to the tech's device
Download Unscheduled to Mobile - check this box to download unscheduled orders to the tech's device NOTE: You may have many unscheduled orders. If you do, this sync will take a while.
Manage Tech Profile - check this box if you are using Meet Your Tech. ServMan will push basic information about this employee to the Meet Your Tech website for you to finish setting up. Should the employee be marked Inactive, that information will be sent to MeetYourTech.com and the employee's profile will be inactive. If they return to work for you, unchecking that box, will reactive their profile.
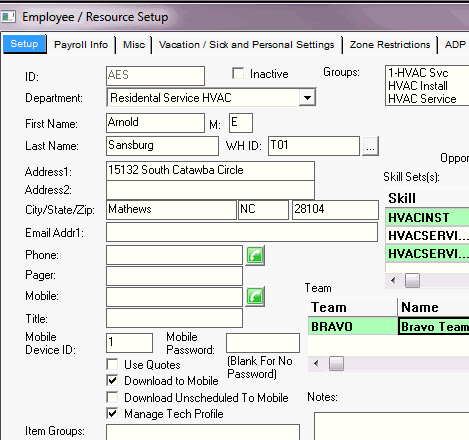
Item groups are used in mobile to manage the number of items downloaded to the tech's device. For example: If the tech works in HVAC only, but your company also does plumbing work, if you have your HVAC items in an HVAC item group, and the tech is in that item group, then only those HVAC items will be sent to his device. Items set up in the Plumbing item group will only go to mobile techs with the Plumbing item group. Techs can be assigned multiple item groups and items can be in multiple item groups. To learn more about item groups, click here.

If you are set up to use the Time Clock, the Badge ID field will be displayed in the lower section of the Setup tab.
You can either assign them an ID or have ServMan auto Assign them one. Badge ID's can be alpha-numeric.

Groups refers to employee groups. They are used exclusively to manage which employees are displayed on the Dispatch board. To learn more about employee groups, click here.

Opportunity Level is used in the RPM module and indicates the tech's ability to sell. To learn more about the Resource Planning Module, click here.
To fine tune the opportunity level for this employee by work type, see the Auto Schedule tab for this employee
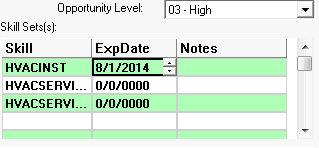
Skill Sets are used to help dispatchers (and the RPM module, if installed) choose the most qualified tech for the job.
Enter all the skills this employee possesses.
Skill sets can then be attached to items such that, if the item is on an order and the tech does not have the necessary skills to service or install the item, the dispatcher will receive a message stating the tech does not have the required skill set. The dispatcher does have the ability to override this.
Skill sets can also be used in conjunction with the dispatch board. To see how they are used, click here.
If your techs require periodic training to maintain their license or certification, the expiration date field will assist in reminding you that they are due.
Use the Notes field for further information about the employee if desired. Since this field is located on the Setup tab, anyone with access to view the employee table will be able to see the note. Fields located on the Payroll tab have an additional layer of protection.
The payroll tab, contains the personal information of the employee. It does have security settings to allow or restrict viewing this screen.

Select hourly or salary and enter the pay rate and burden cost per hour for each employe. Note: Enter the burden cost as a per hour amount, even on your salaried employees.
If the employee is exempt from overtime, check the Exclude from OT checkbox.
Select how you will calculate overtime and select the proper setting in the dropdown.
If you are using the time clock module and want this employee to clock in and out through that interface, check the Enable manual entry on time clock checkbox.
By default, dispatchers are able to clock techs in and out from the dispatch board. If you do not want dispatchers clocking techs in and out, check the Disable clocking in/out from dispatch board checkbox.
If you would like ServMan to automatically detect and subtract time for lunch and breaks, check the auto deduct lunch checkbox. This opens up a new box where you will enter the number of hours on the clock used in this calculation. Also enter the amount of the deduction in the Deduction in hours box.
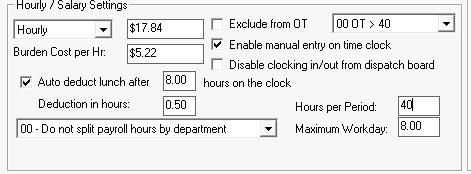
Enter in the number of hours this employee should work per pay period, and the maximum hours per workday.
ServMan offers the opportunity to select how and if you want employment costs to be distributed. This is useful for back office employees where you want to distribute their overhead costs between departments.

See Also: Employee and Departmental Burdens Explained section to see how entering in the Burden Cost per Hr will affect reporting.
Any employee can be set up to receive Sales Rep Commissions just as any employee can be set up to receive Technician Commissions. An employee can also be set up to receive both Sales Rep and Tech commissions. The difference between the two is that the employee ID must be set as the Sales Rep on the order to receive Sales Rep commissions and to receive Tech commissions, the employee ID must be set in the Lead Tech field on the order.
Sales commissions can be computed either on an accrual basis or on a cash basis. Select how you want your commissions to be computed.
If you allow your sales reps to receive and draw, enter the amount.
Check the Eligible for sales commissions checkbox, enter the percentage of commission they will receive and tell the system if this should be computed from the Profit or the Gross Sale price.
Finally select how often you will pay commissions by selecting either, by Pay Period, Monthly or Quarterly from the dropdown.

A spiff is used to pay one employee a set amount as an incentive for selling or performing an item. By default, the tech listed on the FIRST line of the schedule tab receives the set spiff amount when a spiff item is added to an order, no matter the quantity sold. This can be modified by ServMan to pay the spiff by the quantity of the item sold. Contact ServMan support to modify this setting.
Additional Spiff settings include paying spiffs to someone other than the lead tech and the ability to exclude the spiff amount from the profit computation of the order shown on the order profit tab.
Piece Rate is used to split a set amount between all eligible employees scheduled to an order. This amount is set on page two of the item.
If you want this employee to receive either of these commission types, check the appropriate checkboxes. Remember that the items must also be set up for Spiff or Piece Rate, and the item must be on the order detail for the lead tech to receive commission. To learn more about Spiffs and Piece Rates - click here.

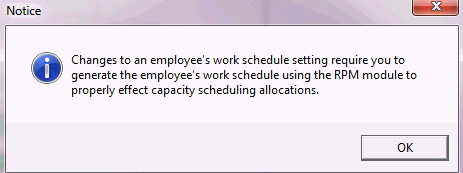
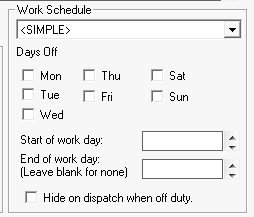
The default work schedule for all employees is <SIMPLE>. If you are using the RPM Module, you may want to set up a more complex work schedule. See the RPM module setup to learn more. Note: If you do have RPM module turned on and you attempt to change someone's work schedule, you will receive this message reminding you to regenerate the employee's work schedule.
If you are NOT using RPM, you may enter the requested information if desired.
Setting the days off, start and end of work day information and checking the Hide on dispatch board when off duty checkbox will help your dispatchers schedule techs to work orders.
This section is used for overriding the employee's pay rate for specific pay types. Do NOT use this feature without discussion the implications with your ServMan Project Manager More information on this can be found here.

Enter up to 2 additional email addresses for your employee on the Misc. tab if desired.
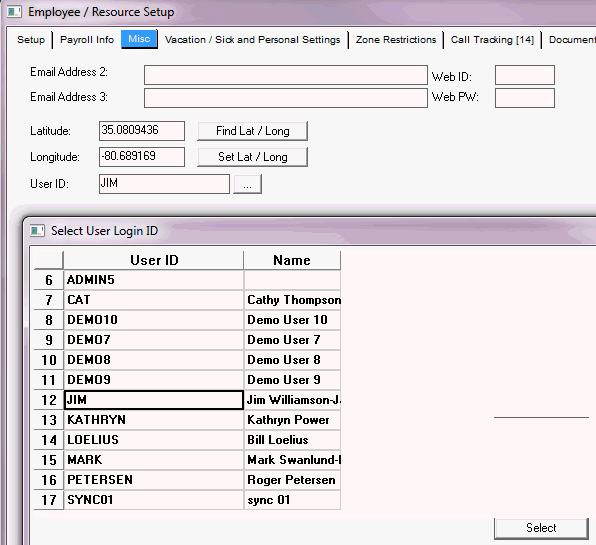
Web ID: and Web PW: are legacy fields
Latitude and longitude should point to the employee's home. If you have MapPoint (no longer available thorough Microsoft) already installed, you may click each button to find the lat/long of the employee's home. If not, you can Google the information and manually enter it here. The employee's home lat/long is used for various reporting purposes.
User ID: If this employee is also a back office user, enter in their ServMan User ID to connect the two together. This information is used in the Call Tracker module.
Both the Vacation and the Sick and Personal time sections use the same logic for accruing time.
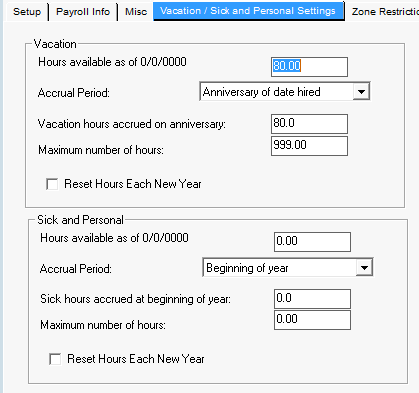
Hours available as of 0/0/0000 - both the date and amount portion of this field will change as you generate your payroll, increasing or decreasing as hours accrue or are used.
Accrual Period - select your accrual method for this employee based upon your company rules.

Vacation hours accrued on anniversary: - enter the yearly amount of vacation this employee is entitled to
Maximum number of hours: - enter the maximum number of hours the employee can accrue over his employment time. Enter 999.00 if they can roll their unused vacation endlessly.
Reset Hours Each New Year - Checking this box will prohibit any rollover of vacation time.
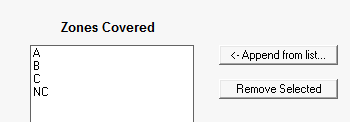
If you use zones, select the zones this employee will be assigned to.

If you use ADP, enter the ADP file number for this employee
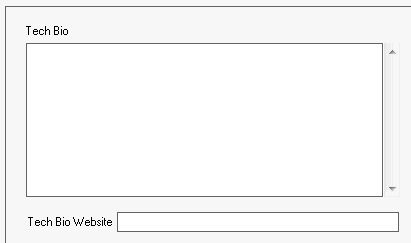
If you use APPAA and send Meet Your Tech emails to clients, enter your tech's Bio and the website link to upload the information to the Meet Your Tech website.
ServMan will monitor this information and
ServMan will tell you how to set this up when you turn on the Call Tracking integration with your phone system.
When adding new employees who will be using Call Tracker, enter the information requested as it appears in a similar employee's set up, replacing the new employee's information for the old. Options are explained in further detail HERE.
This tab works just like all other Documents Tabs in Servman. NOTE: This tab does NOT have security, so do not place anything personal in this folder.
If your tech is using ServMan Mobile, set their mobile permissions on this tab.
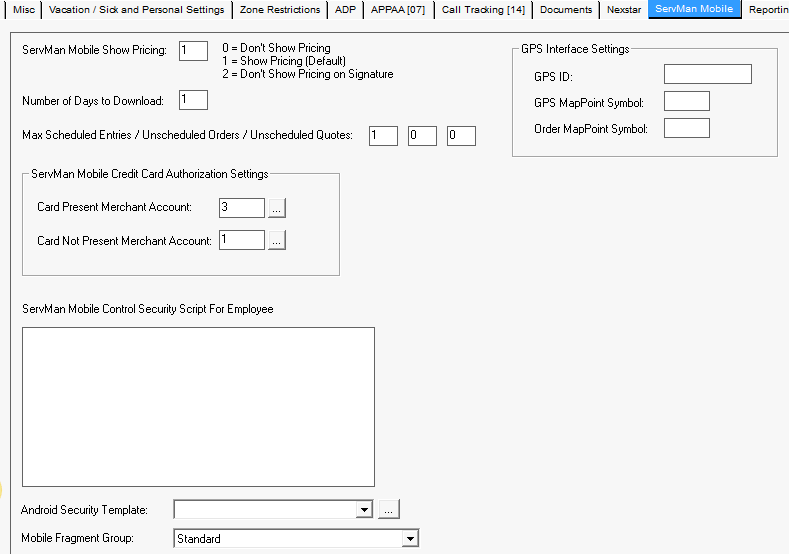
ServMan Mobile Show Pricing - enter the appropriate level of pricing you want this tech to see on their mobile device. Show Pricing is the default - or you can confirm this by entering a 1 in the box. Entering zero means no pricing will show on their mobile device. Entering a 2 in the box will not show any pricing only when getting a signature. thus hiding it from the client.
Number of Days to Download - controls the number of days worth of orders the tech can download to their device.
Max Scheduled Entries/Unschedule entries/Unscheduled Quotes - Enter the maximum number of scheduled orders and unscheduled orders or quotes you want to have downloaded to the tech's device.
ServMan Mobile Credit Card Authorization Settings - enter the code for the Card Present and Card Not Present Merchant accounts. Use the picker button to select the appropriate code.
Servman Mobile Control Security Script For Employee - Should you tech require special security, contact ServMan support to write this for you.
Android Security Template - Select the appropriate mobile security template for this user from the dropdown list. These security templates are built through Tasks -> System Procedures -> ServMan Android Security Templates.
Mobile Fragment Group - Select the appropriate mobile fragment group for this user from the dropdown list. These fragment groups are built through Tasks -> System Procedures -> ServMan Android Fragment Manager.
GPS Interface Settings - These fields are only used for MapPoint installations and are used to set the GPS ID and symbols used for this tech.
RPH Efficiency - This field is used to assist new employees in their efficiency while not impacting the efficiency of the entire department. For example, an employee who has been with the company for a while and generally operates in an efficient manner should remain at 0.00. A new employee may be a bit slower than the rest of the department. Entering .50 will set his efficiency at 50% of what the rest of the seasoned employees do in the same time period. This calculation is used in the Tech Performance report. (Documentation to be added soon)
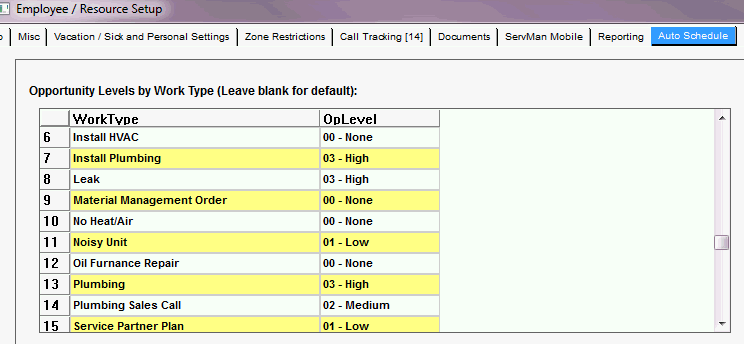
To further fine tune each employee's opportunity level, ServMan provides the ability to set an opportunity level for each work type by employee. If the fields remain blank, the default opportunity set on the employee setup tab will be used.
In the example above, the service and installation plumbing work types are set to a high opportunity and the Plumbing Sales Call is Medium while all HVAC worktypes are set to either Low or None.
Opportunity level information is used by the Auto Schedule program to help select the best employee for the order based up on the rules set in company defaults.
If call tracking is enabled in your system, ServMan will tell you what needs to be set up in this section as it is dependant upon your specific phone integration..