|
What's covered? Hide |
One of the first things you need to do before entering anything into ServMan is to set up your default Company and program settings. Normally this is done with your ServMan Project Manager before you "Go Live" with Servman. However, there may be times when you need to make changes or add additional information such as when you enable the Meet Your Tech module, or accept new credit card types. Please note that these are COMPANY SPECIFIC settings and will be applied to everything for this company in ServMan - unless overridden by branch or department settings or manually by a user.

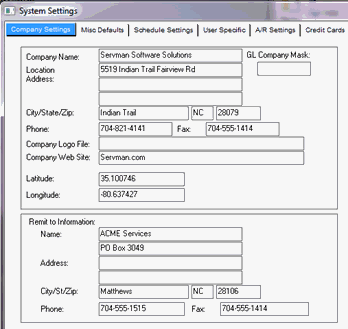
Company Name and Location Address: Enter your company’s name, address and phone numbers as you would like them to appear on your reports and formats. The company name entered here will also appear at the top of your main ServMan screen, after the version of ServMan you are running.

GL Company Mask is for future use in multi-company setups. When entered, the company mask will add this code to the GL account used, thus “branding” it as a part of this specific company’s GL. Multiple companies can be then rolled up into a consolidated statement as well as each company having the ability to print their own.
Company Logo File and Company Web Site fields are not required and are for reference purposes only. They can be used in customizations, if you desire. Logos that print on formats are set on the Reporting tab.
Latitude and Longitude are used in Route Optimization. Enter the lat/long of the location that most employees start their work day from.
Remit to Information section is where you want your payments to be sent. If it is the same as the address above, re-enter your location address into the remit section. If you use a PO Box, lockbox processor or want your payments to be directed elsewhere, make sure to enter that address. The Remit to Information will be printed on your formats.
Phone and Fax in this section are for your accounting department. These will also be printed on invoices and statements.
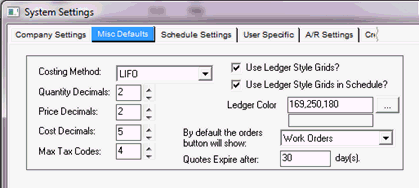
Costing Method – Options are FIFO (First in, first out), LIFO (Last In, First Out) and Average. Please consult with your accountant to determine which Costing Method you should use.
Quantity, Price and Cost Decimal fields all refer to the number of decimal places you will see on your screens. This does impact rounding, so in the example above, the Cost Decimals is set to 5 for more accurate costing.
Max Tax Codes – This setting defines how many tax code fields will be available for use within ServMan, with a maximum of 4 per client location. This is useful for areas that have federal, state, municipal, and/or local taxes they must collect and report on. Consult with your ServMan project manager for the best configuration for your company.
Use Ledger Style Grids?
If left unchecked, all lines in your grids will be white.

When checked, your grid lines will be alternated with a color of your choosing.

Use Ledger Style Grids in Schedule? - gives you the same two grid options for use on your schedule board
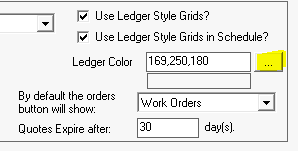
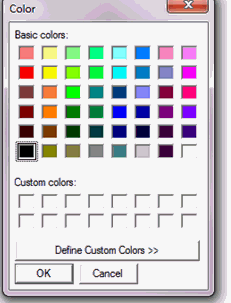
Ledger Color – should be entered as the RGB code or you may press the picker button (…) and select a basic color. If you want to define a custom color, press the Define Custom color and select a spot on the color wheel. This color will then be placed in the Custom Colors section and can be selected and used as your color for all alternate grid lines.
For Multiple Company installations, it is highly advised to use a different color for each company so you always know what company you are working in simply by looking at a grid.
By default the orders button will show: ServMan allows you to select which type of orders you want to appear by default on the order SmartView. Options are Work Orders, Sales Orders, and Recurring Orders.
Quotes Expire after: - day(s) - enter the number of days from the Quote Date that you want your quotes to expire. This date will be defaulted into the Expires On field in the quote and will be printed on your quote format, if desired.
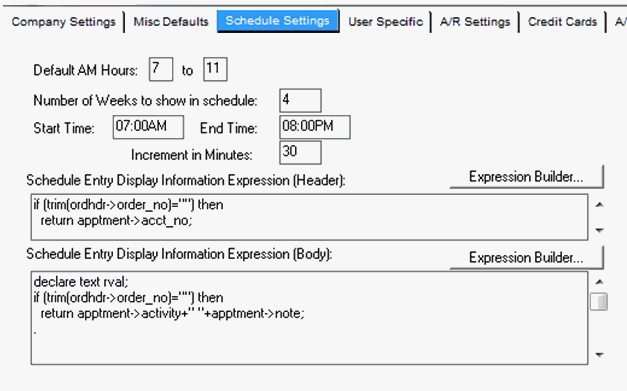
Default AM Hours – refers to the hours you consider to be AM. This is used for ease of entry in time fields so ServMan will know to auto-populate the AM in fields where those hours are used. Using the defaults as shown above as an example, if you type a 7 in a time field, ServMan will convert this to 7:00AM. If you type a 1230 in a time field, ServMan will convert it to 12:30PM since it is past the 11 AM time default.
Number of weeks to show in schedule –controls how many weeks will appear in the Weekly tab of your schedule board
Start Time, End Time, and Increment in Minutes – controls the time slots shown on your schedule board. In the above example, the schedule board shows time slots in half hour increments from 7 AM to 8PM. If you set your work day to start at 6 and end at 4, then the time slots shown on the schedule board will be between 6AM and 4PM. We recommend 30 min increments for most installations to manage the size of your schedule board.
Schedule Entry Display Information Expression (Header) - This is where ServMan will customize what information you see in the header of the orders on the schedule board. In the example above, the code displays the client account number for both orders and appointments on the schedule board. In the picture below, the top line of the blue order shows the client account number 110271. Note - If an appointment is not scheduled to a client record, the header remains blank, as shown in the yellow appointment picture below.
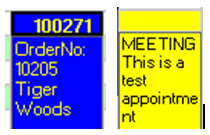
Schedule Entry Display Information Expression (Body) - This is where ServMan will customize what additional information you see in the body of the orders on the schedule board. In the example above, the Order number and Client Name are displayed if this is an order. If it is an appointment, the Type of appointment and Notes will appear on the board.
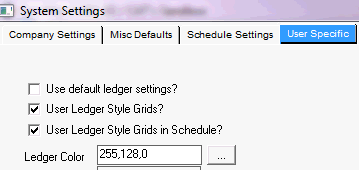
Use default ledger settings?
If checked, all users will use the same ledger settings and colors as those defined on the Misc Defaults tab.
If Unchecked, you may set a new default color, or choose not to use ledger style at all
Ledger colors are set in the same manner as on the Misc. Tab described above
PLEASE NOTE: This setting ONLY works for the user you are logged in as. If you want to change the color of a user who does not have security access to Program Defaults, you must temporarily give access, log in as that user, make the change and log out. Log back in as yourself to remove access to the Program Defaults. This Security setting is found in Master Files -> Miscellaneous -> Users. Navigate to the Utilities Category on the Settings tab. The first setting, Issue No 1000, is the option you will need to change.
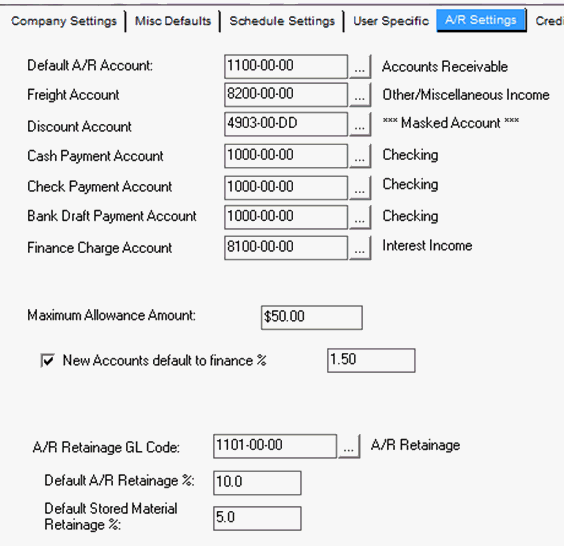
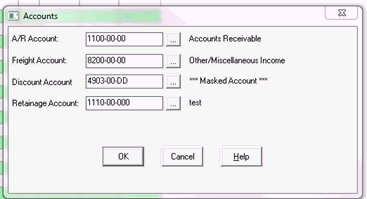
Default A/R Account –default AR GL account number used when setting up new clients – See Override example below
Freight Account – default GL used when posting freight charges that are entered in the lower right corner of an order/invoice – See Override example below
Discount Account – default GL used when taking discounts in AR Batch Pay, COD Batch on Order, or Quick Pay
Cash Payment Account – Must be set to your default cash account, however this is now obsolete with the new OrdPay module and may be removed at a later date.
Check Payment Account – Must be set to your default cash account, however this is now obsolete with the new OrdPay module and may be removed at a later date.
Bank Draft Payment Account – Must be set to your default cash account, however this is now obsolete with the new OrdPay module and may be removed at a later date.
Finance Change Account – default income account used to record finance charges collected from your clients.
Maximum Allowance Amount – The maximum discount amount your data entry person will be allowed to post against an individual invoice in AR Batch Pay or COD Batch on Order.
New Accounts Default to Finance % - when creating a new client, this percentage will be their default finance charge.
A/R Retainage GL Code – A/R retainage account ServMan uses when posting a retainage invoice on an AIA type job. (Only appears when the Retainage Module is turned on.)
Default A/R Retainage % - Percentage defaulted to an AIA job retainage invoice setup screen. This is then printed on the retainage invoice. (Only appears when the Retainage Module is turned on.) See Retainage example below.
Default Stored Materials Retainage % - Percentage defaulted to an AIA job retainage invoice setup screen. This is then printed on the retainage invoice. (Only appears when the Retainage Module is turned on.) See Retainage example below.
**Override Example: On an order (or invoice) you have the opportunity to change the A/R, Freight, Discount and Retainage accounts by clicking the picker button in the lower right corner of the screen, highlighted in yellow below.
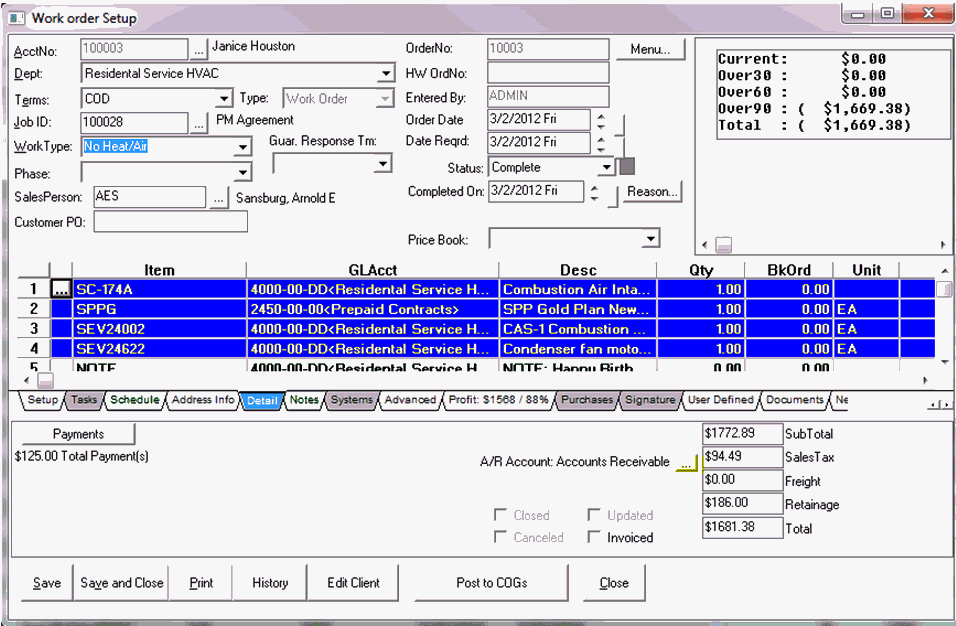
Clicking the picker button opens up a new screen giving you the ability to select the new account numbers for these accounts.
**Retainage Example: Pertains to AIA type jobs only – (set on the Job setup screen)
Defaults set in the Retainage % and Stored Materials % fields on the A/R Settings tab, default to the Progress Billing tab of the AIA type Job record highlighted in yellow below.

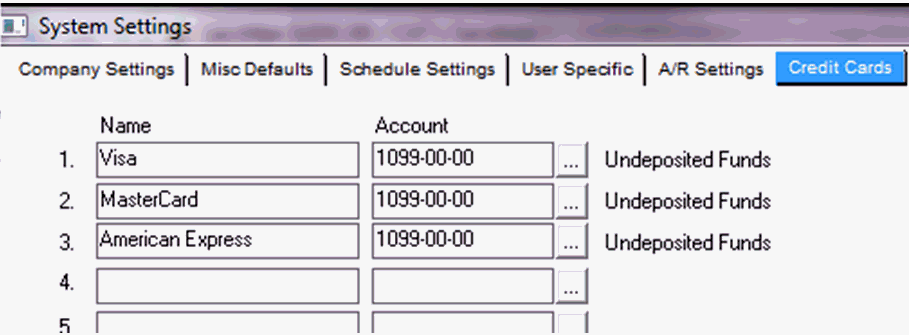
Name - Enter the name of each credit card account you will accept for payment
Account - Enter the GL account of the holding account for undeposited funds for each credit card.
Note: By placing moneys into an individual holding account, it will make both credit card and bank reconciliation easier by allowing you to reconcile each credit card statement individually, then moving only the deposited funds into your cash account.

A/P Account: Default GL account for Accounts Payable – This account can be masked
A/P Discount GL Code: Default GL account for A/P discounts taken – This account can be masked
A/P Freight GL Code: Default Freight Paid account. (This is the GL account for freight entered in the lower right corner of A/P bill.) This account can be masked
A/P Sales Tax GL Code: If you do not pay Use Tax, this is the GL account for Sales Tax that you have paid, typically a cost of sale account. If you do pay Use Tax, then this account should be an expense type account that will be reduced when you file your sales tax reports.
A/P Retainage GL Code: Default Accounts Payable Retainage account. (Only appears when the Retainage Module is turned on.)
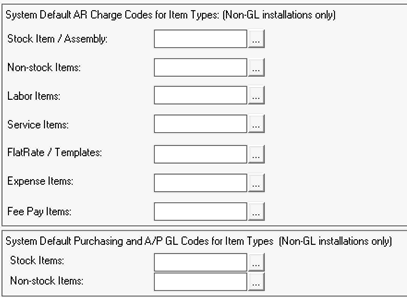
This screen is obsolete. Do not enter any information in this screen.

Cost Variance Account - GL Account number for inventory adjustments. This account cannot be masked. For example, after a physical inventory has been completed, discrepancies between ServMan’s inventory and you actual inventory will be posted to the Cost Variance account.
Consignment Liability Account – Other Current Liability account which will be used to track consignment item money, if you consign items

Default Sales Account for entries not setup in item Master list: Enter the default sales GL account for use when the item number on an order or invoice does not exist in your Item file.
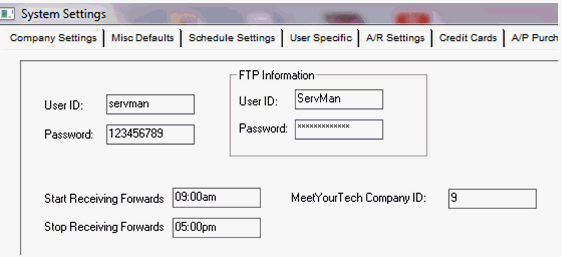
This tab will only be visible if you have APPAA enabled.
User ID and Password will be provided to you by ServMan. These credentials are for APPAA authorization.
FTP Information - User ID and Password will also be given to you by ServMan. These credentials will authorize your company to pick up APPAA files from ServMan’s FTP server.
Start Receiving Forwards is the time of day you want to have returned APPAA calls forwarded into your building. Normally, this is the time your company opens for business.
Stop Receiving Forwards is the time you want to have returned APPAA calls stopped being forwarded into your building. Normally, this is the time your company closes for business.
MeetYourTech Company ID will be provided to you by the MeetYourTech website once your company has created their profile.

If you have Call Tracking enabled this tab will be visible
Dialed Number Location is a special code that your phone provider will give to you or ServMan to enter into this field. In layman’s terms, this code tells ServMan where to look for a phone number within the SIP header. For example, when you dial a number, both your phone number and the number you are calling are included in a header record. Not all providers have these numbers in the same location in that header record. This Dialed Number Location code gives ServMan the location of the correct number to use in call tracker.

Use work type max capacity restrictions in auto-schedule
Unchecked – will allow all worktypes to be auto scheduled
Checked - will give you the ability to limit the scheduling of qualified work types, by the capacity indicated in the Maximum Order Per Day and Per Month fields
This allows you to auto schedule orders in the future if the maximum capacity has been reached
Work Types that Qualify and Work Types that do not qualify
Select the worktypes that you want to apply the maximum capacity limits to
Use the controls that appear between the 2 windows to move work types between the Qualify and Not Qualify windows. Only those work types that appear in the Qualify window will limited by the capacity
Note that the Maximum capacity limits are also available on the Department level. This takes precedence over the company level capacity. If no Department level capacity limits exist for the work type, Company level limits will be enforced, if the work type is in the Qualify window.
Maximum Orders Per Day limits, by worktype, the number of orders auto scheduled in a day
Maximum Orders Per Month limits, by worktype, the number of orders auto scheduled in a month
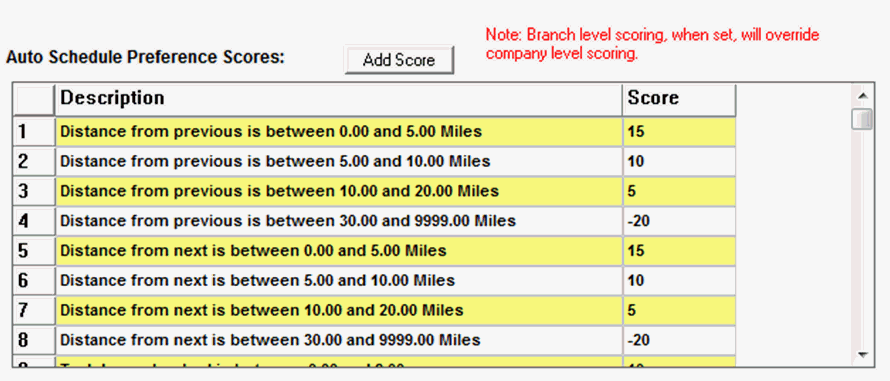
Press the Add Score button to build your auto scheduling scoring rules. (These same rules are also used for scheduling in the RPM module.)
Options currently available to build scores with are:
Distance from previous location
Distance from next location
Distance from employee start location
Distance cannot be determined
Tech hours booked
Preferred Tech match
Opportunity level
Once a rule is built and saved it will populate the grid as shown above.
Scores can be either positive (meaning a good match) or negative (a bad match)
Each order and tech will be evaluated against the rules in the grid and a total score will be derived from this information.
This score is then used to help your dispatchers select the best tech to send to the work site.
NOTE: You MUST press OK on this tab to save all your settings.
Scoring rules can also be applied at the Branch level following the same instructions above. Branch level scoring will override the company scoring if branch scoring exists.
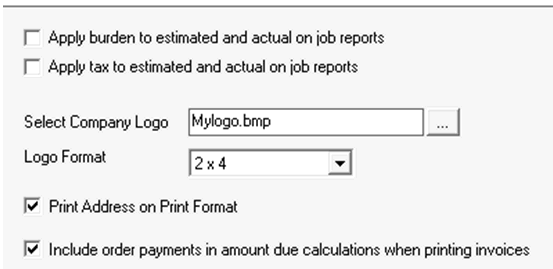
Apply burden to estimated and actual on job reports – adds the departmental burden amount (shown below), located on the General tab of the Department file, if it exists, to ALL JOB reports.
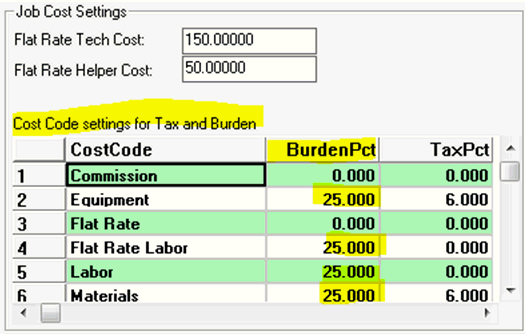
To override the departmental burden to a different rate for a particular job, you may do so on the Reporting Tab of the Job record (shown below). Check the “Override Departmental burden settings for this job” checkbox and enter the new settings to be used. Note this change ONLY affects this job.
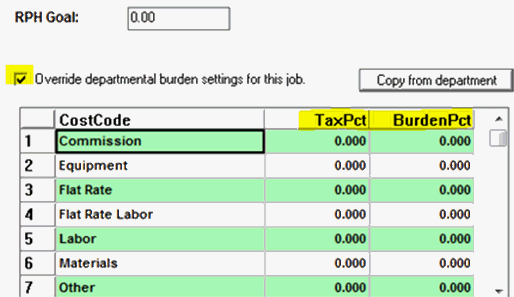
Apply tax to estimated and actual on job reports – adds the Tax Percent amount, located on the department file, if it exists, to ALL JOB reports run.
If you choose to override these taxes on a particular job, you may do so by following the instructions above for overriding the burden on a job.
Select Company Logo – The file name of the logo used to print on your formats
If you have just one logo and it is already printing on your formats properly, then entry here is not necessary.
If you would like be able to choose a company logo to print on your formats, enter the logo information in this box.
Use the picker button to select the logo.
Logos should be in the BMP format and placed in the Logo file of your ServMan’s company directory. (Example: S:\ServMan\01\Logo File) Remember this is your Company logo, not a branch or department logo.
ServMan provides order formats that have “logo switch” functionality meaning if you have branches or departments with different logos, those logos can be entered into the branch or department file and ServMan will select the correct logo to place on the format.
Logo Format – select the actual size of your above selected logo so that it will fit properly in your format
Print Address on Print Format – If your logo does not contain your address and you have chosen the “Logo Switch” style formats, you can print your address on your formats by checking this box.
Include order payments in amount due calculations when printing invoices – allows you to always include payments made to orders in the Amount Due calculation on Invoice formats.