The Resource Planning Module, (RPM) is only applicable if your organization utilizes capacity based scheduling. Using capacity scheduling, orders are initially assigned to a specific day and Service Window, (time slot), instead of a specific Technician. You configure your system to tell it how many of each type of call you want assigned by day and service window and the software then tracks how many slots you have in total and how many remaining. Calls are held in a reserved and unassigned queue where they are then managed by your dispatchers and assigned to specific technicians throughout the day. The module is used to manage all of the information necessary for this process and to be as automated as possible. Your capacity is automatically computed based on your employee schedules, skill sets and service windows. The module is highly sophisticated supporting both rotating shifts and real time adjustments to your capacity allocations to accommodate real life issues like weather!
As easy as the module is to use, it is quite complex to initially configure. The following are terms used by the module that you will need to understand.
Service Windows: A Service Window is a time slot assignment specific to a time of day and day of week. A typical Service Window would be "8AM-11AM Mon-Fri". You can have any number of Service Windows configured in your system. Service Windows will be assigned to Capacity Groups as well as Employee Shift Assignments. To learn how to set up Service Windows, click HERE.
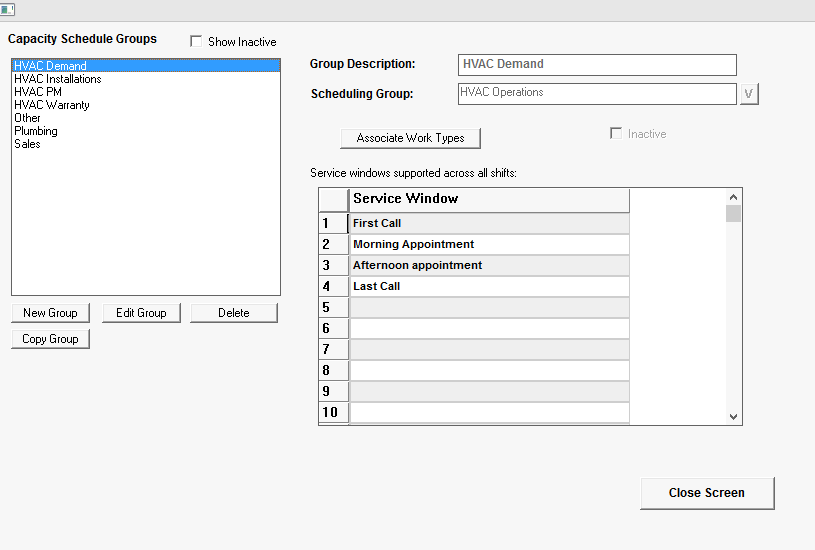
Capacity Groups: Capacity Groups contain specific "work-type" assignments. Each Capacity Group can have any number of work-types associated to it; however, a work-type can only be associated to a single Capacity Group. To learn how to set up Capacity Groups, click HERE.
Capacity groups will also have assigned service windows. Service windows assigned to a Capacity Group will be used to define the number of time slots that will be available to this Capacity Group. For example, if I have 8 qualifying technicians in a Capacity Group I would have 8 "8AM-11AM Mon-Fri" time slots for orders. Once an order is scheduled with a specific work-type and service window assigned, the available time slots are reduced by one. Only Service Windows listed under the Capacity Group setup screen will be allowed to be included on shifts that are later created and assigned to it. Service Window codes listed on the setup screen will be displayed under the Capacity Group Planning and scheduling screen. (Shifts will be assigned to employees indicating which Capacity Group they should be "assigned to" later in your setup.)

Scheduling Group: A Capacity Group can be assigned to a "Capacity Scheduling Group". This feature allows your users to view additional related technicians when making work assignments. For example, a user may be attempting to find work for a Demand Technician only to find no work available; they could quickly view PM calls if they were in the same Capacity Scheduling Group. Scheduling groups are simply a way to group Capacity Groups together. To learn how to set up Scheduling Groups, click HERE.
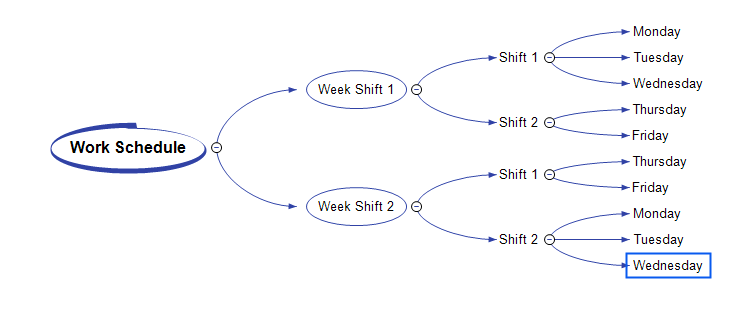
Work Schedules: Work Schedules are assigned to an employee on the Employee setup screen. A work schedule can be either Simple, same days of week and hours all the time, or Compound, schedules which are a combination of varying Weekly Shifts. Weekly Shifts are combinations of Day Shift definitions. An employees work schedule assignment determines what hours they will be defined as "On Duty" and available to have work assigned. To learn how to set up Work Schedules, click HERE.
Shifts: Shifts are the lowest level component used when creating Work Schedules. Shifts are defined only as a beginning time, ending time and specific service windows that are to be included in the Daily planner. Examples of shifts would be:
HVAC 1st Shift - 8AM to 5PM
HVAC 2nd Shift - 12PM to 8PM
PM 1st Shift - 8AM to 5PM
Install 1st Shift 8AM to 5PM etc..
Shifts must be assigned Service Windows, used to determine the time slots that will be used when this shift is applied, and the Capacity Group that will be used by this shift. You will need at least one Shift assignment for each capacity Group.
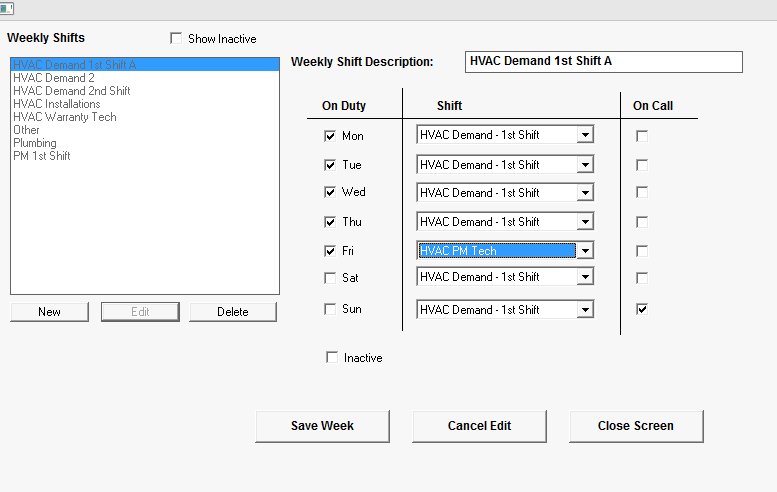
Week Shifts: Week Shifts are used to define collections of shifts to create weekly shift patterns that will be assigned to Work Schedules. Week Shifts allow you to assign Shifts, above, to specific days of the week. Looking at the screen below, notice that the Weekly Shift allows you to assign a specific Day Shift for each day of the week as well as an On Call Assignment.
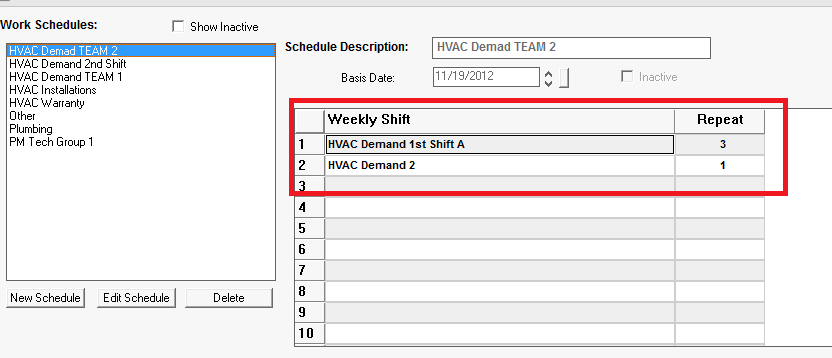
Work Schedules: The Work Schedule is the highest level and final step in setting up your companies Work Shifts. This feature allows you to string together multiple Weekly Schedules to form complex patterns. For example, your company may have groups on rotating shifts working three weeks of one pattern working business days with Saturday and Sunday off, then one week where they work Saturday and Sunday with Thursday and Friday off. Your work schedule provides you this flexibility. The Basis Date for a Work Schedule MUST BE A MONDAY and is used to determine when the pattern will begin.
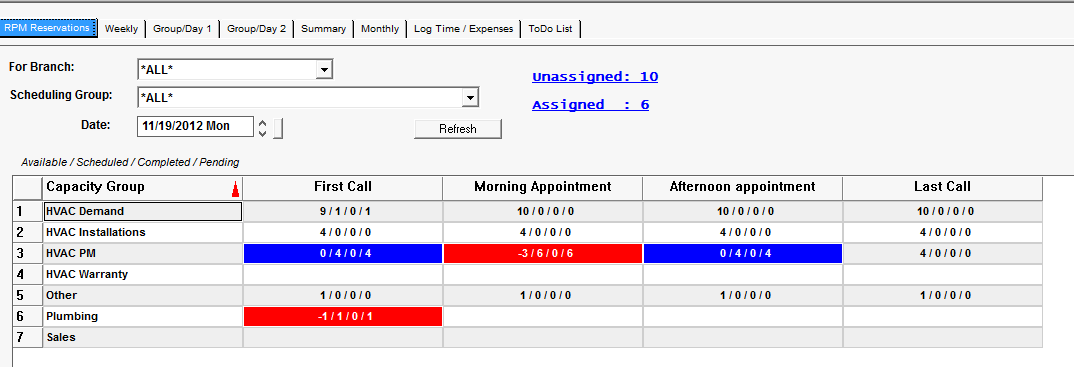
Capacity Day View: The Capacity Day View is a screen function that displays your time slot allocations for each Capacity Group. From this screen you can manually adjust your available time slots by simply Right Clicking in the desired cell. Your initial capacities are automatically calculated based on your employee Work Schedule assignments when you generate your work schedules. The screen displays total available, Scheduled or total used, total completed, total pending completion.
While setting up your initial capacity based scheduling may seem daunting, using it is extremely simple. The following section details how to perform specific actions under the RPM use model.
Once your order is created there are several paths to calling the procedure to book your call. The booking procedure is accessible from:
Your order must be assigned to a Worktype that is associated with an active Capacity Group to be booked. Launching the Capacity Auto-Schedule feature will cause the Capacity Auto Schedule screen to be displayed.

The Capacity Auto-Schedule screen displays all of the configured time slots assigned to the Capacity Group indicating for each the slots remaining, total scheduled, of all of those scheduled how many are completed and how many are still Pending or not yet completed. A key for this is highlighted above in the black box as Available/Scheduled/Completed/Pending. The time slots will be highlighted in blue when full, red if over booked. Time slots, (Service Windows), are displayed for the Capacity Group associated with the Work Type on the order and for the current day. Once the user finds a time slot that suits their client they simply double click in the time slot cell to reserve the order.
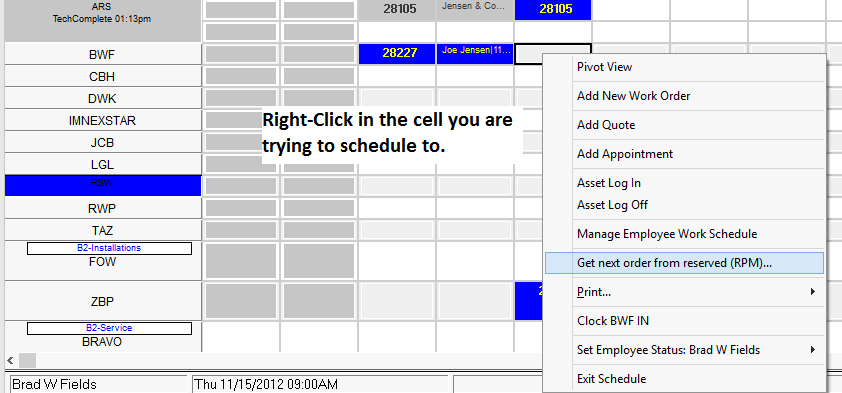
Orders are assigned to technicians directly from the dispatch board by first selecting the technician and time slot the user is seeking to find a suitable order for. This is accomplished simply by Right-Clicking in the time-slot, (cell) on the Dispatch Board and selecting "Get next order from reserved (RPM)"
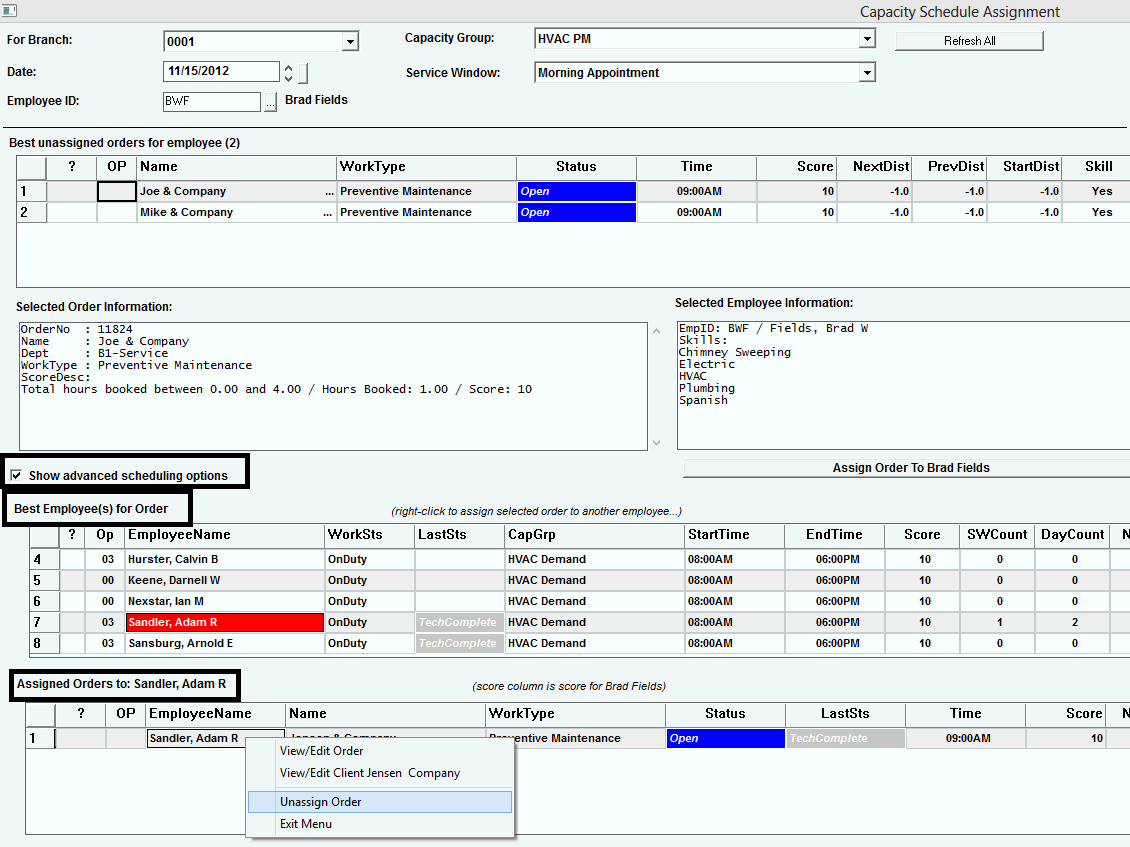
This will pull up the Capacity Schedule Assignment screen. It will default to the Capacity Group currently assigned to the selected employee based on his work schedule setup and the Service Window that matches the curser placement from the dispatch board. Unscheduled calls are listed in the top grid with the BEST choice listed first. The best choice is based on the technician's score for this ticket based on your companies scoring rules. Simply double click on the desired order to assign the call to the technician. The call will be placed on the dispatch board at the location of your mouse pointer.
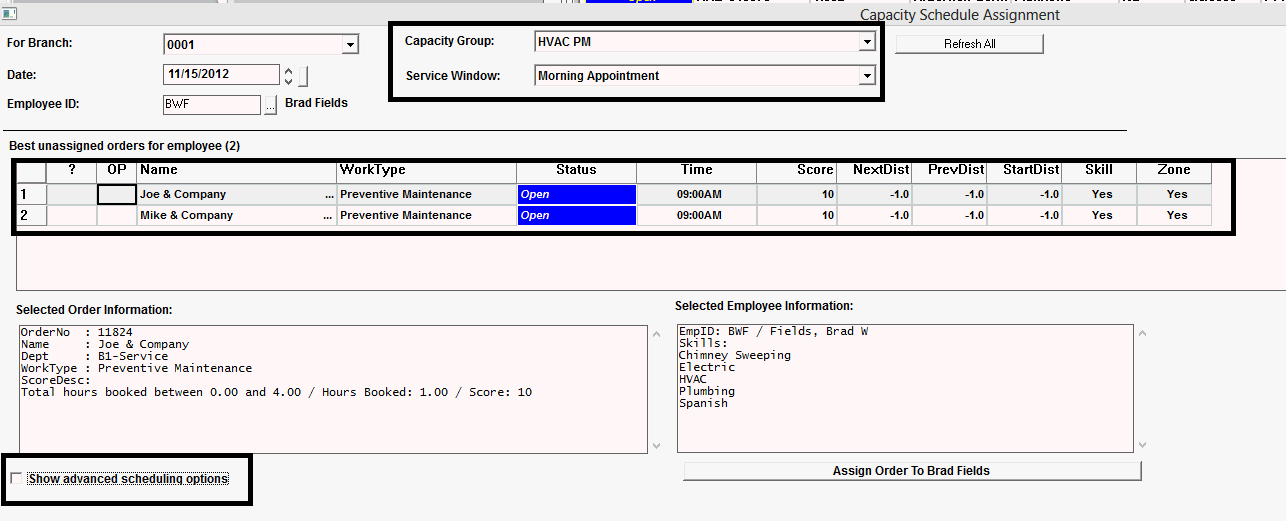
Checking the "Show advanced scheduling options" check box will expose and additional grid control. This feature is provided to assure that the best assignment can be made when allocating calls to your employees. The section will list all other employees assigned to this Capacity Schedule Group. Remember, a Capacity Schedule Group can span multiple Capacity Groups! It will list the technicians best on their ranking relevant to the currently selected order in the top grid. If the technician in the listing has a score higher than the current technician you were originally attempting to schedule the order to, you may now optionally assign the ticket to the better suited technician for the call. If the higher scoring technician is already booked for this time slot they will be flagged in RED. Selecting the technician will display their currently assigned orders allowing the user to determine if the current assignment should be "swapped" for a better call. Right click on the desired technician or order to access your available assignment options.
To remove an employee assignment simply click it and drag it on the dispatch board onto the RPM Reservations tab. The order will be returned to its unassigned Capacity Group.
Drag the order to the unscheduled orders area on the dispatch board. The reservation will be removed.
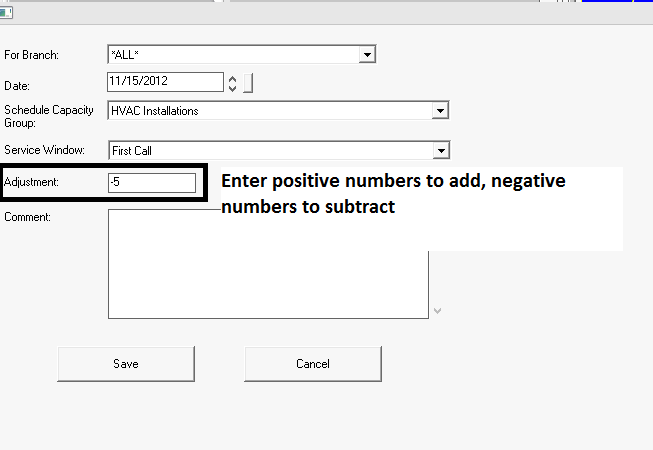
Click on the RPM Reservations tab and Right Click on the Service Window and Capacity Group you wish to manually adjust. Choose Manual Adjustment screen. Key positive numbers to add additional slots, negative numbers to subtract.
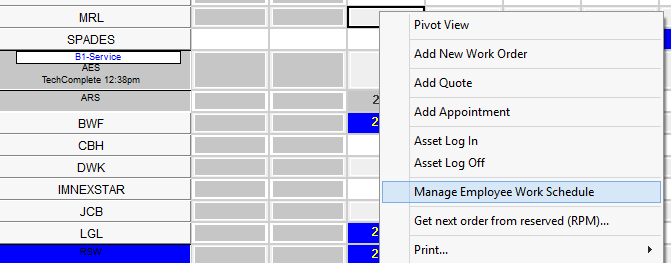
Employee Schedule adjustments will directly affect the number of time slots available for their associated Capacity Groups. You can manually adjust an employees schedule and availability as well as reassign their Capacity Group dynamically. To adjust an employees schedule simply right-click on their schedule area and choose "Manage Employee Work Schedule" to access the adjustment screen.
The Employee's schedule will be displayed. The current day of the week will be displayed in green. Right Clicking on a given day allows you to Edit existing schedule entries, add new, delete or Split an entry between two or more Capacity Groups.
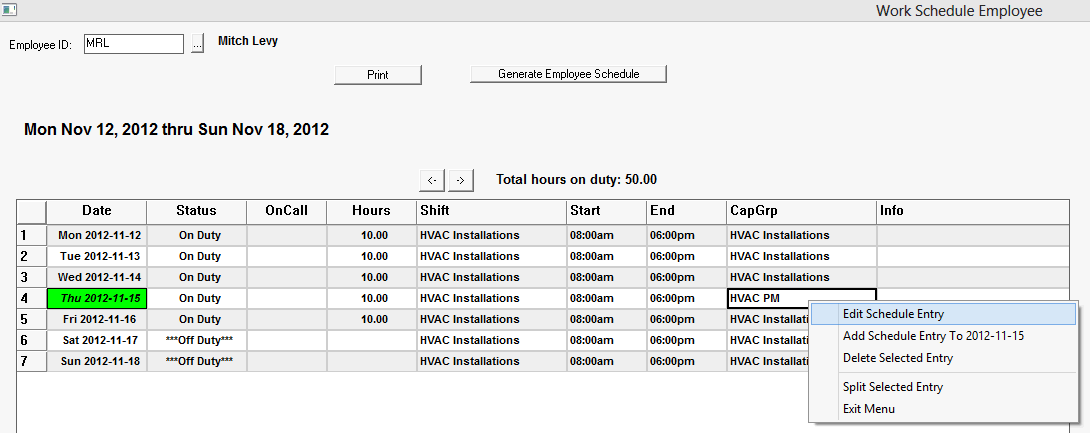
Modifications to an employee's schedule are only for the day selected and will not affect future schedules. You must Generate employee schedules after making your adjustments to affect your Capacity allocations.
Certain work types require multiple time slots and often come with time constraints on how the time slots are allocated. For example a work order which first requires 2 technicians at the same time for a time slot, then only one for the final time slot, or an order that requires 2 technicians for two consecutive time slots - totaling 4 time slots consumed.
On Work Type - new tab
Please note that both the Service Window AND the User file must be set properly for this restriction to work.
Service Window restriction
Check the "DO NOT OVERBOOK" checkbox on the Service Window Setup page to block that Service Window from being overbooked when the User does not have permission to do so.
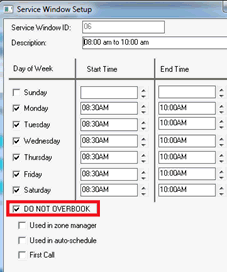
Once your specific (or all) Service Windows have been set to "DO NOT OVERBOOK", you must then open the User's template found in Master Files -> Miscellaneous -> Users File
Double-click the template of the group you do not want to have overbooking rights.
Select the RPM Category and UNCHECK the Allow User To Overbook Service Window checkbox.

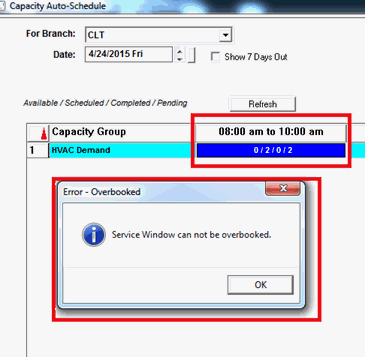
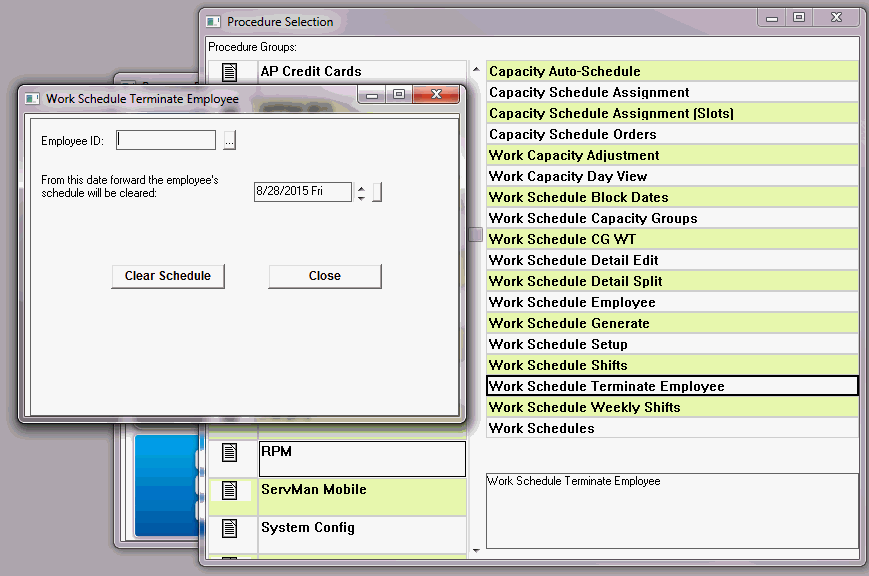
If you have an employee who was a member of a Capacity Group in the RPM Module and the employee has left your company, you will still see the employee as a resource in the Capacity Group until you do the following:
Tasks -> System Procedures -> RPM -> Work Schedule Terminate Employee:
Enter the employee ID or choose the employee with the picker button
Enter the last date the employee will work and press Clear Schedule
