|
What's covered? Hide |
AIA “style” jobs use a standardized application for payment method where the user sets pre-determined Billing Amounts for each cost code in a project, then invoices against these totals by creating an “Application for Payment”. These projects allow you to easily track overall Project Status against estimate, manage Percent of Completion based revenue recognition as well as track and bill retainage.
POC – Percent of Completion
Stored Materials – Materials purchased for the project that have not yet been placed into service.
Retainage – Amounts withheld from invoices prior to acceptance.
AIA – A standard billing application recommended by the American Institute of Architects
Payment Application – Each Invoice on an AIA Style Job (i.e. an application for payment)
ServMan must be configured to properly use Progress Billing. Job Groups, Cost Codes and Items must be set correctly to allow the system to generate the bill correctly. If you are using Retainage, there are additional settings required. Click HERE to learn more about Retainage.
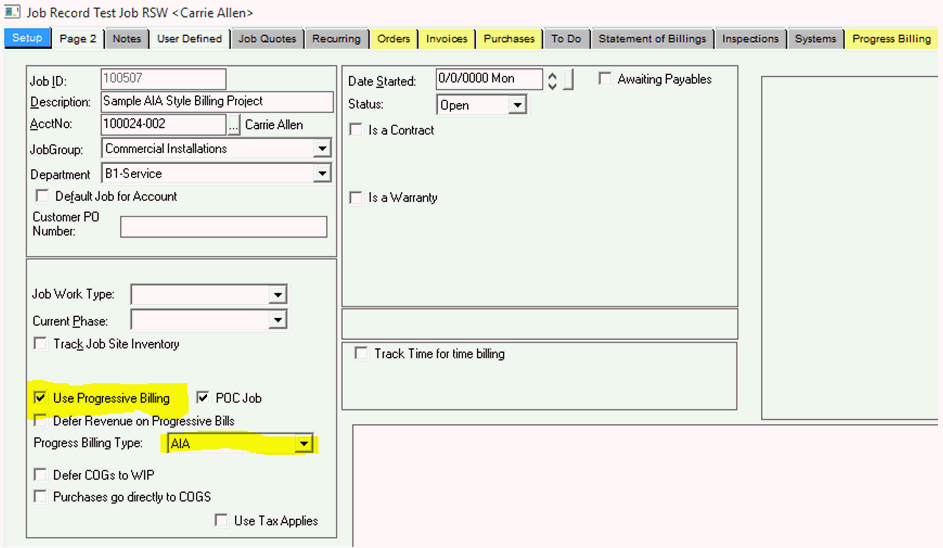
To create a Progress Billing type Job you must check the “Use Progressive Billing” option. Choose the “Progress Billing Type” of AIA as shown below. If you are managing revenue using the Percent of Completion Method, you should also check the “POC Job” check box. (See Below) If deferring revenue on the Progress bills, check the Defer Revenue on Progressive Bills checkbox as well.

Figure 1 Job Setup tab
For each Job Group you must set the Default Debit account for Work In Progress (WIP) Billings AND for the Income Recognition. These accounts may be masked. The mask will be resolved based on the department on the Job Record. To use the POC automated adjustment feature of the POC Job Analysis process, you must check the POC JOB checkbox and have your amortization accounts properly setup on the Job Group as shown below.

Figure 2 GL Account defaults for POC Adjustment Tool
Cost estimates are created by converting Quotes under the Job record. All converted lines on quotes will be included in your cost estimate for this project. Note, AIA Style jobs do NOT have an ESTIMATE tab as do regular jobs, you must use converted lines on quotes exclusively.
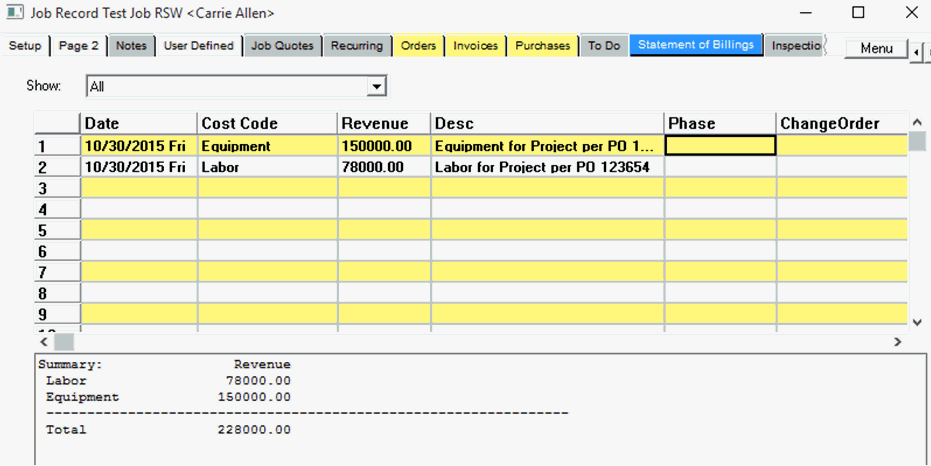
Once the AIA Progress Billing Type is selected you will see a STATEMENT OF BILLINGS tab displayed on the Job Tabs. Selecting this tab will expose the following screen.

Figure 3 Statement of Billings Screen
Use this screen to preload your total Project Billing Schedule. Note that the date field is NOT when you intend to Bill the project but the date you are making the entry. You may optionally list the phase against which the billing will apply or, if the Billing will be for a Change Order request, set the Change order flag in the last column.
The amounts set on the Statement of Billings tab will be considered primary for creating Progress Billing invoices.
WARNING – ALL INVOICES FOR PROGRESS BILLING JOBS MUST BE GENERATED THROUGH THE PROGRESS BILLING SYSTEM. MANUAL INVOICES or MANUAL INVOICE ADJUSTMENTS WILL NOT BE REPORTED CORRECTLY AGAINST THE PROJECT.
To generate your invoices for AIA Style jobs start by opening the Progress Billing Tab on the Job Record. One line will be displayed for each line you created on your “Statement of Billings” tab. The retainage percentage will default to the values set on the BRANCH Setup under the AR Settings. You can override the retainage amounts for any billing line by right clicking and choosing the appropriate option. (Displayed Below).

Figure 4 Right Click to Adjust Retainage Values & More
Enter either the desired Percentage of the total “to be invoiced” in the % Complete field, or a dollar amount in the Current Billing field for each line.

Figure 5 Completed Progress Billing Line
Once you’ve entered your desired Current Billing Detail, Press the “Generate Progress Billing Invoice” option at the top of the screen. This process will create your Payment Application . Important, if you have generated the invoice in ERROR, delete the invoice BEFORE posting to AR. The invoiced to date amounts will automatically revert to the prior values. If you discover an error AFTER updating the invoice, see – Crediting Progress Billing Invoices for additional help.
Your new invoice will now be listed under the Job’s invoice tab.
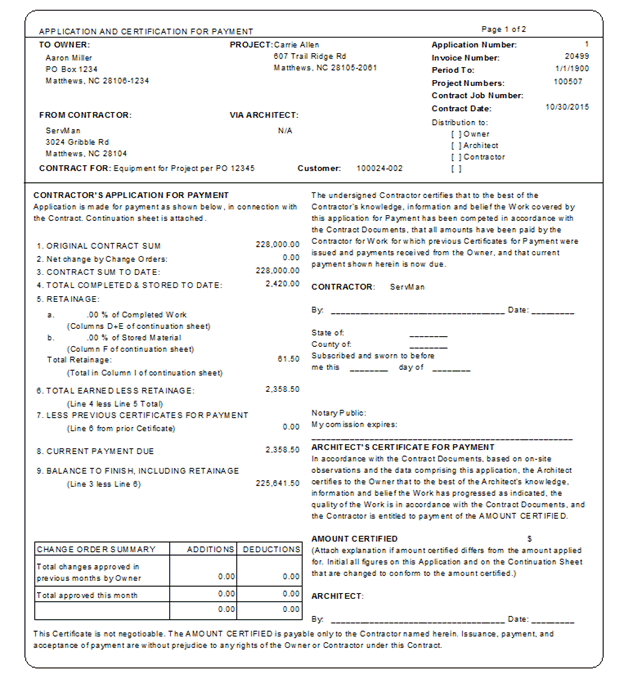
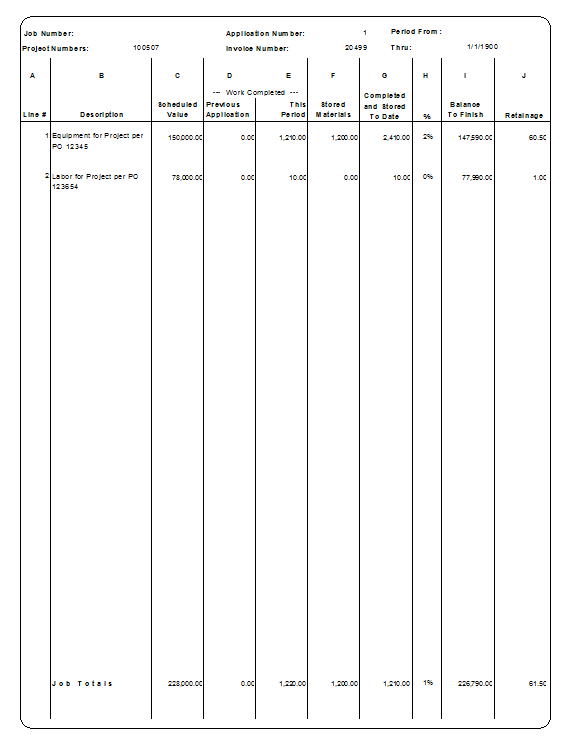
The software is installed with a standard AIA style formatted invoice format. (Format name: Progressive Bill from Estimate). If you do NOT see this format installed in your system, contact your support representative for assistance. The AIA Style invoices are generally printed one at a time directly from the Job. Select the invoice from the Job/Invoice tab, and select print, choosing the AIA Style format option.

Figure 6 AIA Style Billing Format Page 1

Figure 7 AIA Style Billing Format page 2
Remember, AIA Invoice formats can be customized to meet your organizations more specific requirements. Discuss this with your Project Manager.
Once you’ve reviewed and approved your project invoice, update to AR normally.
If you have updated the invoice to AR, you must create a NEGATIVE Payment Application using the “Generate Progress Billing Invoice” option described above. Credit Vouchers, or any other invoice, created outside of the module will NOT BE RECOGNIZED by the Progress Billing module.
To invoice retainage simply open the Job’s Progress Billing tab. The CURRENT RETAINAGE amount will always display the retainage to date. (Thus the *difference* between the Retainage To Date amount and the new Current Retainage amount you just set will be the amount of retainage that you are invoicing.) To invoice retainage simply adjust this amount to the new CURRENT to date balance desired. Generate the Progress Billing Invoice application as normal.

Figure 8 Invoicing Retainage - Adjust the Current Retainage amount to desired after Billing