|
What's covered? Hide |
After completing this session you should understand how to create, manage, monitor and complete installation projects and jobs in ServMan. Specific learning objectives include the following:
· Purpose of Jobs
· Creating Jobs
· Estimates and job budgets
· Change orders
· Flat-rate projects
· Materials management
· Labor management
· Price controls
· Posting expenses directly to COGS and AP
· Progressive Billing
· Key job cost and profitability reports
· Completing jobs
Managing installation projects and other lengthy jobs is an important business requirement for ServMan clients in many industries. One of the core concepts within ServMan is the ability to create a Job that functions as a virtual container for all information related to a specific project. Once this Job “Folder” is created, a unique Job ID or “Number” is associated with it. This unique Job ID is then placed on ALL orders, invoices, purchases, time logs and other transactions that serve as the basis for various reporting about the status and profitability of the project. Placing the Job ID on any of these documents is the equivalent of placing the document in a Job “folder” located in your “virtual” filing cabinet. When you run a report on the Job, everything that’s in this “folder” will be included!
In ServMan Jobs are also used for tracking and managing Maintenance Agreements as well as other types of projects where you may have multiple work orders, bills, recurring orders or even amortization schedules to manage complex income or cost realization strategies. Jobs share one common goal; they all have multiple activities that occur over a potentially extended period of time where the desire exists to consolidate information for reporting. For example, with a maintenance agreement or extended warranty you may want to view your cost/profit for the agreement over a three-year period. Similarly, you may have internal projects that you want to capture time and expenses against. One example of this would be for a software developer to track the development cost of unique new modules and customizations. That’s what we do!
To support these disparate uses the software allows you to assign both Departments and Groups to Jobs. Jobs can also be flagged as “Contracts”. All of these tools are provided simply to allow you to differentiate between them when reporting or otherwise listing your various Jobs, Contracts and Projects when using a SmartView.
Jobs are created directly from the client screen. From the client record to which you want to associate the Job, locate and select the “Job tab” at the bottom of the screen which will display existing Jobs or Contracts associated with this client. To add a new Job record simply right click and choose ADD or select the ADD button from the top of the screen. You can also optionally create new Jobs directly from the Jobs SmartView listing, again with a right click option or by converting a Quote directly to an Order and auto creating a Job.
If your company tracks its sales queue then you will want to use quotes. Quotes are used to track the referral source, sales representative and profit opportunity with your client. They are a terrific means of maintaining control of and measuring both your sales performance and sales funnel. The more detailed a Quote, the more detail available for reporting. If your company uses Quotes, once you “win” the deal, you can optionally convert the Quote directly to an order and automatically create a new Job record at the same time. Converting a Quote to a Job accomplishes three basic tasks.
· Associates the Quote to a Job
· Creates a new Job record and automatically completes the Client, Sales Rep and Marketing Source information.
· Creates a work order under the Job Record. (The work order will have all of the items that you selected in the prior step from the Quote!)
To convert a Quote to a Job, simply complete the following tasks:
1. Create a Quote - Save & Close
2. From the Quote Listing, (SmartView) – Right Click and Choose – “Convert to Order and Setup Job”
3. You will be presented with a listing of all items on the quote. You can manually check or uncheck the items the client agreed to purchase. Only the items you select will be converted to the Order and Job.
4. Choose OK
5. Complete the Job setup with other desired information when presented with the Job Screen, which is illustrated and discussed below. The new Job will have both a converted Quote and Order already associated with it.
The Job Screen makes use of tabs, listed across the top of the screen, to organize items related to it. Keeping with our analogy of a Job being equivalent to a file folder, picture it now as a “hanging” file folder. One of those big green ones you place in your file drawer within which you place other smaller manila folders. With this picture in your mind now consider each of the tabs as one of these smaller manila folders. One each for Notes, Quotes, Orders, Invoices, Time Sheets, Purchases, and other documents that are related to this particular Job. Now shift your focus to the fields directly on the Job Screen itself such as Job ID, Description, Job Group and other fields located directly on the Job setup tab. Think of this information as notes written directly on that big green hanging file folder. We can only have one Job ID, Job Description or Job Group on the main folder, but we could drop any number of Orders, Notes, Invoices or other items into its sub folders. Linking an Order or any other documents to this Job is done by simply placing the Job’s unique “Job ID” on it. Moving one of these documents from one Job to another is as simple as changing the Job ID assigned to the document.
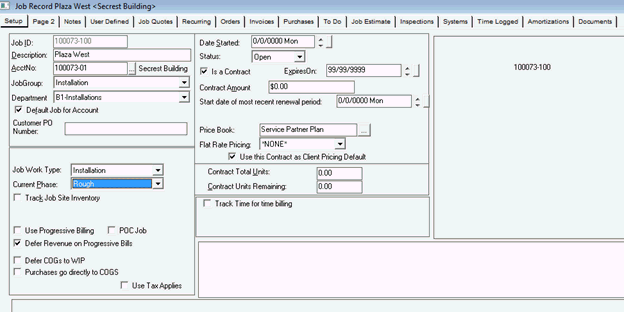
The following section details each field on the Job’s “Setup tab”/screen and its meaning.
| Field | Description |
|
Job ID |
This is the “Primary” key used for tying all other transactions to this Job. It must be unique and can be configured to be any alphanumeric value up to 20 characters. These values can be auto-numbered by the computer system, manually entered, or optionally set to be auto-numbered unless manually keyed. If auto-numbering is enabled the ID will have *AUTO* in the field when you create a new record. Hitting the save key will assign the ID. Once an ID has been assigned to a Job it CANNOT BE CHANGED. |
|
Description |
The description can be up to 30 characters long and is used to provide a brief description that other users should find useful. This field is displayed on many of the Job reports. |
|
Acct No |
This is for the Client Account Number to which this Job relates. A Client Account Number is required for all Jobs. |
|
Job Group |
The Job Group is a great means of categorizing your different types of Jobs. This is used when running reports or simply displaying your Jobs to the screen. Typical Job Groups would be PM Agreements, Installations, Internal Projects, etc. Even though the software doesn’t require you to have a Job Group it’s a great idea if you do. For certain types of Jobs, such as ServMan’s PM Agreements, this field is required and can even carry certain default information with it. Job Groups are set up under MasterFiles-Misc-Job Groups. |
|
Department |
This is used to assign a specific department as default for handling the work for this Job. Any orders you create for this Job will use this department by default however you can override this if needed. You may also find that you run certain reports by Department, allowing you to view all Jobs for your Installation Department for example. |
|
Default Job For Account |
If checked, any Orders taken for this Client and the Department listed will automatically be linked to this Job. This can be overridden on the Order but by default it will be linked. You can have as many default Jobs as you do Departments. For example, you may have an Installation Job set as default for your Installation Department. However, if you took an order for the Service Department it would NOT place the Job ID on the Order. In any event, the Job ID may manually be placed on any Order for this Client regardless of the Department assigned. |
|
PO Number |
Whatever is placed in this field will by default be automatically placed in the PO number field for all Orders and Invoices linked to this Job. |
|
Date Started |
It’s important to get into the habit of entering your start date for Jobs. This date can drive many of your reports when trying to track new Job starts or other date-driven reports. This value can be set to any verifiable date whether in the past, present or future. |
|
Status |
Unlike Orders, Jobs can only be set to one of three statuses. They are, Open, Complete or Cancelled. Jobs should be completed as soon as possible. Completing your Jobs will reduce the number of records your users must look over when managing active projects. More importantly, completing a Job assures that all orders have been processed, money recognized, PO’s received, etc. Jobs with any of these issues pending CANNOT be Completed or Cancelled. |
|
Is A Contract |
Setting the “Is a Contract” checkbox exposes additional fields to the user listed below in Blue. This field is checked for PM Agreements, or any other type of Job that has an expiration date. There are many reports that display Expiring Contracts, etc. Checking this box allows you to set this and other information. |
|
Expires On |
This is the Expiration Date for this Agreement. If you have Recurring Orders or Invoices under this Job, they will not be generated beyond this date unless explicitly manually overridden on the Recurring Setup Schedule. Many reports may be run based on this date. If you have a contract with Recurring Orders and the contract has expired, changing this date will automatically modify the expiration date on the Recurring Orders and Invoices for you! |
|
Contract Amount |
This field is simply referential and not required to be completed. It is NOT used in any standard reports and has been added primarily to support user adaptations and reporting. |
|
Start Date of the Most Recent Renewal |
This field is used by the ServMan PM module’s automated renewal features to display the most recent renewal period date for PM Agreements. |
|
Price Book |
PriceBooks can be configured to manage client-specific pricing. They can be set on both the Client record as well as the Job Screen. If a Client has a PriceBook on their record AND a PriceBook on a Job record, any Orders completed under the Job will use the Job’s PriceBook instead of the Client’s PriceBook. This allows you to provide project specific price breaks. However, if the work falls outside of the project, standard pricing will apply. |
|
Flat Rate Pricing |
ServMan’s integrated Flat Rate items support the ability of having three price levels, Standard and Preferred One or Two. Setting a pricing level on this Job Screen will force this option for all Orders under this Job. |
|
Contract Total Units |
If your company pre-sells time blocks, you can key the quantity of pre-paid hours to this field. As time is logged to the Job the hours will automatically debit, tracking the remaining hours in the “Contract Units Remaining” field. The system will notify you when the client’s units are running low. The system can be configured to a specific minimum level as an INI setting. Contact customer support if you wish to modify the 10-hour default value. |
|
Tract time for Time Billing |
Setting this field allows you to default all time entries to either Non-Billable, Contract or Billable. Time types can be overridden regardless at the time of entry. |
|
Job Work Type |
This field can serve dual purposes. First, work types can have default phase types associated with them should your company require tracking activity by phase. These phase settings can be optionally created as Job-specific by selecting the Jobs menu button located at the upper right hand corner of the Job screen. Any Order created under a Job with a value in this field will automatically default to this work type. This field is NOT required. |
|
Current Phase |
If entered, this phase will be automatically entered for all Orders created under the Job. This is NOT a required field. |
|
Track Job Site Inventory |
Selecting this option will automatically create a new warehouse that is specifically linked to this Job. All inventories must be cleared from the warehouse prior to completing or cancelling the Job. Job Site Inventory Warehouses are primarily used for larger projects where an area is selected and secured at a project site. Materials can be purchased directly to the warehouse and then distributed and locally managed. |
|
Use Progressive Billing |
Check this field to use percentage-based billing by cost code. This feature is further detailed below. |
|
POC Job |
This field is checked if this project is a Percent-of-Completion based project where income is to be deferred and then recognized based on a cost basis using a traditional percent-of-completion method. |
|
Defer Revenue on Progressive Bills |
Check this field if using Progressive Billing and you wish all billings to be deferred. Using this feature requires that both Progressive Billing is enabled (properly configured per the section below), and WIP enabled GL deferred revenue accounts with associated income clearing accounts are properly configured and associated to cost codes under the cost code setup area. |
|
Defer COGs to WIP |
This feature enables deferring cost to deferred revenue accounts. This feature requires that WIP (Work in Progress) is enabled and properly configured per the WIP configuration guidelines. If enabled you will have the ability to post materials from Inventory to Work In Progress directly from Orders as well as from Purchases. WIP accounting methods are complex in concept and should be decided only by senior accounting staff in concert with your ServMan support representative. |
|
Purchases go to COGS |
If checked, when purchasing materials for this Job the items will bypass inventory and be posted directly to the cost-of-good-sold (COGS) account recorded on the item’s setup screen. The cost will appropriately be posted to the Job for proper Job costing. |
|
Use Tax Applies |
Checking this box forces all Orders under this Job to be subject to use tax reporting. The application of use tax can be overridden individually on any Order as required. |
The “Page Two” tab has information primarily used by contractors who deal with new home builders. It supports the ability to override addresses for Orders created under the Job, builder information and other common information ServMan users have requested over the years. However, at the bottom of the screen you will find three key fields that are used by most all users. They are: Preferred Tech, SalesRep, and Marketing Source information. SalesRep and Marketing Source are automatically updated to the Job record if the Job is created as a result of converting a “Quote to a Job”. This option is detailed further below.
| Field | Definition |
| Address is Different from Customer Address | Checking this field allows you to key an address that will be used to override the standard customer address on work orders. This is most useful when you don’t want to create a new location account for a one-off project. |
| Builder/MFG | The Builder/manufacturer for this project. |
| Permit No. | Your company’s Permit number for this project. |
| Lot No. | The Lot Number for new construction projects. |
| Plan ID | The Plan ID for new construction projects. |
| County | County of the overridden location. |
| Closing Date | Referential date for clients dealing with builders who may have homes in the closing process. |
| Billing Account is different from Account | Keying a Billing Account here will override the Billing Account on all Orders created under this Job. |
| First, Last name and numbers | These fields are used to provide Job-specific contact information that would not normally be placed on the contact tab of the client. |
| Preferred Tech | This is the technician who will receive credit as LEAD technician when running certain Job-based technician performance reports. |
| Sales Rep | This is the sales rep who will receive credit for this Job when running certain Job-based sales reports. If the job is created from a Quote, this will pre-populate with the Sales rep from the quote. |
| Marketing Source | Used to track the Source and Referral for this project. If this information is on a Quote from which this Job is created, then this information will automatically be populated. |
The above information is like writing on our big green hanging folder. For the information listed above there is only one value each. One preferred tech, one sales rep, etc. The remaining tabs are more like the manila folders that we drop inside our big green hanging folder. Each “manila folder” (i.e. Tab) can hold any number of documents. These remaining tabs are discussed below.
The notes tab allows you to create notes that are linked specifically to this Job. When you add a new note from the Job screen it will automatically be linked to the Job you’re on. You can optionally link any note to a Job simply by entering the Job’s ID in the appropriate field on the note. It should be noted, no pun intended, that notes for this Job will also be displayed under the notes tab on the associated client record. When you look at a client’s note tab, you see ALL notes, but when looking at the Job’s notes, you see only the notes specific to the project you are working on.
The Quotes tab lists all Quotes linked to this Job. Quotes play an important role as estimates for ServMan Jobs. All items on quotes that are “converted” supply the ESTIMATED values for the ServMan Job Costing Reports. When you convert a Quote you have the option of selecting only specified lines, leaving certain items as NOT converted. Converted lines on a quote are listed in “grey” if you open the Quote and look at its detail tab. Only these converted lines will be included in your ESTIMATED columns on reports like the POC Job Analysis Report and others. To link a Quote to a Job you simply need to enter the Job ID in the appropriate field on the Quote. You can enter or modify the Job ID on a quote at any time if you have it linked to the wrong project. Doing so will adjust your reporting accordingly.
The Recurring tab lists all Recurring Orders or Invoices that are assigned to this Job. Making this assignment is as simple as placing the Job ID on the record. A Recurring Order has a recurrence pattern associated with it that is used to manage when the Orders or Invoices are created. If you have a Job flagged as a Contract with an expiration date set, and then create your Recurring Orders or Invoices from within the Job, the expiration date on these recurrence patterns will match that on the Job record. If you later change the date on the Job record (extending an agreement), the system will automatically adjust the expiration date on all Recurring Orders and Invoices. You should use an expiration date of 99/99/9999 if your contract does not expire.
The Orders tab lists ALL Orders associated with this job. Orders can be created to manage any number of events under a project. It is not uncommon for users to have many Orders on a project. Orders can be used to manage materials, in-house personnel, billings to the client, sub-contractors, and material deliveries to a job site or other purposes. Each Order can then be individually managed under the single Job.
When you place an item on an Order that is linked to a Job (other than a labor item), it will not show as an expense on your job cost reports until it is actually posted or invoiced. In effect placing items on an Order simply tells others and the system that you “intend” to use the item or otherwise “require” it. Your material management team then manages these requests and acts to either pull parts from inventory or purchase them to facilitate the project. There are several methods of “posting” these materials to the Job that will be discussed under the Material Management section of this document. To summarize, it is important to understand that simply placing an item on an Order does NOT cost it to the Job. The orders must be invoiced or otherwise “Posted to COGS” or “Posted to WIP” prior to being displayed as either EXPENSES or INCOME on the Job reports.
The Invoices tab displays ALL Invoices containing this Job ID. All income and expenses detailed on Invoices will be displayed on your Job Cost Reports. You can manually create Invoices and link them to a Job, invoice your orders to create Invoices or you can use ServMan’s optional Progressive Billing Module to create them.
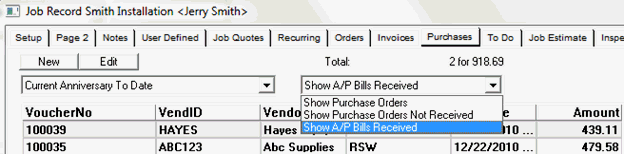
The Purchases tab serves a dual purpose. From it you can view both your Purchase Orders and AP vouchers associated with the project. This is accomplished by selecting the drop down option at the top center of the screen. When viewing these screens make note of the filters that may limit the information displayed. For example, on the screen displayed below only transactions occurring from the most recent anniversary date of the project to date are displayed. You may choose to view all transactions simply by modifying this filter. The system remembers your last settings and matches these settings the next time you choose the tab.
The ToDo tab displays all ToDo tasks that have been assigned to users and linked to this Job. Like all other events, linking the ToDo is as simple as placing the Job ID on it. ToDos are a great means of managing internal actions that occur between users that do not merit the creation of a work order. ToDos can be assigned both a user and a required date to manage accountability for their completion. There are reports that will display all open or expiring ToDos by Job.
In addition to converted Quotes acting as estimates for your Job Cost Reports you can optionally use the Job Estimate Screen as well. Using this screen you can manually enter, by cost code, estimated expenses and income by date. Anything entered in the Estimate Tab will be displayed in the Estimate portion of your Job Cost Reports.
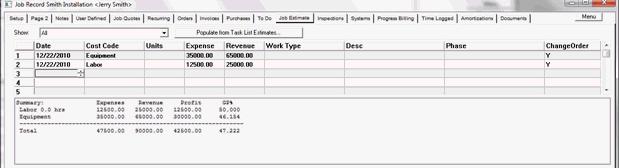
The bottom of the Estimate screen displays totals based on information keyed to this screen only. Entries may be assigned to phases as well as flagged as Change Orders.
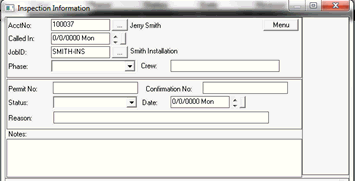 The Inspections tab is designed to list municipal inspection requests you have on the project. Any number of inspection requests may be tracked by date and status. The image to the left is a sample of the inspection screen displayed when adding a new record. It should be noted that any tab which is not required to be used by your team can be disabled. If your company does not use inspections or other features, speak to your support representative about preventing them from being displayed.
The Systems Tab is used only if your company is using the optional Maintenance Tasking module and can otherwise be hidden. This tab will list all client systems that are covered by this Job/Contract. Maintenance tasking allows you to create task lists, each with its own schedule for Order creation. You can then automatically generate Orders for your maintenance agreements based on the equipment to be serviced and the specific tasks to be performed. The Maintenance Tasking Module is documented independently for more information.
The Progress Billing Tab is only displayed if the “Use Project Billing” check box is selected for the Job. It is used to manage the automated creation of percentage-based billing against the project. If Progress Billing is enabled, then Orders will not be able to be invoiced. The Progress Billing Tab lists invoiced-to-date amounts as well as remaining amounts to be billed. The amount to be invoiced is determined by the Orders listed under the project. The system looks at all of the billable items on Orders under this Job record and summarizes them by the cost code assigned to the line items on the Orders. Invoices are then generated using the “Generate Progressive Billing Invoice” feature. The Progressive Billing Module is described in greater detail elsewhere in this document. AIA Billing is another form of progressive billing ServMan provides to our clients.
The Time Logged tab will display ALL time logged to this Job as either Billable, Non-Billable or Contract. Time can be posted to a Job from many sources including SM Mobile, Web Time Log, or back office time entry. Any time log entry with this Job ID keyed to it will be displayed.
The Amortizations tab allows you to create amortization schedules for Jobs to manage the realization of either income or costs over a scheduled period of time. These features are most useful when managing extended warranties where you may defer a percentage of your billing on a project as a warranty set aside. Then, by creating an amortization schedule, you may realize the set aside value over whatever time period and schedule you may create. Amortizations are recognized by running a batch process monthly located under Modules->General Ledger->Create Journal Entries from Contract/Job Amortizations.
The Document tab displays all documents linked to this Job record. From it you may add new and manage existing documents using standard Windows cut/paste features. ServMan additionally supports the ability to “GRAB” documents from file folders and paste them directly into the screen you’re on. This ability is documented under the Document Management features.
As discussed under the Order tab section of this document, simply placing an item on an Order does not expense it to the Job. The materials must be “posted” prior to being displayed on your Job Cost Reports as an expense. For Stock items, posting the item also removes the item from inventory. Materials can be posted to a Job using any of the following methods:
| Method | Description |
|
Invoicing an Order |
When an order is invoiced and the invoice is then “posted” to AR, the materials are removed from inventory and posted to the Job. You can PICK an order if you wish to remove specified line items (but not all) from inventory, then invoice it and post the invoice. This method is the most common across most traditional accounting systems.
Pros – Simple to train and execute.
Cons – Requires multiple departments to complete an inventory transaction. Orders are picked by Material Management then invoiced by Accounting. Should issues arise they are often re-routed back to Material Management. This delays both the invoicing and job costing processes. |
|
Post an order to COG's |
Orders can be partially Picked or Posted in full to COGS directly from the order or using a Right Click option. Posting an order to COGS that has been Picked, will relieve inventory for all Picked items and allocate the cost to the Job. Posting an order that has NOT been picked will relieve inventory and post costs for ALL inventory items appearing on the Order. Pros – Faster costing to Jobs. If issues are encountered with Inventory shortages, they can be immediately addressed by Material Management prior to passing the Order to accounting for invoicing. Cons – None documented |
|
Post Purchases to COG's |
The software allows you to flag certain Jobs to post stock item purchases directly to COGS, bypassing inventory. This feature is enabled by simply checking the “Purchases go directly to COGS” check box on the Job setup screen. When checked, any purchase orders linked to this Job will default to the COGS account listed on the item, bypassing inventory and posting directly to the project. If this method is used the items would NOT be posted from an order as this would double book the cost to the Project. Pros – Expedited costing to Jobs and eliminates the requirement of receiving to inventory and then having to Pick the materials to an order and processing the materials out of inventory. Cons – additional training required for both Job setup and purchase receipts. Often requires users to be trained to use Orders to pull stock from inventory, and purchase orders to post purchases directly to the project. |
|
|
|
Time can be posted to a Job from many locations in the software including Orders, (either using SM Mobile or the Enterprise), the ServMan Web portal or by logging time directly to the system using a batch time logging procedure. It is important to understand how the labor is reported to your Job Cost Reporting. Most reports provide you the option of viewing the labor based on one of the following:
| Method | Description |
|
Item Cost |
Uses the cost shown on the item cost field for the item the employee logged time against. The item cost is entered on the item’s setup screen in the “Cost” field. For time logging it will be the cost keyed on the detail line. This cost is derived from the item posted. However, if the cost on the posted item is later modified it does not modify historical postings. |
|
Employee Cost |
Uses the employee cost based on their wage settings as configured on the employee setup screen located under MasterFiles->Misc->Employees |
|
Employee Cost plus Employee Burden Rate |
Uses the employee cost plus a burden amount based on the specific employee that logged the time. The employee burden is setup on the employees setup screen located at MasterFiles->Misc->Employees.
|
|
Employee Cost plus Departmental Burden |
Uses the employee cost plus a burden factor based on the department assignment on the Order time is logged against. The burden factors are recorded on the Department setup screen located under MasterFiles->Misc->Departments. |
When running your Job Cost reports take note as to the options on the report screen. You can run most reports using any of the above options interchangeably.
See Also: Job Cost Reporting for more information about Labor, Burden and how they affect your reports.
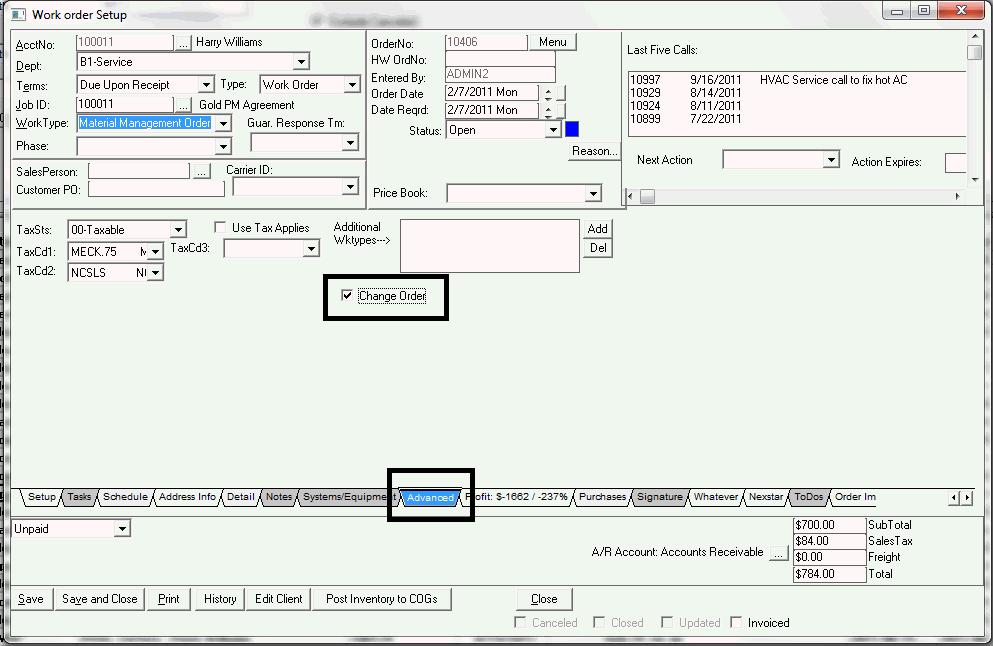
Many of the Job reports allow you to summarize change orders independently from standard Orders. Quotes, Orders and Invoices are flagged as change orders by setting the change order flag located on the Advanced Tab of the quotes, orders or invoices.
Any documents flagged as change orders will be displayed in the change order section of a Job report. If a report does not have a change order section specifically defined, change orders will be displayed with the standard quotes and orders.
Many of the Job reports will include break outs by phase when Job phase information is included on the Estimates (Quotes), Orders, Purchase Orders and Invoices. Each detail line on any of the aforementioned documents allows for the inclusion of a phase. Phases can be associated to a work type if they are always the same. Applying this work type to a job will then expose these phases as being able to be set and tracked. You also are provided the ability to create project-specific phases for your individual Jobs. This is accomplished by selecting the “Menu” button at the upper right corner of the Job screen and choosing “Setup/Define Job Phases”. Using this feature you can add any number of phases specific to any project.
Phase codes are determined by the Work Type assigned to the Job. The user will need to go to into the Work Type’s setup file to add/modify phase codes.
Master Files-> Miscellaneous->Work Types File:

All jobs and contracts should eventually be either completed or cancelled to remove them from your open Job SmartView listings and active reports, as well as to assure that all documents have been properly completed or processed. To complete a job simply set the job status to complete. The screen will inform you of any issues that would prevent you from closing it. Issues that prevent a job from being completed are:
| Issue | Description |
|
Review Orders |
Review the Orders and either invoice, close or cancel them as may be appropriate. |
|
Review Purchases |
Receive or Cancel the POs. You can not complete a job with pending PO's. |
|
Review WIP Balances |
The job has a balance in a deferred cost or revenue account. From the Job menu select WIP Reconciliation and realize all cost and income for the Job. |
Once you have your Jobs setup there are several steps that you can use for managing them. Aside from the obvious requirements of managing the work orders assigned to each, it is important to track jobs themselves by status. Remember jobs are always set to one of three statuses, Open, Completed or Cancelled. If a job is flagged as a contract, then the job is additionally assigned an expiration date. This date is independent of the Job’s status, meaning a Contract Job can be both open & expired. Expired contracts should be set to either cancelled or complete based on your work flow requirements.
When viewing Jobs for a single client it is best to open the client record and select their Jobs tab. When looking at Jobs by departments or by group you will want to use the Job SmartView. Using the Job SmartView search screen you have the ability to view jobs by Status, Group, Department or virtually any other information listed on the Job setup screen. Getting to understand working with SmartViews is critical when managing your projects. Get in the habit of viewing all of your open jobs often; confirming the list to be representative of the work you are performing. Remember, the act of completing or cancelling a Job is the only way to truly verify that all work flow requirements have been met for the project.
Explore the Job reports. The software has evolved over many years and reports have been created to support various issues as requested by ServMan users. The most comprehensive Job report is the “POC Job Analysis Report” and we recommend you start here. You may find the report provides information you feel is not required for your particular needs. This said, we urge you to get to understand its format and selection criteria. Many of the other reports have similar layouts.
Once you’ve found the best report for monitoring your company’s KPI’s, (Key Performance Indicators), experiment with running it with various selection criteria set. Most reports include both summary and grand totals at the bottom that will allow you to watch the overall progress not only by project but by department as well. Getting in the habit of reviewing your SmartViews and Reports on a regular basis keeps the information in the system both relevant and accurate.
NOTE: If a job is set as a POC Job and you set the POC Job Analysis report check box to "POC JOBS ONLY", you have an option to have ServMan automatically post the Over/Under to the GL and to the job once the report is done.