Progress Billing may be employed when projects require milestone billing. In many facilities a percentage billing approach is taken for Jobs. For example, 50% upon acceptance of the quote and 50% upon completion. Using this module, the software can be configured to help facilitate this process by auto-generating the progressive billing invoices using a percentage based billing method by cost code. (Remember: cost codes are assigned to items on the item setup screen. Typical cost codes are things like Labor, Materials, Equipment, etc.) To enable Progress Billing for a project simply check the Progress Billing Check Box located on the Job Setup Screen. When Progress Billing is enabled, a project’s orders will NOT be able to be invoiced.
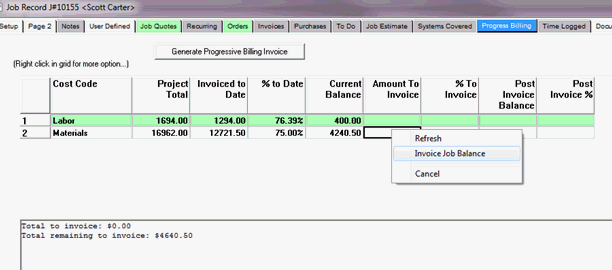
The Progress Billing tab lists all amounts billed to date as well as remaining amounts to be invoiced summarized by cost code. The total to be invoiced is derived solely from the orders listed under this project/job. The system looks at all of the billable line items on orders for the job and displays totals by cost code on the Progressive Billing tab. Invoices are then generated by entering either a percentage or specific amount for each cost code to be billed and then selecting the “Generate Progressive Billing Invoice” button.
ServMan must be configured to properly use Progress Billing and Retainage. Learn more about setting up your system for retainage here.
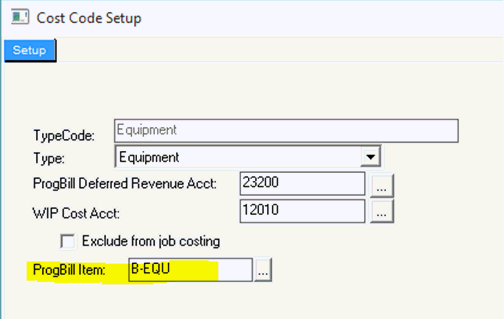
You must tell the software the specific item codes that will be used when generating the Progress Billing Invoice. To do this you must set an item code for EACH unique Cost Code you will be using for managing income under your projects. This is accomplished from the COST CODE Setup screen. The description of the item in the ProgBill Item field will be what is printed on the invoice. You can edit the descriptions for the Invoice or you can set the print flags to N for all progress billing items and enter a subtotal item with your description should you not wish your clients to see a detailed break out of the billing by Cost Code.

Figure 1 Cost Code Setup Screen - You must set up a Billing Item for all Cost Codes. Used on Progress Billing Documents.
Note – You do NOT need to complete the ProgBill Deferred Revenue Account or WIP Cost Account fields unless you are Deferring Revenue or Deferring Cost to WIP.
The Income Account for Progress Billing Invoices will be based on the GL ACCOUNT SET ON THE BILLING ITEM.
| Issue | Description |
| Cost Codes Required | All items on orders under the Job MUST HAVE A COST CODE assigned. If items exist without a cost code assigned they will cause the generate invoice feature to fail. If this occurs simply locate the offending item and add a valid cost code to the item’s setup. |
| Billing Item required for each Cost Code | You must create an item code that will be used for each cost code when the invoice is created. When generating your invoice the software will create a single line item for each cost code. This will allow you to allocate the income to the appropriate income account based on the billing item you have created. Billing items are assigned to the cost code on the cost code setup screen as described below. |
| Assign Billing Item to Cost Code | Under the Cost Code setup screen, located under MasterFiles->Misc->Cost Codes, you must assign the Billing item you created to the Cost Code you wish to use during invoice creation. |
For each Job Group you must set the Default Debit account for Work In Progress (WIP) Billings AND for the Income Recognition. These accounts may be masked. The mask will be resolved based on the department on the Job Record.

Figure 8- GL Account defaults for POC Adjustment Tool
To use the POC automated adjustment feature of the POC Job Analysis process you must check the POC Job option and additionally have your amortization accounts properly setup on the Job Group setup as above.
If you have submitted a quote that was subsequently accepted, right click on quote and select Convert to Work Order and Set Up a Job. This will populate the order detail information as well as allow reports to pull estimated costs and revenue information directly from the quote.
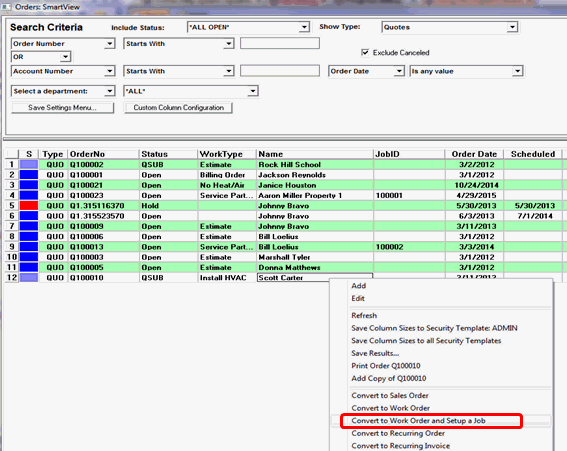
Figure 2 Convert Quote
On the Job Setup tab, click the Use Progressive Billing and POC Job checkboxes and choose the Progress Billing Type of "Standard". If you Defer Revenue, check that box as well.
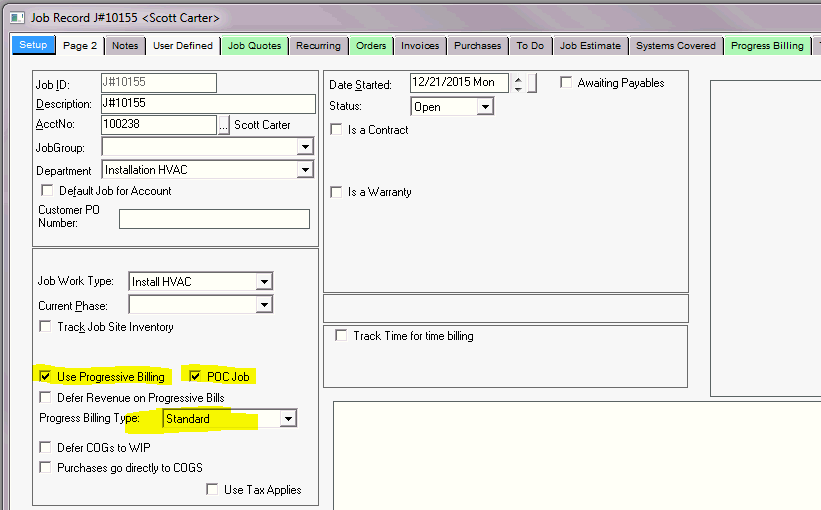
Figure 3 Job Setup Screen
Note: When Progressive Billing is checked and Standard selected, the Job Estimate and Progress Bill tabs will appear.
If you have created the job directly from a converted quote, there is no need to re-enter job cost estimates. If you have not converted this from a quote, on the Job Estimates tab, enter your cost codes, quantities, estimated expenses and revenue amounts or press the "Populate from Task List Estimates" button if they have been entered that way. When all estimate information has been entered, press Save.
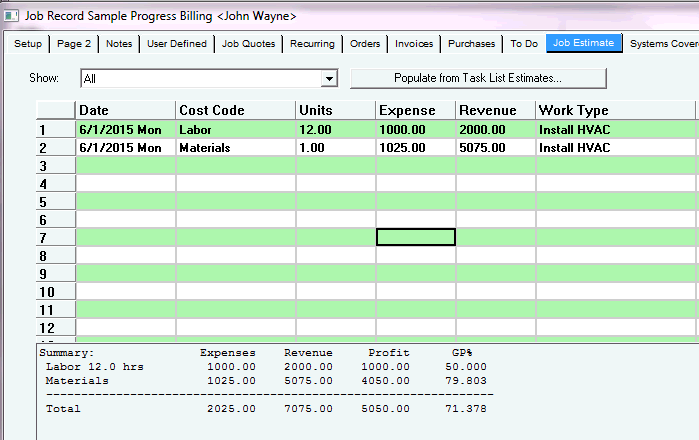
Figure 4 Job Estimate Screen
The Progress Billing tab will display information from all orders associated with this job, by cost code and revenue amount.
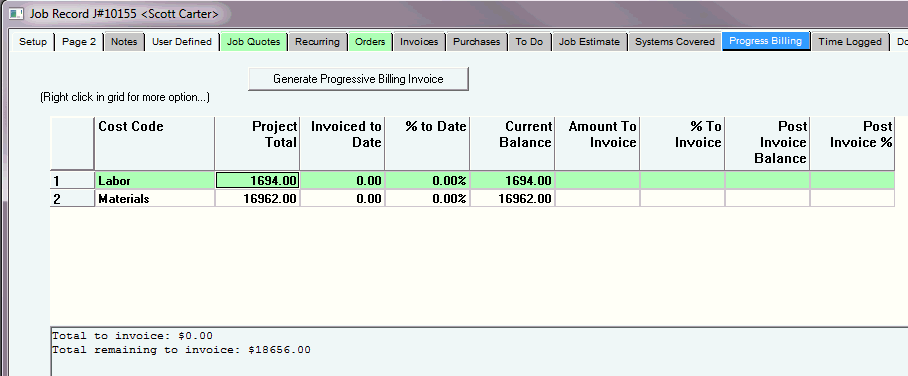
Figure 5 Progress Billing Screen
Enter the Amount To Invoice or the % To Invoice for each line item you want to send in invoice for.
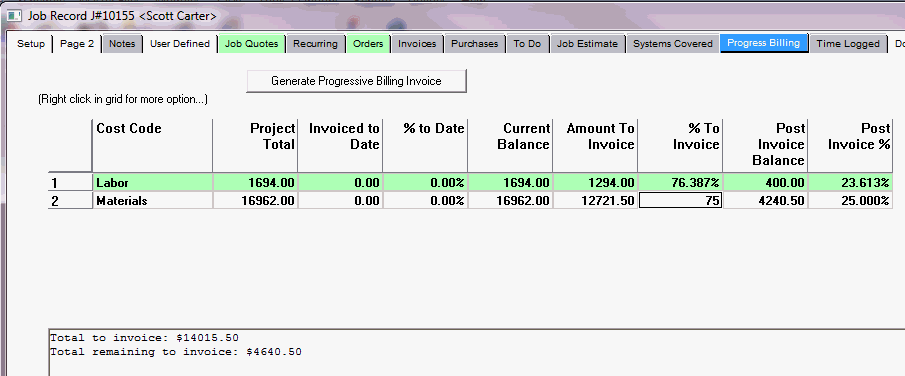
Figure 6 - In the example above, I have entered 1294 in the Amount to Invoice column for Labor and 75 to invoice 75% of the Materials.
Notice that the Total to Invoice and the remaining balance to invoice appears in the lower section. You may adjust your amount or % as necessary to meet your needs.
When you are ready to create the invoice, press the Generate Progressive Billing Invoice button.
NOTE: If you receive the error message below, you have not set up your Cost Code correctly. Refer to the information here to assist.
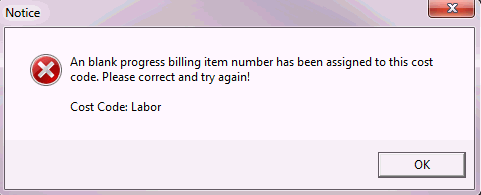
Figure 7 Cost Code setup error message
When the invoice is generated, you will be asked to view it. Validate it is correct, change any descriptions and/or print flags as necessary. Save, Print and Close.
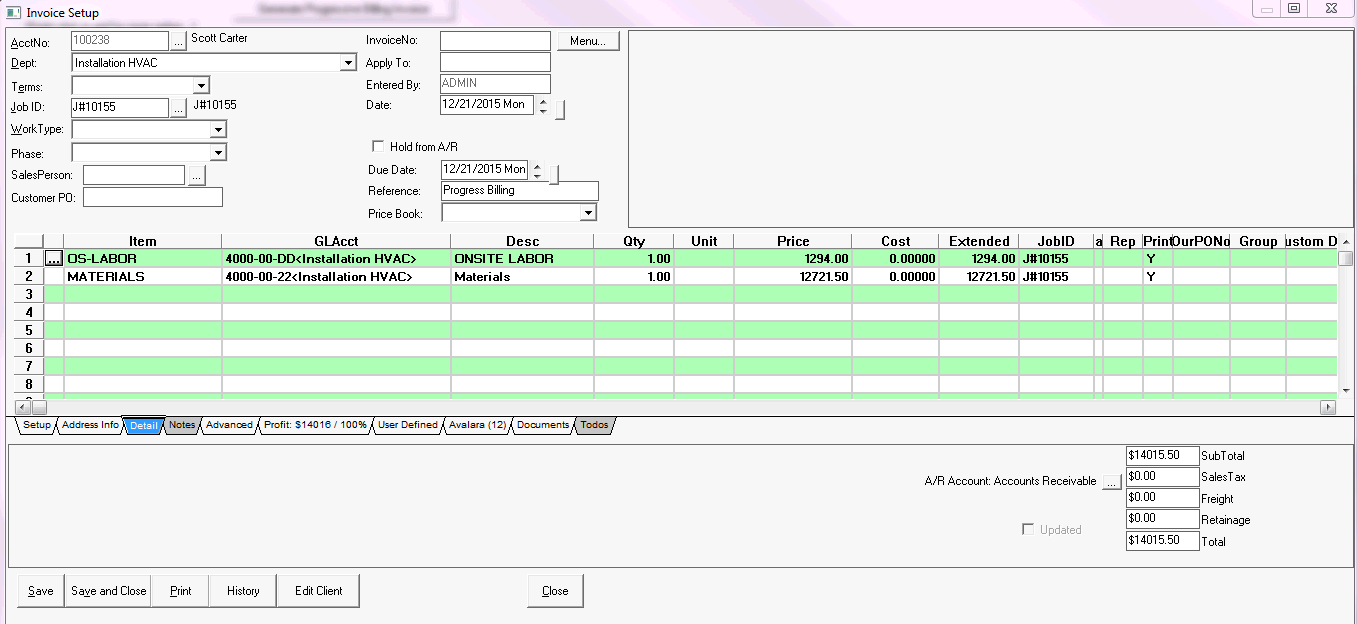
Figure 8 Standard Invoice screen that reflects the Progress Billing in the Reference area
On the Invoice tab, right click on the invoice created above, and select Update to AR
On the Progress Billing tab, it now shows the amounts that have been invoiced to date and the remaining balance.
To invoice the remaining balance, simply right click and select Invoice Job Balance.
