Physical inventory
Overview
A company usually makes a large investment in its Inventory which can be subject to shrinkage and stocking issues. As a result, it is critical to have strong Inventory controls in place.
ServMan's Inventory Module allows users the ability to keep Perpetual inventory; where information on inventory quantity and availability is update on a continuous basis as a function of doing business. This is done by databased Inventory Quantities, Aisle and Bin Locations, Tracking of Reserved and On-Order Quantities, etc. To use wireless bar code scanners to log your daily Inventory transactions, ServMan can install our Wireless Warehouse Module. NOTE: We do not support barcode scanning as a part of our physical inventory process.
Though ServMan maintains a perpetual inventory system, you will need to perform a physical inventory count from time to time. This may be mandated by financial accounting rules or tax regulations to place an accurate value on the inventory, or needed to verify raw material levels.
IMPORTANT: While conducting a physical inventory, it is imperative that no activity be performed during the count and research stages so you know exactly where every item is at all times.
- No work orders should be detailed or invoiced
- No invoices updated
- No purchase orders received
- No stock transfers processed
- No items should be discarded or scrapped
- Additionally, when the physical count forms are completed, the totals need to be entered immediately into ServMan. Failure to adhere to these guidelines could compromise your inventory valuation.
Elements of the Physical Inventory Process
There are four main steps to any Physical Inventory Process - please consult your accountant for specifics for your business.
- PLAN
- COUNT
- RESEARCH/ADJUST
- EVALUATE RESULTS
PLAN
The best practice is to use the Wall to Wall approach. Cycle and Sample Counting are not advisable unless your Wall to Wall count consistently shows accurate results for all items over a period of years. You must also be very detailed in all aspects of tracking inventory at all stages of your workflow.
- Decide on your approach
- Wall to Wall - Count everything in the warehouse at one time - Recommended
- Cycle Count - Count smaller sections of your warehouse at one time
- Sample Count - Count just a small sampling of items periodically
- Count Style - Two person teams, count all items twice, tag system, Blind Count
- Tolerance Level - What will you do if the count and expected quantities do not match?
- Select a suitable date and time
-
- Allow adequate preparation time prior to the date
- Consider scheduling the count for after business hours or on a weekend to reduce impact on your operations
- No inventory related activity can be performed including detailing work orders and invoices, updating invoices, transferring or receiving items
- Organize your teams
- Will you need a supervisor to oversee the count?
- Will you need to hire temps to assist?
- Do you have proper segregation of duties and security measures in place?
- Document the process and train the counters
- How many times will you count each item?
- Which count will you use as the final count?
- Will you use a blind count?
- How will you research and resolve discrepancies?
-
- Pre-defined tolerance levels
- Require recount
back to top
COUNT
- Pre-Inventory Review
- All items must be in their proper place
- Aisles and Bins should be labeled
- Perform a pre-inventory count for large quantities of small items
- Count most items and place in a sealed bag marked with quantity contained
-
- If seal is broken at the time of the count, recount entire bag
- Perform appropriate cutoff activities
- Process inventory transfers and returns immediately prior to the count
- Update all orders, invoices, AR and receive all PO's immediately prior to the count
- Recompute Reserved items on Orders immediately prior to the count
- Freeze all warehouse transactions
- Print Count Sheets
- Perform Physical Count
- When counting trucks, it is best to unload all items and count them as you put them back into the truck
- Count your scrap items and log them as scrap on your count sheet
- Do not receive deliveries (or set in a holding area)
- Do not detail or update orders, invoices or PO's
- Don't move misplaced material once the count has begun
back to top
RESEARCH/ADJUST
- Validate ALL items have been counted - including any misplaced material
- Adjust the actual counts - include quantities on Reserve
- Investigate all unusual results based upon predetermined discrepancy tolerance levels
- Accept the variance and enter the counts into ServMan
- Print the report, make data entry corrections and update the physical quantities to the warehouse
- Advise that the warehouse is again open for business
back to top
EVALUATE RESULTS
- Evaluate all successes and failures
- Revise documentation based upon what you learned
- Communicate results to staff
- Take necessary actions; modify workflow and/or coach staff
back to top
Print physical inventory forms
ServMan provides two reports you can print to perform your physical counts: Physical Inventory Forms and Physical Inventory Forms (All Items). The first prints only items that have historically been in the warehouse. The later, as its name suggests, prints all items. Both forms include the location (aisle/bin), item number and description, stocking unit, quantity on hand, quantity available, and a space to record your physical count.
- Select Reports > Inventory
- Run the Physical Inventory Forms or Physical Inventory Forms (All Items) report
- Note which sort option you select to populate ServMan's physical information form in the same manner
- Click Print
back to top
Perform physical count
If you have chosen the one person method, it is advisable to print the Physical Count sheet with the option Don't Print Quantities checked. By having no quantities printed on the sheet, you have created an additional layer of security in your process. The counter must write down a number without knowing what the expected quantity is.
If you have chosen the 2 person method, one person will validate the item number and location while the second person counts the items. The first person then records the quantity counted by the second on the sheet. If you choose to print the quantities on the sheet and first person indicates there is a discrepancy, the second person can re-count the item immediately to validate the number in the warehouse.
NOTE: The total count entered into ServMan will not always be the count written. If items are On Reserve, these items must be added to the physical count prior to data entry. Reserved item counts are printed on your count sheet for easy compilation.
back to top
Adjust physical count
The quantity from your count may not represent the true inventory quantity because of jobs that are in progress during the count or billing delays. Therefore, the physical quantity that should be entered for any item should be:
Actual Quantity from Count + Reserved Quantity from Non-post Orders and Invoices = Adjusted Physical Count
The Reserved Quantity will be printed on the Count sheet as long as the "Don't print quantities" checkbox is not checked.
The Reserved Quantity also appears on the Physical Inventory data entry screen.
back to top
Key physical inventory count
Key the inventory quantities into ServMan. Each warehouse must be keyed individually.
- Click Physical Inventory on the Inventory Navigator.
- Enter or select the warehouse.
- Enter or select the inventory account.
- Enter or select the cost or expense account for the variance.
- Enter a comment.
- Enter the date and time to post based upon these recommendations.
- Click the menu button for options to pre-fill the physical inventory entry screen.
- Key your ADJUSTED Physical Count into ServMan.
- Make sure you enter an amount for each item. If no entry is made, ServMan will keep the existing quantity on hand value.
- Click Print Out to print a copy of the changes.
- Validate keying accuracy.
- Click Update.
back to top
Recommended date and time settings
The dates and times of the transactions you enter are critical because ServMan’s inventory valuation reports work from the dates and times entered on these transactions. Physical inventory transactions should be entered with dates and times such that the quantity you specify as the physical quantity is the last transaction for that item for that day in that warehouse. It is recommended that you perform your physical inventory at the end of a work day or on a week end. We recommend that you enter all physical inventory transactions with the following dates and times.
- Set initial physical count entries: use the date of the count with a time of 11:00 p.m.
- Corrections to physical count: use the date of the count with a time after 11:00 p.m.
These recommendations assume you have no other inventory transactions occurring on or after 11:00 p.m. and they allow for a maximum of 59 corrections to your initial physical entries. If you have inventory transactions posting after 11:00 p.m. or need more corrections, adjust the time accordingly.
back to top
Physical inventory menu button options
ServMan provides a Menu button on many screens for quick and convenient access to frequently used functions. For the physical inventory screen, the menu contains the following options:
Clicking PreFill items... displays these sort options:
Go Across the Page - Positions the cursor at the item number, count and then cost field going horizontally across the page and will advance via the Enter key - Typically used for entering stock items not listed in the grid.
Go Down the Page - Positions the cursor at the count field only for each line item advancing via the Enter key
Extend Grid... - adds 500 more empty lines to the bottom of the grid
Force all Qty's to Zero removes ALL counts from ALL non-serialized items in the selected warehouse. Use this option ONLY when advised by your accountant or ServMan Project Manager. You will receive the notice below. Click Cancel or No to abort the update process.
back to top
Options and field definitions
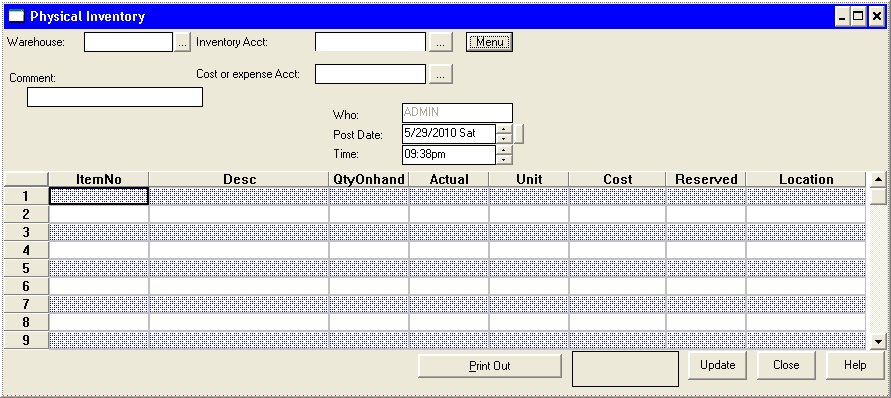
- Warehouse: the warehouse the physical count was performed on
- Inventory Acct: inventory account to be affected
- Cost or expense Acct: cost of sale or expense account to be affected; It is advised to use a separate account for physical inventory adjustments - see your accountant for further advice
- Comment: reference information about the physical, i.e. 2009 Year End Physical
- Who: ServMan user keying the physical; is set automatically
- Post Date: date the physical will post to the general ledger; see recommended date and time settings
- Time: time the physical will post to the general ledger; see recommended date and time settings
- ItemNo: item number; will be auto-populated if that option is selected from the Menu button
- Desc: description of the item; automatically entered from the item master file
- Qtyonhand: quantity on hand in the warehouse; this is the quantity ServMan has calculated based on transactions in the system
- Actual: actual quantity on hand in the warehouse; this is the adjusted physical count (physical count + reserved)
- Unit: stocking unit of measure for the item; automatically entered from the item master file
- Cost: average cost for the Qtyonhand;
- Reserved : quantity reserved on open work orders and non-posted invoices
- Location: location of the item in your warehouse; automatically entered from the item master file
To Count a Truck without Decommissioning it for the Day
- Create a template that matches the quantities of standard stocking items. Click HERE to learn how to create these.
- Have a restocking bin already set up with all the standard stocking items as shown on the transfer template
- Print an Inventory Valuation by Date report for the truck you will be counting - This is what you expect to be on the truck
- Empty the truck and put those items aside to count.
- Use the transfer template to transfer the items into the truck. Click HERE to learn how to do this.
- The truck is now fully stocked and on the road while Physical Inventory is being done it its contents.
back to top