Working with orders
Overview
Orders are vital to ServMan users as they are primary in documenting and managing the work they perform for their clients. The key workflow processes for ServMan users involved in managing and processing orders include taking service requests, scheduling service orders, monitoring order status, detailing the work performed on the orders and billing the customer for the work performed. Before you dive into using the software it's important understand the software's "best use" work flows for dealing with these documents.
Orders are the lowest level of reporting cost and profit for a particular service request. We create an "Order", dispatch it to our technicians and then log our time and materials against it. In doing so we capture our cost/profit. ServMan orders can be scheduled to any number of days or employees. Key points of understanding are:
- An order can only be assigned to a single department - Departments are used for determining financial reporting as well as allocating and reporting work assignments.
- An order can have any number of Technicians scheduled to it but only one can be listed as "Primary" for the purposes of Technician Productivity tracking. The software has many reports that will show technician productivity. When reporting on departments that are "order based", having a single Lead Technician assigned becomes primary. When you schedule an order to an employee, they are set as lead on the ticket. The software will auto-maintain this setting for you if you reschedule it but also allows you to lock it to a particular employee if necessary.
- An order can be scheduled to any number of days. Order status can be tracked by technician by day, so an order can actually be completed yesterday but today still be pending. When orders have multiple employees this becomes even more critical. If an order is assigned to two employees, one can be done and the other may be on his way! The software allows you to graphically track these types of events directly from the dispatch board. However, certain status codes can be set to say ... all work for this order is complete! When we set the status to one of these codes, it will be displayed as complete for everyone. Read up on Status Codes for more on this.
- An order can be partially invoiced, any number of times. You can "Pick" certain billing lines from an order and invoice them back-ordering the balance. There is actually a feature, using status codes, to cause orders to be invoiced and remain open for billing.
Jobs verses Orders
When you have larger projects that will require multiple visits and/or departments to complete the work you probably want to use a "Job". A Job is similar to a "Project" folder placed in a clients file. You can then place individual orders in the jobs folder, tracking the results of each order separately, (by looking at the order), or collectively by reporting the Job as a whole. Assigning an order to a Job is as simple as placing the Job ID on the orders setup form.
It's important to understand how you will report and track productivity for your Technicians. Based on the type of department they work in, the process can be completely different. This is a critical concept to grasp. If a department is Order based, like a service department, you grade their performance based on completion of Orders. If they are "Project Based" like installations, you typically grade them based on Job based reports. Think of it this way, a Job can have many purchases posted to it and potentially many orders, each individually managed. You grade your Technicians working in Job-based departments based on Job Cost reporting.
Quotes
Quotes are used by the system to manage our leads with our prospects and clients. We enter a blank quote for each lead, assigning a marketing source to it and then assign a Sales Representative. Quotes are then detailed with our proposed items and services, including cost and profit, and converted to orders when we "win" the deal. The original quote always stays in your system, clearly indicating what was originally proposed verses what was purchased. Expiration dates are placed on all quotes and your employees are taught to manage these dates as a form of "following up" with your prospects. If you lose a deal, you cancel the quote, assigning a reason code for proper reporting.
Quotes also support the ability to create multiple quotes, linking them together in such a way so that only the quote flagged as "Master" will be reported. This is useful when offering options to your clients where they would always take option A or B, never both. This method allows you to track all options but doesn't inflate your sales funnel when running the ServMan marketing reports.
This remainder of this section is a review of the tools available to help perform and order management tasks in ServMan.
Different companies in the service industry use different terms to refer to the document which they use track their service and sales business. Job order, service order, work ticket, and sales order are among the more common. `ServMan has specific type codes for orders that have very specific meaning to the software:
Types of orders
ServMan uses four (4) distinct types of orders, with each serving a unique purpose. The order type is set on the top of the order form using the drop down list, located directly under the Department field. The Order type will default to either Work or Sales orders based on your system defaults. By default, all orders will default to Work. In some systems it you may not have the option of creating Sales orders as this feature can be disabled by your administrator.
- Work order: Used when an employee (technician) needs to be scheduled to perform the work. A Work Order is the most commonly used type of order in ServMan. Work Orders allow you to schedule work for a Client, track requests for service and record both parts and labor to be charged to a Client.
- Sales order: Sales Orders are used to track equipment and parts orders (i.e. over-the-counter sales) that are not scheduled to a worker. A Sales Order may contain labor, but usually doesn’t. If a small percentage of your orders are parts only orders then Sales Orders may be disabled in your system to avoid the confusion caused by your staff accidentally creating a Sales Order instead of a Work Order. Sales Orders will not appear on your schedule board.
- Recurring order: A Recurring Order is generally linked to a service contract. Recurring Orders are used to process Preventative Maintenance visits and other recurring events. Recurring orders act as a "template" for future visits to a customer that occur on a predetermined schedule.
- Maintenance order: Maintenance Tasking Orders are used specifically for fulfilling maintenance contracts where specific systems and equipment are being serviced on a planned schedule. Maintenance tasking is a key element of the ServMan PM Module which is covered in detail is a separate session, but tasking orders can also be used independent of the PM Module. ServMan's Maintenance Tasking module is a powerful tool that allows you to quickly take control of your commercial maintenance task management, scheduling and invoicing requirements. The module allows you to create a library of tasks to be performed, complete with inventory and skill set requirements, group your tasks and then create lists specific to your particular service plans and schedules.
back to top
Find an order
Orders are an essential element to ServMan and it is important that you monitor your orders to ensure they are processed in a timely manner. Orders are tied to clients and jobs and can be found on each of these screen in addition to the Order SmartView.
SmartView
- Click Orders on the Sales Navigator. You may also select Master Files > Orders or click the Orders icon on the tool bar.
- Enter your search criteria. Make sure the Search Work Orders and Search Sales Orders check boxes are checked. You can uncheck the Search Quotes and Search Recurring Orders options.
- Press Enter or click Start Search.
Client account
- Open the client's account.
- Click the menu button and select Order/Quote History.
- Select the Work Orders tab to see work order or select the Sales Orders tab to see Sales Orders.
Job record
- Open the job record.
- Click the Orders tab.
back to top
Add a new order
There are several ways to add an order or quote in ServMan, but the preferred method is to open the client's account and view the order history to determine if an order already existing for their request.
Client account
- Open the client's account.
- Click the menu button and select one of the following:
- Add Work Order: adds a new work order
- Add Sales Order: adds a new sales order
- Add Recurring Order: adds a new recurring order
- Enter the requested information.
- Click Save.
Task menu
- Select Task > New Order.
- Enter the requested information.
- Click Save.
Dispatch Board
- Click the Schedule icon in the tool bar.
- Click and drag your mouse over the desired time slot for the technician for whom you wish to schedule.
- Release the mouse button and select Add Order to add a new work order
- Enter the requested information.
- Click save.
back to top
Add a copy of an order
- Click Orders on the Sales Navigator. Or select Master Files > Orders or click the Orders icon in the tool bar.
- Find the order you wish to copy.
- Right-click on the order and select Add Copy of.
- Edit the information as needed.
- Click Save.
back to top
Order menu button shortcuts
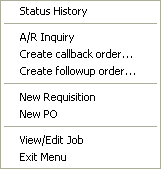
ServMan provides a  button on many screens that allows quick and convenient access to frequently used functions. For orders, the menu has the following options:
back to top
Link client systems to an order
Linking clients to orders is important because it provides a service history for each system.
- Add an order or open an existing orders.
- Select the Systems tab.
- Click Attach. This displays a list of the client's systems.
- Double-click a system to attach it to an order.
- Edit the information as needed.
- Click Save.
back to top
Edit an order
- Open the order.
- Update the information as needed.
- Click Save.
back to top
Print an order
ServMan allows you to print individual works orders or orders that are scheduled.
Single Order
- Open the order.
- Select either Work Order or Sales Order in the Type drop-down menu.
- Click Save.
Scheduled Orders
- Open the Dispatch Board.
- Right-clicking in the scheduled section and select Print... > Print Orders. This will print all of the scheduled orders currently displayed. You can use the filtering options on the Dispatch Board to show orders for specific departments, groups, or employees
- Select the from the following criteria:
- To Screen: prints the orders to screen rather than on paper; useful for reviewing purposes or exporting
- Exclude previously printed: orders that have been printed before will not be printed
- Department: allows you to print the orders for a specific department
- Status: allows you to print orders in the selected status
- From / Thru Acct: allows you to print orders for a specific client or range of clients
- From / Thru Order: allows you print orders for specific order numbers
- From / Thru Tech: allows you to print orders scheduled to a specific technician
- From / Thru Scheduled Date: allows you print order scheduled on specific dates or date ranges
- Click Save.
back to top
Change an order from a work order to a sales order
If you change from a work order to a sales order, any schedule information will be lost because sales orders cannot be scheduled.
- Open the order.
- Select either Work Order or Sales Order in the Type drop-down menu.
- Click Save.
back to top
Create a callback order
A callback order is a work order where the technician did not complete the original request properly. A callback order is used for additional work that needs to be completed if you wish to track technician performance.
- Open the original work order.
- Click the menu button and select Create callback order.
- Select any items that should carry forward to the new order.
- Click OK. Note the following fields on the Setup tab:
- Callback check box is checked
- Original technician's ID has been added to the TechID
- Original order number has the order number of the original order open in step 1
- Enter or update the information as needed.
- Click Save.
If another order has already been entered, you establish the callback link manually.
- Open the order that should be a callback order.
- Select the Setup tab.
- Check the Callback check box.
- Enter or select the ID of the technician who originally performed the service.
- Enter or select the original order number.
- Click Save.
back to top
Create a follow-up order
A follow-up order is a work order where the original request could not be completed on the original visit.
- Open the original work order.
- Click the menu button and select Create follow-up order.
- Select any items that should carry forward to the new order.
- Click OK. Note the original order number has been populated on the setup tab.
- Enter or update the information as needed.
- Click Save.
If another order has already been entered, you establish the follow-up link manually.
- Open the order that should be a callback order.
- Select the Setup tab.
- Enter or select the original order number.
- Click Save.
back to top
Override the billing account on an order
- Open the order.
- Select the Address Info tab.
- Check the Override Billing Account check box.
- Enter or select the billing account. This change only applies to invoices created from this order. To permanently reassign the billing account, you should change the client's billing account.
- Click Save.
back to top
Override the billing address on an order
- Open the order.
- Select the Address Info tab.
- Change the Billing Address. This change only applies to invoices created from this order. To permanently reassign the billing address, you should change the client's billing address.
- Click Save.
back to top
Change the tax codes on an order
The tax codes on an order are automatically set to the same tax codes found on the client's account, but you can manually override them if needed.
- Open the order.
- Select the Advanced tab.
- Select the appropriate tax codes from the drop-down menus. There may be up to four (4) tax codes depending on your system settings.
- Click Save.
back to top
Cancel an order
Orders are integral part of a client's history with your company and ServMan prohibits them from being deleted. Instead, you should change the status of the order to canceled.
- Open the order.
- Click the Status menu and select Canceled, or similar status. If the status requires a reason code, you will be prompted to select one.
- Click Save.
PrePay an order
Many company's require a client to prepay an order using a credit card prior to dispatching their technician. This is easily accomplished by:
Open the order and select the credit card payment option at the bottom of the screen.
Complete the Process Payment Wizard.
The Payment will be noted on the order and a credit balance will be posted to the clients AR record. When the order is posted to AR the payment will automatically be applied to the invoice.
Important Note: If using ServMan Mobile, the payment will NOT be noted on the order total. You should manually note and inform the technician if they are not to collect the total amount of the order upon completion of service.
back to top
ServMan provides the Callback Orders report to view basic information about Call Backs for a particular time period, person or group of people, This report is found on the Reports Menu in the Service Management section. This report will show both the Callbacks For and the Callbacks Against for each person for the time period selected.
back to top
Order Profit Tab
The order's Profit Tab includes material costs from Purchase Orders linked to the Work Order whether the material is on the order detail screen or not.

However, the Order Register Profit Analysis Report only shows material that is on the order detail screen.
The easy way to resolve this issue is to let ServMan create order detail lines for any purchase detail lines that are not currently linked.
This can be accomplished as follows:
1. Open the order on the screen
2. Click on the Purchases tab
3. Right click in the purchase section of the screen
4. Select "Append all unlinked purchases to sales detail"
back to top