|
What's covered? Hide |
ServMan allows you to easily maintain and retrieve a tremendous amount of information about your clients. From a single screen you can quickly access client accounting balances, sales histories, open orders, installed equipment, contracts and more. The program additionally allows you to locate and manage your clients’ documents and contact information much like many "stand alone" contact management solutions. You can track notes, to-do's, set alarms on tasks and much, much, more.
There are three (3) different ways a customer may want you to handle their invoices. The most typical situation is when the address that you perform the service at is the same address that you mail the invoice to. The second situation is when a customer has only one location, but wants you to mail the bills to another address, possibly a P.O. Box. And the third situation is when you have a parent company with multiple location addresses. ServMan can handle all three situations, and unlike many less sophisticated software packages, ServMan allows a billing account to have an unlimited number of location accounts linking to it. The rule of thumb is that you should create a separate client record for each location that you will service.
A regular Client account is created when you will perform the work at and bill for the work to the same person. The location and billing addresses may be different but the account number is the same.
A Location account is similar to a client account in ServMan, with one exception. The work is performed at the location address while the billing points to a different client account number. The two accounts are linked together and are easily found in the database due to a special numbering scheme. What effect does this have? You will still track service history (work orders), sales history (sales orders), quotes, contacts, systems, tax rates, etc. at the location level (account), but all invoices will be posted the billing account. The billing account can be either a regular client account where work may be performed, or it can be a Billing Only account where work will not be performed.
A Billing account is a regular client account with various location accounts associated with it.
Use a Billing Only account when you want to keep the invoice and payment information on the account totally separate from any work performed.
For example: a Property Management company with multiple locations could be set up as a Bill Only client to keep all associated work performed at the various properties completely separate from the Property Management company who is paying for the work.
Another example would be when an extended family owns various properties and any work performed at any location could be paid for by any one of the family members. In this example, create a Billing Only account for each family member. When a work order is created for a location you can easily associate the proper Billing Only client keeping an accurate and easy to follow record of who paid and how much.
NOTE: The Billing account and the Billing Only account should not be confused with a billing address, which is set by selecting Billing in the address type drop-down located above client's name and entering a billing address.
In the case where the client would like the invoices to go to a PO Box rather than the location address, simply select "billing address" with the dropdown and enter the PO Box. NOTE: This method of changing the billing address is NOT recommended if the client record is, was or will be associated with a location account or a Bill Only account.
This will create a new client record for the location; the original client account will become the billing account and the location record will have an account number beginning with the billing account number followed by a location number that increments up as new locations are added (ie: 12345-001, 12345-002, 12345-003, etc.) This allows all associated records to be pulled up at once through a SmartView.

NOTE: Accounts created as Billing Only will only be found in the Client SmartView where *ALL*, Billing Accounts or Active or Billing is selected
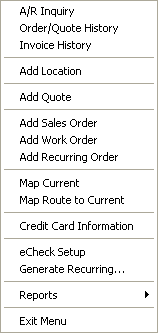
ServMan provides a ![]() button on many screens that allows quick and convenient access to frequently used functions. For clients, the menu has the following options:
button on many screens that allows quick and convenient access to frequently used functions. For clients, the menu has the following options:
If the account bills to another account, then you should open the billing account and update the billing address on that account.
A billing account allows you to designate another client account to be responsible for any invoices. If a client has a different billing account, work orders will remain on the location account but invoices will post to the billing account.
You can set defaults on a client's account that will automatically populate on the new orders, quotes, and invoices. These settings are found on the Address and Misc tabs on the client's account.
This tab contains the following defaults:
This tab contains the following defaults:
You must setup the tax codes before assigning them to a client.
Note: ServMan allows you to determine the number of tax code fields that are displayed. Select Utilities > Program Settings and Defaults and click on the Misc. Defaults tab. Enter any value from 1 to 4 in the Max Tax Codes fields. This setting applies to both clients and vendors and will limit the number of Tax fields that will be displayed.
Based upon your settings, clients may all be created as taxable. This can be overridden on the Misc. tab of the client record.
If the client is to be taxable, the Tax Exempt No: field must be blank
See Also: Stock Items Tax Exempt Options by State - Release 2017 A.27
Deleting a client account completely removes it from ServMan. If your business use historical reporting, you should change the client's status to inactive instead.
NOTE: You cannot delete a client account until all Accounts Receivable transaction are paid in full and purged to history.
ServMan provides a free-form text box to display a special handling message each time the client record is accessed.
When the Special Handling checkbox, usually found in the gray area at the bottom of the client setup screen, is checked, the text box appears.
When saved, the message will pop, both in the back office and on your mobile devices, whenever the client record or an order, quote or invoice for the client is accessed.
If you do not see the Special Handling checkbox on your client setup screen, please contact support@servman.com, to have this feature activated.