What's Covered? Hide
Organizationally, most clients fall into one of two categories when it comes to setting up new agreements, most typically defined by "who" and "when" the agreements will be entered. Generally, companies either enter the Agreements when detailing work orders while reviewing orders received back from the field, or contracts come in from technicians and are set aside to be entered by specially trained personnel independently from your order review and posting procedures. Because Agreements are a specialized and complex topic, we recommend they are entered into the system by specially trained personnel.
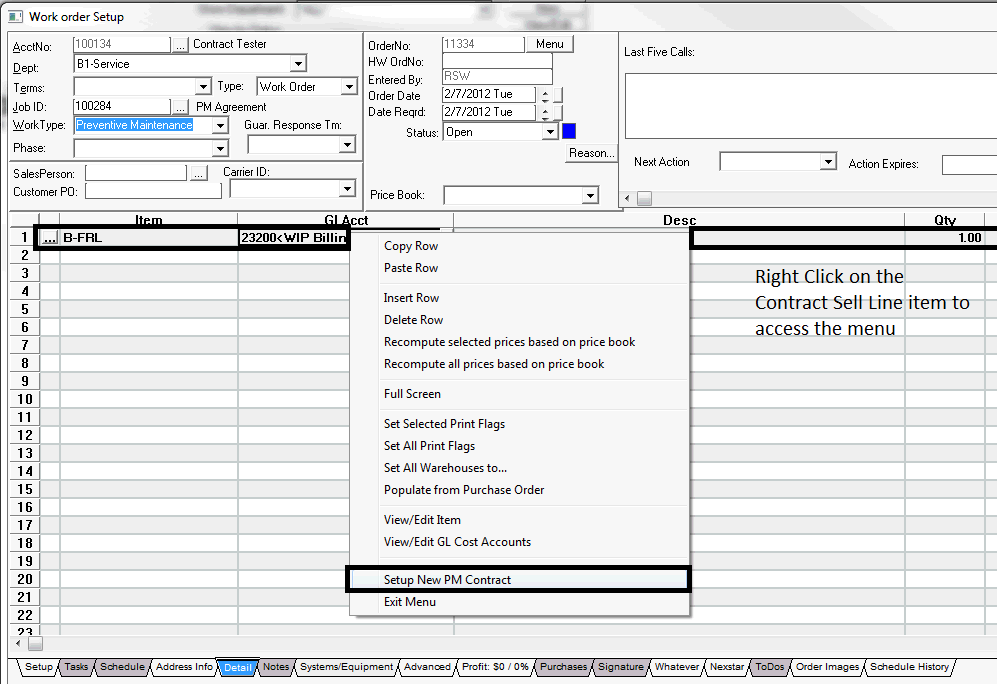
Item codes are setup with a special contract activity flag that tells the software this item is a PM Agreement that has been sold. The rest of the information; price, equipment covered, and other details, must be captured on the actual PM Contract.
You can have as many of these PM Agreement items as needed for the various plan types you may offer. (Notice: the Contract Activity must be set to SELL and Term in Years must be entered.) These items are then entered on orders/invoices by technicians or back office personnel.
There are a number of ways to create PM Agreements within ServMan.

The first tab/page of the wizard prompts the user for the Location Account number where this work will be performed. This is followed by the contract start date, term or duration, and ending date. Choosing from any of the predetermined terms will automatically set the ending date for you, or, you can choose to manually enter the contract's expiration date.
Deferring revenue on agreements is an accounting method where management does not wish to see the revenue from the sale of these agreements when sold; instead they want to see only the income from the agreement either amortized over the life of the agreement or when the work is performed.
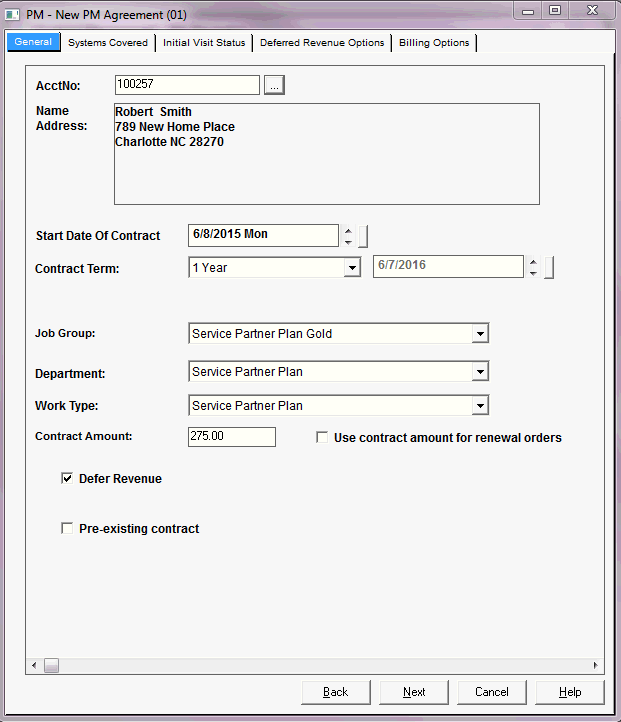
If this is a pre-existing Contract, enter the Serviced Thru Date - the purpose of this field will be explained in Hand Keying Pre-Existing Agreements

From this tab, we see all equipment currently associated with this client’s location record. If equipment is already covered under another agreement, it will be highlighted in red and you will see the coverage plan listed in the coverage column.

OR
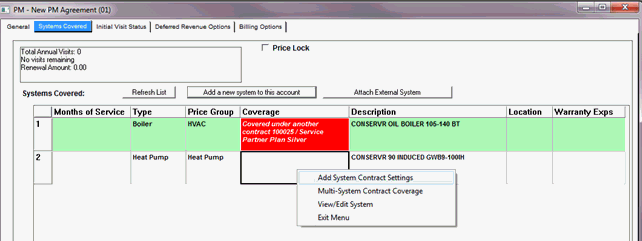
Double-clicking or selecting the Add System Contract Coverage option will open the Systems Covered screen.
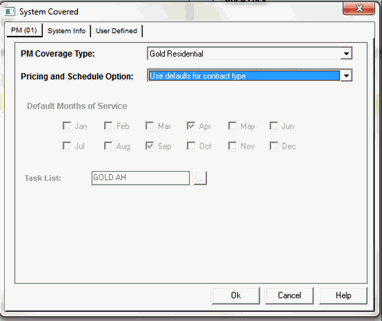
Selecting the Multi-System Contract Coverage
Selecting this option brings up all equipment/systems on the client record
Choose a coverage type and identify perform months for each by double-clicking the checkbox next to each piece to be covered
Different coverage types can be assigned to different pieces of equipment from this screen
Press Save to continue


Understanding that the first order for a maintenance plan is often completed when a plan is sold, the software prompts the user to respond if the first visit has been completed.


NOTE: Choosing either option will tell the software NOT to create the first visit for the agreement as the work has already been performed.
If you do not defer revenue for agreements you may skip this section.
If you DO defer revenue, this tab is where you tell the software how to handle the revenue for this PM agreement. If the revenue was already posted to your deferred revenue account, you would select the “No action required” option. However, if your revenue posted to an Income account, you would select the “Create a journal entry” option that will reduce your income and add the amount to your pre-designated balance sheet account, typically a liability account.
The last option on this screen allows you to choose your Revenue Realization method. Two options are provided:
1. Realize a percentage when the work is performed
2. Realize based on an amortization schedule
Select No Action Required, if a journal entry has already been made to defer this revenue. This is usually done when converting many contracts into the PM Module.

OR
Selecting this option allows the system to automatically recognize a percentage of the deferred revenue on each visit. By default, the software will split the revenue equally across all visits. The total, from the amount you entered in the Contract Amount field, is used. You can override the amount to be realized on each visit directly on the screen; however, the total of all visits must match the total amount being deferred.

The number of visits is determined by the different plan types within this contract. The revenue will be recognized as income when ServMan encounters invoices with “Perform” items. For example: If you have two visits, with $100 on visit one and $50 on visit two, the first perform item, when invoiced, will trigger the $100 to be realized, the second item will trigger the $50. The software will recognize revenue only if it has amounts in this table. Once revenue is recognized, it cannot be recognized again using this method. This assures that your revenue accounts are properly maintained.
If you recognize revenue based on an amortization schedule, the range of the table will be based on the start and end dates of the agreement. The amount will be amortized equally across all periods with any rounding issues being handled in the final month. Optionally, you can manually adjust the schedule here or on the contract once it has been created.
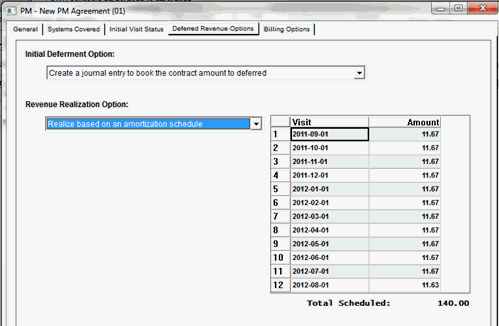
NOTE: Using amortization schedules, you must manually launch a batch process once a month to realize these amounts.
Using the Billing Options tab, you can manage automated monthly or annual payments using either Credit Cards or eChecks, or use a recurring renewal order to mail to your clients. If necessary, you can manually create your own recurring invoices with any recurrence pattern to meet your invoicing requirements.
If you choose to automatically debit a client’s credit card or banking account, the software will prompt you for the account information, billing amount and date for the first charge to take place.
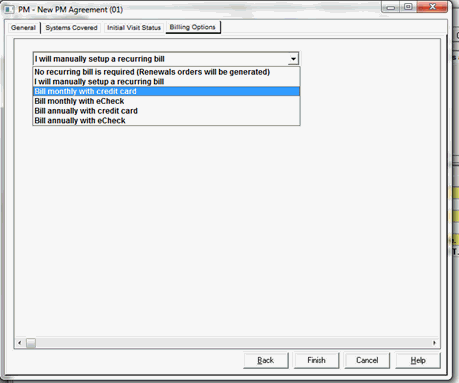
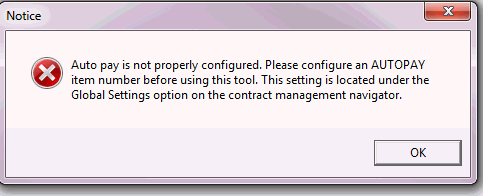
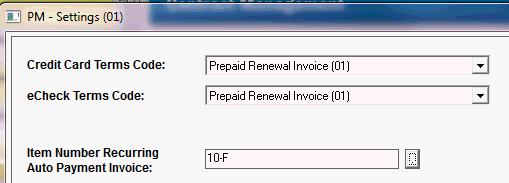
Choose "Finish" to save the contract. The software will prompt you to view the setup screen, if desired.
Congratulations!! You have just completed the setup of a maintenance agreement! Watch the Managing PM Orders tutorial to see how to generate the orders under a maintenance agreement.
Often you might like to offer a client a price discount for a predetermined period of time. For example; you priced the agreement using current pricing but want to give a discount for two years, then have the agreement revert to standard pricing on the following renewal. This is handled using the Price Lock Feature on the PM Tab of the agreement setup.
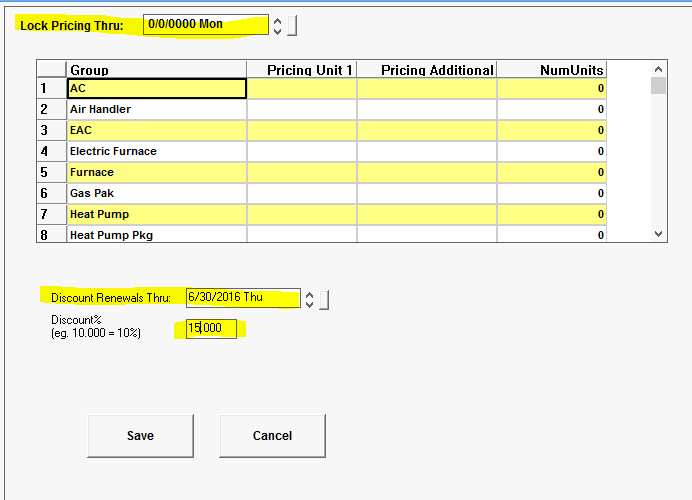
You have two options when locking a client's price.
Both options apply to Renewals Only and will be reflected on the Mock Invoices created for renewing the agreements.
If you want to give a one time adjustment to a client for the NEXT renewal only, the simplest approach is to pre-create the renewal order (Mock Invoice) and manually adjust it as required to meet your needs. This document will be used when mailing your renewals at the next anniversary date of this agreement.

This is accomplished by clicking the "Generate Next Renewal Order" button from the Renewal History tab on the agreement setup screen. Choosing the "Show Renewals Sent" option from the dropdown will allow you to view and edit the upcoming renewal.

Open the Contract record and select the PM Systems tab. Add the additional system records and add the coverage type to each.
Open the Contract Record and select the PM (01) Tab. Press the "Generate Next Visit" button at the top of the screen.
From the Contract Management navigator, choose the Scheduled Amortization option to open the Revenue Recognition processor. Enter the desired date range for processing and press OK. Note: Revenue will always be posted to the accounting period based on the recognition schedule, not when you run the process.
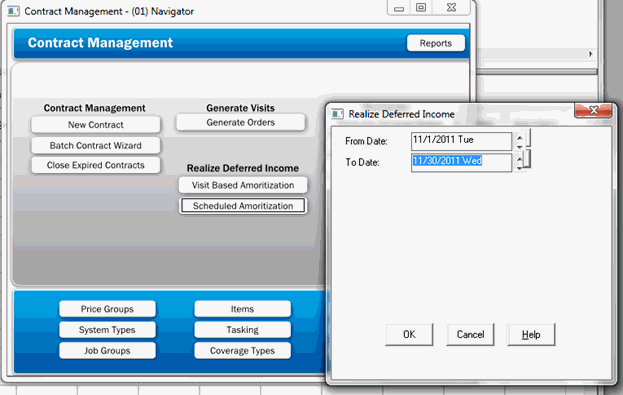
Select "Visit based Amortization" from the Contract Management navigator and enter the date range you wish to process. The system will recognize revenue based on orders flagged as Complete, within the date range selected, that have an item code flagged as a “Perform” item, AND a Job ID, (Contract Number) listed on the order detail line.
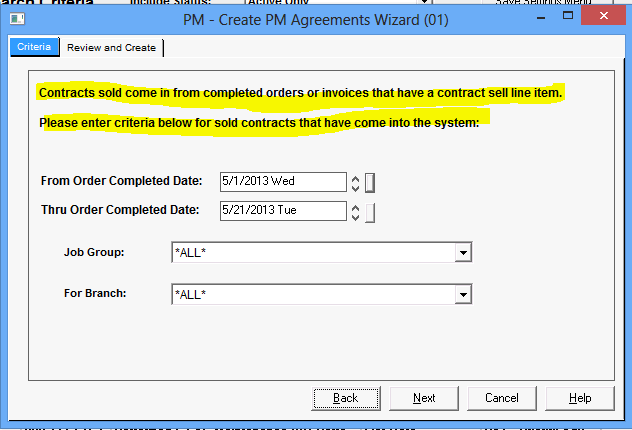
The Batch Contract Wizard is accessed from the Contract Navigator. The process should be run often, based on activity levels, never less frequently than weekly. Enter a date range that will look for contract SELL items on completed orders or payments to invoices received through the mail.

This listing becomes the user's Action List for agreements that need to be created in the system. The user can simply right-click on each line to open the order/invoice and can launch the Batch Contract Wizard. This process is repeated for each line on the screen.