|
What's covered? Hide |
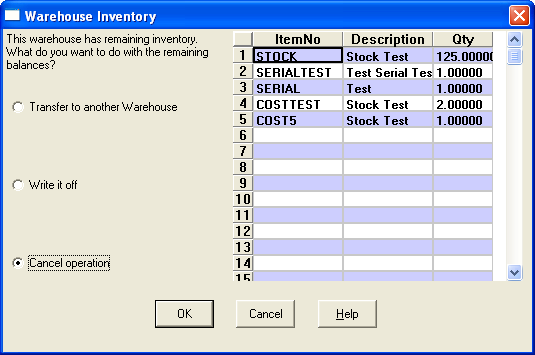
ServMan allows you to have an unlimited number of warehouses. You must create a warehouse record in ServMan for all warehouses including any vehicles that will be stocked with items. Items are sold from and received to warehouses throughout the course of a day. ServMan will allow you to track OnHand balances as well as quantities reserved on orders. You can view this information for any stock item by either opening the item record or right clicking on the item, in a SmartView listing and choosing "Warehouse Availability".
Referring to the image above, the OnHand value is the quantity that the software is currently valuing as being in the warehouse. Remember, if you have materials that have been pulled for orders but not yet posted, these items may not be on the shelf, but the software is still valuing them as inventory.
The "Reserved" column shows you the quantity of items that are on Orders that have not yet been pulled from inventory, or as we say, "posted". When a material is relieved from inventory the cost of the item has to go someplace. In most cases this will be Cost of Goods sold, but in some cases this may be to a Work in Progress account. This said, materials are relieved using one of the following methods:
Posting an Invoice to AR
Posting an order to COGS
Posting an order to WIP
Manual Adjustment
Until one of the above actions occurs, the item will remain in the "OnHand" column.
The "Available" column tells us the difference between what the software is valuing, in the "OnHand" column and what is reserved on orders, in the "Reserved" Column.
This and other information including quantities on purchase orders that have yet to be received, (OnOrder), Minimum\Maximum stocking quantities with warehouse location is all stored for each of your warehouses.
If you "right click" on a Warehouse listed on the screen above you will be provided the following additional actions. Each is defined in the following grid:
| Right Click Option | Description |
 |
|
| Setup | Edit the Warehouse line to perform manual warehouse adjustments. |
| Delete | Delete the warehouse listing for this item. This can not be performed if you have a quantity on hand in any of the columns. |
| Refresh | Refresh the listing |
| Save results | Save the WH listing detail for this item to a file |
| Change View Columns | Modify the information returned to the Grid control |
| Reserved By... | Shows a listing of all orders with the item on it that has yet to be posted to COGS, WIP or Invoiced. |
| Adjustments Log... | Loads the adjustment log for this Warehouse and Item. You must set a "From Date" when using this feature. |
| PO History | Displays a Purchase History for this item/warehouse |
| Sales History | Displays the sales history for this item/warehouse |
| Item Cost Table | Displays the current cost table for this item and warehouse. The cost table tracks the cost you've paid for items with each purchase. This information is used to determine your costing method for items of either FIFO, LIFO or Average. |
| Stock Transfer | Loads the Stock Transfer form to move inventory between warehouses. |
The ServMan inventory control system can automate many steps in the process of ordering and replenishment of parts. Proper setup of ServMan will ensure smooth operation of this process.
You must create a warehouse record in ServMan for all your warehouses and vehicles (vehicles are considered warehouses.) The stocking quantities for minimum and maximum on hand values must be set by warehouse. You may enter the minimum and maximum values by warehouse for each item by clicking on the "Warehouse Balances" button on each item or by creating a spreadsheet that your ServMan Project Manager can assist you in importing into the software.
The spreadsheet must have the columns of Part Number, Warehouse ID, Min, Max. The Part Number and Warehouse ID must match the values in ServMan exactly for the import program to properly update the item file.
Typically, for vehicles, the minimum and maximum values for a given part number are set to the same value. For instance, you may always want to keep three of part number XYZ on hand for Truck 1. In that case the minimum and maximum would both be three. However, in the main warehouse you may want to reorder part number XYZ when your on hand quantity gets down to 10, but never stock more than 20. In that case your minimum would be 10 and your maximum would be 20.
Perform a physical inventory count of each truck or warehouse. The counts should be made within as close a time period as possible to each other to avoid mistakes of inventory items being removed from a warehouse or truck before the counts are entered into the software.
You may enter your physical inventory counts using the Physical Inventory screen on the Inventory Navigator, or create a spreadsheet that your ServMan Project Manager can assist you in being imported. If being imported the spreadsheet must have the columns of Part Number, Warehouse ID, and Quantity On Hand. The Part Number and Warehouse ID must match the values in ServMan exactly for the import program to properly update the item file. This spreadsheet may optionally contain the Minimum and Maximum on hand quantities by warehouse and be used in the procedure described above for creating the warehouses. If your items are serialized you will also be required to provide an upload file with serial number listings for each item and warehouse.
You should expect that when you perform your next physical inventory or cycle counts you will be adjusting your inventory on hand values to accommodate for parts whose locations may not have been posted properly when you performed your initial physical inventory count.
In order for ServMan to correctly monitor usage of your parts by warehouse you must correctly tell the software the correct warehouse part is to be pulled from. Any parts that are taken directly from your main warehouse should be put on your work orders by your back office staff. ServMan will then automatically populate the Warehouse ID on the order as your primary warehouse for those parts. This ensures that when the order is invoiced that the part will be removed from your main warehouse's stock and not the technicians truck.
If you are using ServMan mobile, when a technician adds a part to an order using his mobile device the software will automatically set the part as coming from the technician's truck stock. If you are not using ServMan mobile then when the technician marks the part on his paperwork he should indicate which truck the part came from. Then when your personnel are adding the parts to the work order screen they can indicate which warehouse the parts came from. You must pay close attention to these warehouse settings. Posting the incorrect warehouse on a detail line will obviously lead to "issues". To verify you have assigned a warehouse (truck) to your techs, make sure they have they have the truck ID as the WH ID in their employee file.
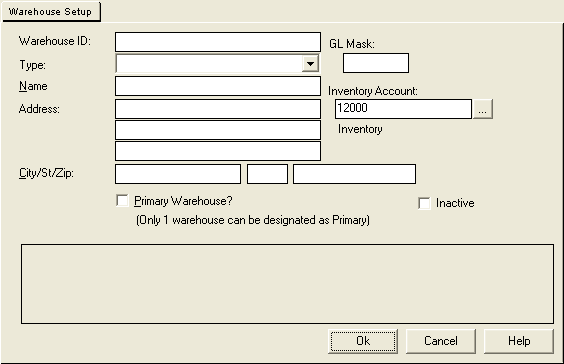
For more information on each field on the setup screen, click here.