Working with recurring orders and invoices
Recurring orders and invoices are a powerful tool for managing ongoing maintenance and billing arrangements. Think of them as templates for managing future service visits or pre-arranged billings for a client, which are very flexible to work the way you do.
Find a recurring order
Recurring orders are used a templates to generate future invoices or work reminders. They can be found using Orders: SmartView, on a client account, or job record..
SmartView
- Click Orders on the Sales Navigator. You may also select Master Files > Orders or click the Orders icon on the tool bar.
- Enter your search criteria. Make sure the Search Recurring Orders check boxes are checked. You can un-check the Search Work Orders Search Sales Orders, and Search Quotes options.
- Press Enter or click Start Search.
Client account
- Open the client's account.
- Click the menu button and select Order/Quote History.
- Select the Recurring Orders / Invoices tab.
Job record
- Open the job record.
- Click the Recurring tab.
back to top
Add a recurring order or invoice
Recurring orders and invoices can be added in three (3) ways: from a client record, from a job record, or by converting a quote.
From a client record
- Open the client's account.
- Click the Menu button and select Add Recurring Order. A new order is add and the recurring Event Setup Window is displayed.
- Enter the recurring setup information.
- Click OK.
- Add information on the order as needed.
- Click Save.
From a job record
- Open the job record.
- Select the Recurring tab.
- Click New. A new order is add and the recurring Event Setup Window is displayed.
- Enter the recurring setup information.
- Click OK.
- Add information on the order as needed.
- Click Save.
During conversion of a quote
- Use the Order SmartView or quote list to locate the quote.
- Right-click on the quote and select Convert to Recurring Order or Convert to Recurring Invoice.
- This displays the Quote Conversion screen. Remove items that are not needed and adjust the quantities as needed.
- Click OK. A new order is add and the recurring Event Setup Window is displayed.
- Click OK.
- Add information on the order as needed.
- Click Save.
back to top
Add a copy of a recurring order or invoice
- Locate the recurring order or invoice.
- Right-click and select Add Copy of.
- Edit the information as needed.
- Click Save.
back to top
Edit a recurring order or invoice
- Open the recurring order or invoice.
- Edit the information as needed. To change the recurrence pattern, select the Schedule tab and select the Setup button.
- Click Save.
back to top
Generate recurring orders and invoices
Remember that recurring orders and invoices are simply templates for future events. When it is time to perform the work, the actual orders and invoices should be generated.
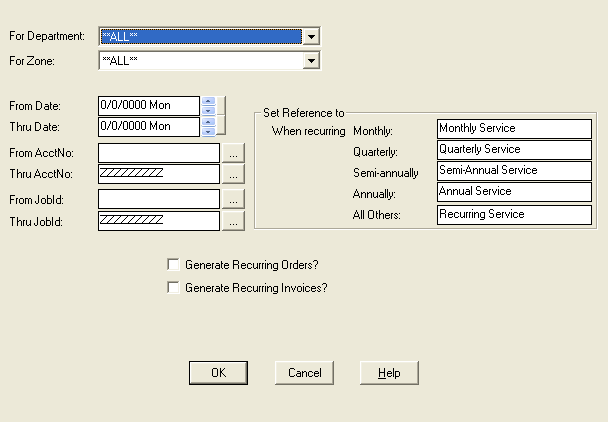
- Click Generate Recurring on the Accounts Receivable Navigator. You may also select Modules > Billing > Generate Invoices/Orders from Recurring.
- Select from the following options to generate recurring orders and invoices:
- Department: only recurring orders and invoices for the selected department will be generated
- Zone: only recurring orders and invoices for the selected zone will be generated
- From Date/Thru Date: only recurring orders and invoices for with a next occurrence date between the dates you specify will be generated
- From Account Number/Thru Account Number: only recurring order and invoices for accounts in the range you specify will be generated
- From Job ID/Thru Job ID: only recurring order and invoices for jobs in the range you specify will be generated
- Set reference: allows you to specific the reference that will appear on the invoice; you can independently set the reference based on the recurrence pattern for the order or invoice; orders and invoices that recur monthly will inherit the monthly reference, orders and invoices that recur quarterly will inherit the quarterly reference, orders and invoices that recur semi-annually will inherit the semi-annual reference, orders and invoices that recur annually will inherit the annual reference, and orders and invoices that recur outside of the previous patterns will inherit the all others reference
- Choose whether recurring orders, recurring invoices, or both should be generated:
- Generate recurring orders: to generate recurring orders
- Generate recurring invoices: to generate recurring invoices; you may also choose to place invoices on hold when they are generated. This prevents then from being updated to Accounts Receivable until the hold is removed.
- Click OK.
- (Invoices Only) Print the invoices.
- (Invoices Only) Update the invoices.
back to top
Cancel a recurring order or invoice
Recurring orders and invoices are integral part of a client's history with your company and ServMan prohibits them from being deleted. Instead, you should change the status of the order or invoice or canceled to canceled.
On a recurring order or invoice
- Open the recurring order or invoice.
- Click the Status menu and select Canceled, or similar status. If the status requires a reason code, you will be prompted to select one.
- Click Save.
On a job record
If the recurring order or invoice is part of a job and the job is also being completed or cancelled, ServMan can assist with cancelling all of the recurring orders or invoices associated with that job.
- Open the job record.
- Change the status from Open to Complete or Canceled.
- Click Save. A dialog is displayed advising that changing to the status will cause the orders to be canceled.
- Click Yes to cancel all recurring orders or invoices associated with the job.
- Click Save.
back to top
Recurrence pattern options and field definitions
ServMan offers a lot of flexibility when setting up a recurrence pattern. If the event happens daily, weekly, monthly, yearly, every three weeks on Tuesday, or fourth Monday of every month, ServMan can handle it.

- Recurrence pattern: indicate the pattern of the recurring events; choose from daily, weekly, monthly, twice monthly, or yearly with additional options available based on your selection; additional option include specific days or dates and specific or selected months
- Employee ID (s): associates a specific employee with the recurring event; most often set for route based businesses and left unassigned for maintenance agreements
- Recur as: indicates if the event will recur as an order or invoice; select order if a technician needs to be scheduled to complete the work or select invoice if the event is for billing only
- Time: indicates the start time for the recurring event
- Duration: indicates the duration of the recurring event
- Stating date: indicates the date the recurring event starts; will default to the job start date if part of a job, otherwise blank; must be on of before the next occurrence date for the first occurrence to be generated
- Ending date: indicates the date the recurring event ends; will default to the job expiration date if part of a job, otherwise defaults to 99/99/9999 (never ends)
- Next occurrence date: this the most important date and represents the next time the event is supposed to happen; if set to 00/00/0000 or to a date after the end date, the recurring event will not generate
back to top