|
What's covered? Hide |
Now that you've seen how simple it is to add and manage agreements let's look at what's required to make all of this work. There are several things that must be properly configured prior to using the PM (01) module for managing your maintenance agreements.
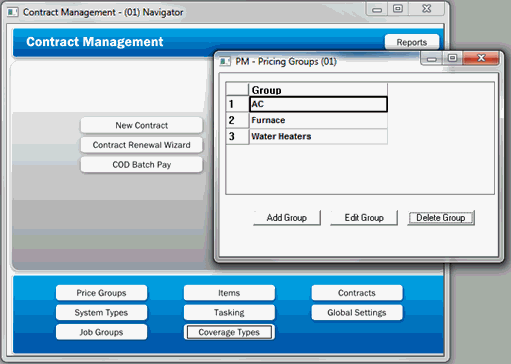
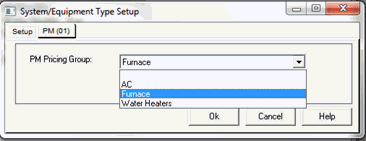
You must create pricing groups. Price groups will be assigned to your various systems types and are used to group like equipment for the purposes of renewal price management. The prices entered here have nothing to do with your pricing of NEW agreements. You should have item codes configured as “Sell” items with pricing detail for managing the sale of new agreements.
The renewal pricing options allow you to price the first piece of equipment, under a price group, at a price different than additional equipment in the same group. For example, you may charge $120 for the first Air Handler and $90 for all additional units. Because you may have various "Types" of air handlers, the software allows you to use a Price Group code to associate them with one another allowing this pricing logic to work.
Create your pricing groups by choosing the "Price Groups" option from the Contract Management Navigator and entering the name of each group.
Remember, you must have a client's system record to link to a PM Maintenance agreement. A system record must have a "Type" code associated with it to tell the software which Price Group as well as the specific task list and schedule that should be associated with it. Choose the "System Types" option from the Contract Management Navigator to work with your System Type codes.
You need to consider how your items are configured and sold prior to creating your System Types. Certain items will be flagged to “Update to Client systems records”, this is what will be displayed as installed at your client site. It is important to have a complete understanding as to how you will be using the software prior to configuring these options. Work with your project manager to resolve any questions you may have.
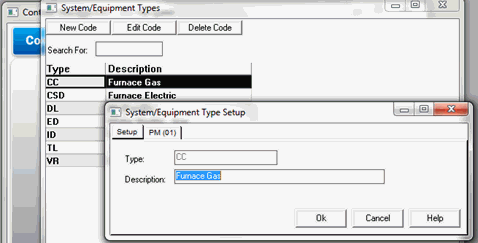
You MUST associate a Price Group code, using the PM(01) tab on the System Type setup form for the software to properly populate contract renewal orders.
***Renewal Orders will NOT be created if a Price Group code is not associated with a System Type.
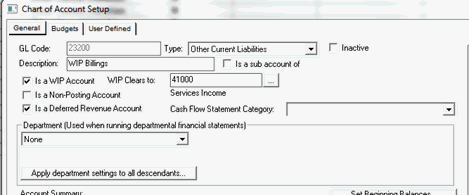
If you will be deferring revenue for your agreements, you must be sure that your accounts are created prior to setting up your agreements. Deferred Revenue accounts must be flagged as a “Is a WIP Account” account and as a “Deferred Revenue Account” to function properly. These flags are set on the GL Account settings screen as indicated below. All WIP accounts will require a Clearing account to be created as well. The WIP Clearing account is used when revenue is Recognized for the agreement.
PM Agreements are managed through Job Records. To tell the software that a job is a PM Agreement, thereby exposing the additional tabs and fields, you must check the "Is PM" checkbox on the PM (01) tab of the Job Group set up screen. You can access Job Groups from the Contract Management Navigator.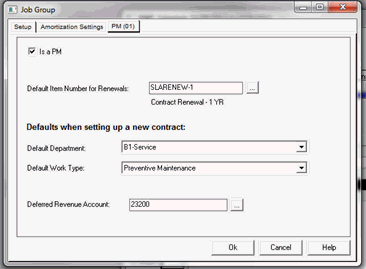 Learn more about Job Groups here.
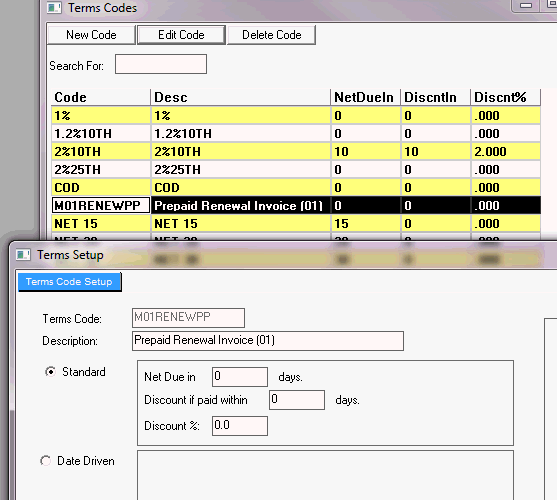
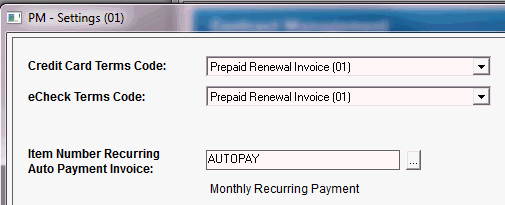
Checking this option also exposes the Default Item for Renewals option. During the renewal process, renewal orders can be generated to mail to your clients, if desired. This item code used to manage the income received on the detail section of the renewal order is entered here. This item code must have the contract activity flag set to "Renewal" to function properly. The contract activity flag is setup on page two of an item setup screen.
Additional options used for managing your default department and worktypes on agreements as well as deferred revenue is also setup here.
The Deferred Revenue account set here must be flagged as a “Is a WIP Account” account and is a “Deferred Revenue Account” set to function properly. These flags are set on the GL Account settings screen as indicated above.
The module allows you to create list of tasks that will be added to each maintenance visit. This is especially useful when using SM Mobile and Laptop versions to provide your technician step by step instructions on each task you wish performed during the visit. Create a task listing for each System or Coverage type you will be offering. Task list are accessed and created under the Maintenance Tasking Module. You must create individual task codes first, then build list of various task codes. You will then associate the task listing to a type of equipment.
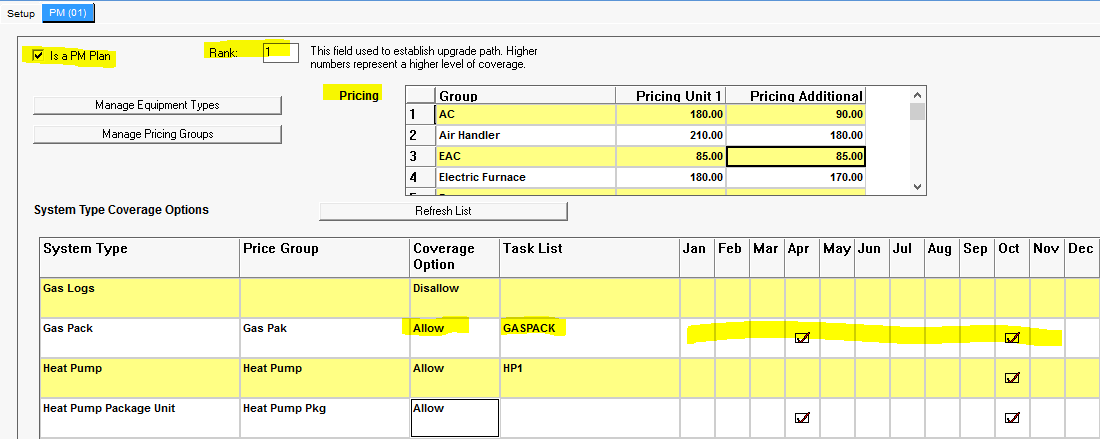
The last step in the configuration process is to create your coverage types. You'll want a coverage type code for each of the plan types that you offer. You may have as many coverage types as may be required to properly manage your agreements. For example, Gold, Platinum, Silver, etc... For each Coverage type you have the ability of configuring the price charged for renewals, by Price Group, under the Pricing Section. You will additionally be able to configure the system to either Allow or Disallow coverage for various System Types under this plan. You can additionally assign your equipment a specific task listing for this Plan type as well as the months for which you want maintenance orders created.
Coverage Types are created by pressing the Coverage Types button from the Contract Management Navigator.
You must create contract related items that you will use for Selling, Renewing and Performing maintenance visits. Review your item setup instructions under the PM item documentation for additional detail.
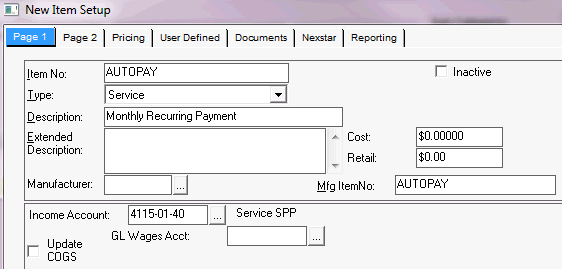
How your company decides to handle deferred revenue and amortization on your monthly PM contracts, will determine how you set up your automatic payment item. This item is only used for monthly recurring invoices and must be created with the Income Account as your deferred liability account if you recognize this monthly income when you perform a visit (visit-based amortization ). It must be created as an Income account if you choose to recognize this money monthly as you receive it.