|
What's covered? Hide |
The follow document defines the various configuration settings required to configure the ServMan ADP module. The ServMan ADP Module is an optional module that may be installed in ServMan. The ADP module creates a gross payroll export from data in ServMan that can then be imported into ADP's website. (NOTE: ADP requires a product level of “WorkForce Now” or higher level to import any information to their software.) The export will be in comma-separated value (CSV) format and will contain the following:
* Account for different pay types (regular, overtime, commission, vacation, sick, and holiday)
* Department allocation by employee based on time logged in ServMan. The allocation with be same as that used by ServMan's standard payroll edit report. For example: Employee A has 50 hours of total time: 40 hours in Dept A and 10 hours in Dept B. Time log for the employee would show Dept A 32 hours regular, 8 hours OT and Dept B 8 regular hours, 2 hours OT
* Commissions will be logged to the department based on the department on the invoice, which generated the commission
* Only physical time work will count towards overtime. Holiday, sick, and vacation time will not count towards overtime hours.
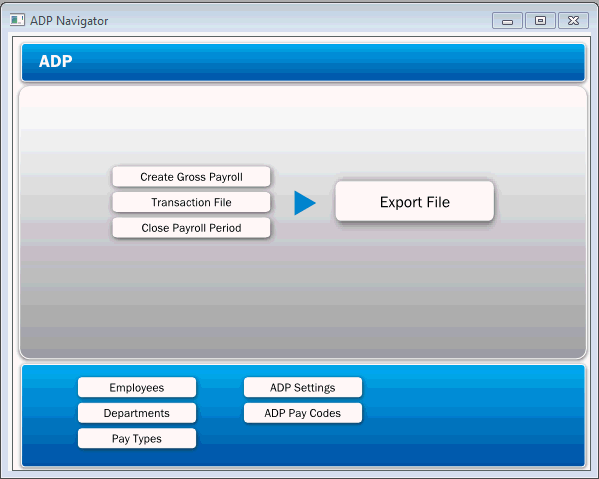
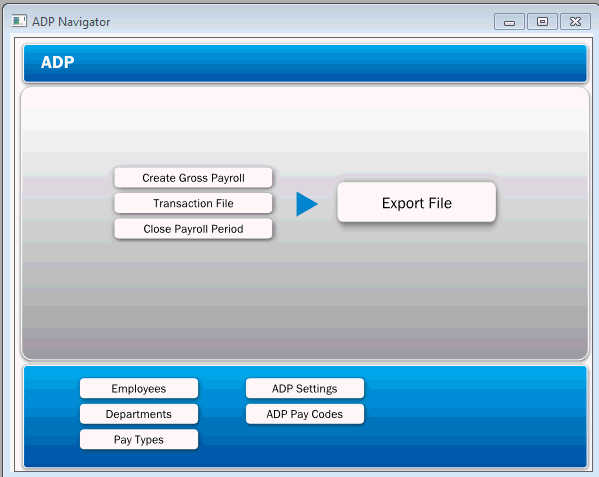
All configuration settings for the ServMan ADP module can be found on the ADP Navigator.
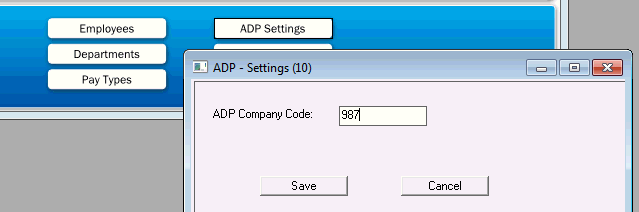
Click the ADP Settings button in the blue area of the ADP Navigator.
Enter the Company Code provided to you by your ADP Account Representative in the space provided.
Click Save when finished.
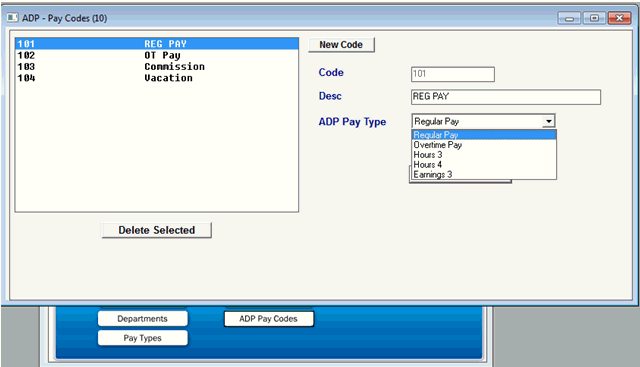
ADP Pay Codes are used to map ServMan’s Pay Types to ADP’s Pay Codes.
Consult with your ADP representative on creating the various ADP Pay Codes for your installation. A ServMan representative can also assist in matching the ADP Pay Code to the various ServMan Pay Types. If you need to create additional pay types, see the section - ServMan Pay Types.
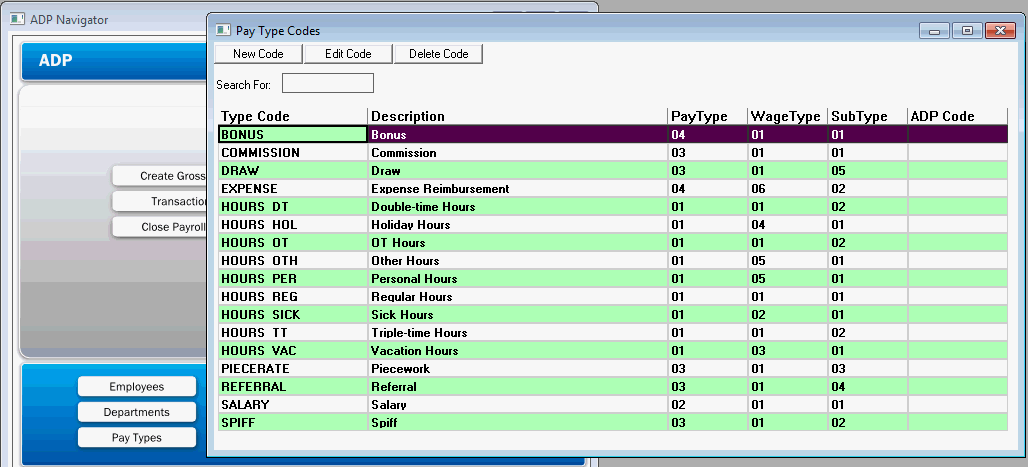
ServMan uses pay types for employee compensation decisions. If your company uses the Log all Time method, your ServMan labor items will have the ability to associate a payroll pay type to the labor codes you post to. If you are using the Time Punches through the time clock method, you will use pay types when posting payroll overrides on the employee payroll-posting screen. The software comes with standard pay types already defined that include items like: Regular, Overtime, Double Time, Vacation, Sick time, etc. In addition to the standard pay types, you have the ability to create your own pay types and configure them such that you can manage them as overtime, exclusion from overtime, as well as many other advanced setup options. Pay types are managed under the Payroll ->Pay Types module.
Click the Pay Types button in the blue area of the ADP Navigator. This will bring up a list of Pay Types currently configured in your ServMan installation.
Open the appropriate pay type
Click on the ADP tab.
Choose the appropriate ADP Pay Code from the drop down list that corresponds to the ServMan Pay Type.
If you have created NEW ServMan Pay Types, remember you will need to assign those Pay Types to an ADP Pay Code as explained in the section above - ADP Pay Codes.
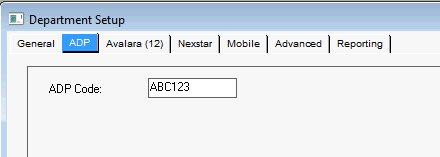
Click the Departments button in the blue area of the ADP Navigator. This will bring up a list of departments currently set up in your ServMan installation.
Open the appropriate department and
Click on the ADP tab.
Enter the Department Code provided to you by your ADP Account Representative for each ServMan department that will have labor logged against it.
ServMan allows up to 20 characters of alphanumeric data to be entered into this field.
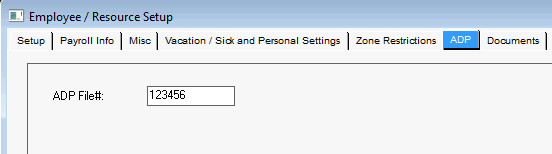
Click the Employees button in the blue area of the ADP Navigator. This will bring up a list of employees currently configured in your ServMan installation.
Open the appropriate employee record.
Click on the ADP tab.
Enter the Employee Codes provided to you by your ADP Account Representative for each Employee.
ServMan allows up to six numeric characters to be entered into this field.
NOTE: The export will not create employees. Employees entered into ServMan will need to also be configured in the online ADP payroll module.
Prior to creating the ADP export file, you will need to complete all of your normal payroll functions within ServMan. Instructions on processing your ServMan payroll can be found in the Processing Payroll section.
Open the ADP Navigator
Click the Export File button
Enter the Date Range you wish to export
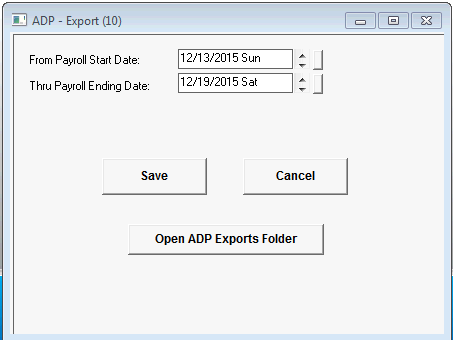
Click Save
After you click save, ServMan will export the ServMan payroll information into a comma separated (CSV) file that you can use to upload to ADP.
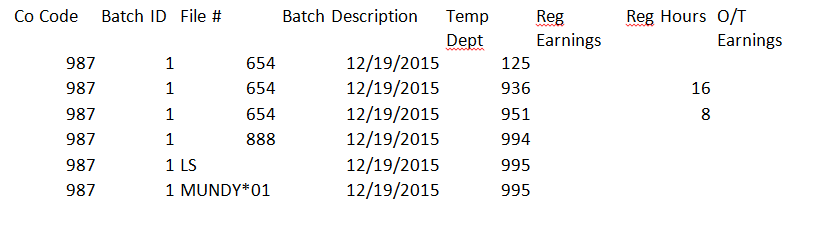
The file will look similar to the following:
The ADP export file is exported to a directory within the ServMan company folder named ADP Exports. Please have you IT staff configure security to that directory so that only employees that have access to payroll information can access that directory.