ServMan Mobile: Android
Overview
ServMan Mobile is now offered in both Windows and Android versions. This document provides an overview of the required Back Office Application Setup (ServMan Mobile Settings and Employee Configuration) and the ServMan Mobile Android Screens and Functionality.
ServMan Mobile Installation
Back Office Configuration
Employee Settings
Setting Up Your Android Device
ServMan Mobile Android
§ Android Client Lookup Screen
§ Punch in and out via the Time Clock Module
ServMan Mobile Android Basic Troubleshooting
ServMan Mobile Android Sample Workflow
ServMan Mobile Android -- Installation
Prior to using ServMan Mobile Android, you will be required to meet certain IT Requirements. If you have any questions, please contact your ServMan Project Manager or ServMan Support. Please also note that the below requirements are up to date as of the header on this document. Please contact ServMan Support for Current Requirements.
ServMan Web Service Requirements
We recommend a stand-alone Windows Server which is separate from your application server, terminal server, or SQL server. Remote access must be granted to server for ServMan personnel to install and configure the web service.
IIS 7.0 or higher must be installed on Windows Server. IIS 6.0 compatibility role must be turned on.
SQL Server native drivers for connecting to SQL production server installed on web server.
An SSL certificate to allow HTTPS connection (port 443) must be obtained or created and installed in IIS
and linked to the ServMan Web Service. The SSL certificate does not need to be from a trusted SSL authority because the ServMan mobile applications trust any SSL certificate. An SSL certificate should be from a trusted SSL authority if it will also be used for taking credit card payments through a website.
We do not recommend any configuration of the web service using non-SSL connections.
A specific Windows domain user should be created and set on application pool for ServMan Web Service. This user should be set to have read/write access to the website directory and given read/write access to SQL Server, which hosts ServMan data. Windows user should also have read/write/create writes to Server Application Event logs.
2. Credit Card Processing Through Web Service
Card Present and Card Not Present merchant accounts must be obtained from Authorize.NET and configured in ServMan Credit Card module. Authorize.NET is the only Gateway supported in ServMan Mobile and SMAuthorize.
Authorize.NET must be configured in ServMan Enterprise to support credit card processing.
Prior to using ServMan Mobile Android, your Project Manager will meet with you to go over your Current Workflow and Customizations. They will also explain the timeline for installation. Below please find a sample of the timeline and items required. If you have any questions, please contact your ServMan Project Manager or ServMan Support. Please note that the below is up to date as of the header on this document. Please contact ServMan Support for a Current Document.
Initial Discovery Meeting (approx. 30 minutes)
Overview of Current Mobile Workflow and Customizations (Please Note: Customizations are Billable Hourly and some customizations are not transferrable to SM Android)
Overview of IT Requirements
§ ServMan Web Service Prerequisites Document
§ SMTP Information
Overview of ServMan Back Office Application Requirements
§ ServMan Back Office Application on Version 5.00 C.24 or Higher
§ Modules to be Enabled
Document Management Module Enabled
Web Service Module Enabled
ServMan Mobile Module Enabled
Credit Card Processing Module Enabled (If processing Credit Cards in the Field)
Authorize.NET Merchant Accounts Setup
Please Contact ServMan Support for approved card swipes
Print Formats to be Used (Work Order and Quote)
Client to Configure Web Server & ServMan Staff to Assist with ServMan Back Office Application Requirements
(approx. 1 Week Depending on Items to Complete)
Web Server Credentials Provided by Client and Web Server Setup Verified by ServMan Staff (1-2 Days)
Web Server Information
External IP or DNS Name _______________________________________
Internal IP __________________________________________________
SSL Certificate Name __________________________________________
Windows Domain User Name / Password
__________________________________________________________
SMTP Information
Server Name ________________________________________________
SMTP User_______________________________________________________
SMTP Password______________________________________________
SSL Required? ________________________________________________
SMTP Server Port _____________________________________________
From Email Address ___________________________________________
From Email Name _____________________________________________
Print Formats
Work Order __________________________________________________
Quote ______________________________________________________
Web Service Installation & SM Android Mobile Testing and Configuration by ServMan Staff (approx. 2 Weeks)
ServMan Android Mobile Application Overview provided by ServMan Staff (1 Hr.)
ServMan Android Mobile will run on any phone or tablet running Android OS 2.3 (Gingerbread) or more recent. All mobile devices require the ability to connect to the Internet either through a cellular data network or through a wireless network (i.e. Broadband Card, Wi-Fi Hotspot, etc.).
For companies seeking to migrate from Windows mobile, Android can coexist with your current SM Mobile for Windows; therefore, you can deploy a few Android devices initially and then rollout additional devices later, if desired.
If you decide to process credit cards from the field we ONLY support the UniMag Pro Mobile MagStripe Reader or the UniMag II, Two-Track Secure Mobile MagStripe Reader which plug into the audio port on the Android device.
Please contact ServMan Support PRIOR to purchase to confirm compatibility!
Back Office Configuration
Prior to using ServMan Mobile Android, you will be required to complete the Back Office ServMan Application Configuration. These settings will determine how many orders the Mobile Users see, which Statuses they have to use etc. If you have any questions, please contact your ServMan Project Manager or ServMan Support.
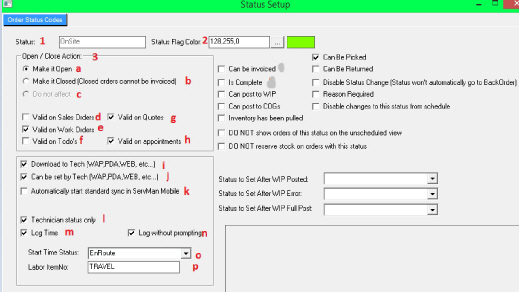
In the ServMan Back Office Application go to Master Files à Miscellaneous à Order Status Codes to configure the Order Status Codes for Mobile Use. See Sample Residential Service Workflow Order Status Codes for
example Status Codes
Status the status that is displayed or orders, quotes, to do tasks, and appointments; status codes are limited to a maximum of 12 alpha only characters and cannot be changed once saved
Status Flag Color indicates the color that represents the status; displays on the dispatch board and some search screens
Open / Close Action How the Order Status will impact a Work Order / Quote
Make it open: indicates the status is considered open, meaning the orders, quotes, to do tasks, and appointments are not yet complete
Make it closed: indicates the status is considered closed, meaning the orders, quotes, to do tasks, and appointments are complete
Do not affect
Valid on sales orders: indicates the status can be assigned to sales orders
Valid on work orders: indicates the status can be assigned to work orders
Valid on to do's: indicates the status can be assigned to to do tasks
Valid on quotes: indicates the status can be assigned to quotes
Valid on appointments: indicates the status can be assigned to appointments
Download to tech: indicates work orders or quotes in this status can be downloaded to the
technician's device using ServMan Mobile
Can be set by tech: indicates the status can be set on work orders and quotes by a technician using ServMan Mobile
Automatically start standard sync in ServMan Mobile: when a technician changes an order or quote to this status in ServMan Mobile, a standard will automatically be initiated
Technician only status: indicates the status is to indicate the technician's status; technician statuses are applicable only to the technician that set the status and only on the day the status was set
Log time: indicates that time should be logged when an order, quote, to do task, or appointment is set to this status; time can be logged manually by the user or automatically by calculating the time between previous status changes
Log time without prompting: indicates time logging will happen automatically without prompting the user; only applicable if log time is checked; the stating time status and labor item must be set for automated time logging to work properly
Start time status: indicates the status that used be used to calculate the amount of time to log; for example, if you wanted to log the time a technician spent on site, you would set the start time status to Onsite or similar and have it log automatically when the order is set to TechComplete or similar status
Labor item number: indicates the labor item that automated time logs will use
Overrides technician status: overrides a technician status
In the ServMan Back Office Application go to Tasks à System Procedures à ServMan Mobile à Servman Mobile Settings to setup how Mobile will operate (i.e. How Many Days' worth of Orders/Quotes can the User see, Enabling the Time Clock etc.)
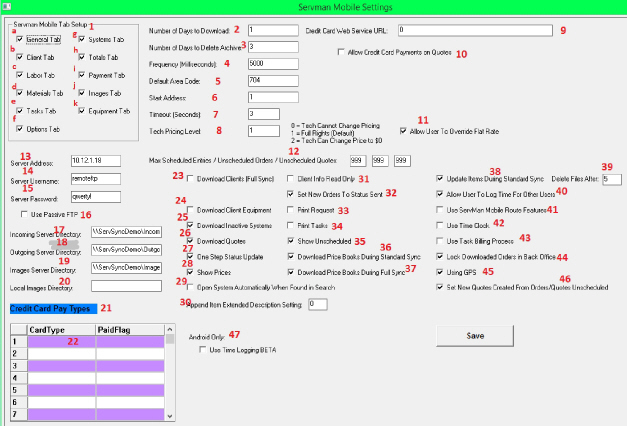
Servman Mobile Tab Setup Checking and Unchecking Boxes Determines which Tabs will appear on the Mobile Device
General Tab Basic Order Information (Order No, Status, Request etc.)
Client Tab Client/Contact Tab (Name, Address, Contact Phone etc.)
Labor Tab Windows Mobile Only Screen for Labor Item Entry
Materials Tab Windows Mobile = Screen for Stock/Non-Stock Item Entry; Android = Order Detail Screen
Tasks Tab Screen for Task Codes
Options Tab -- Windows Mobile Only
Systems Tab Screen for Client System Information/Entry
Totals Tab Screen Showing Order Totals
Payment Tab Screen Showing Payment Information/Entry
Images Tab Windows Mobile = Images Tab; Android = Documents Tab
Equipment Tab -- Windows Mobile Only
Number of Days to Download 0 = Only the Current Days Orders, 1 = Current Day and the Following Day etc.
Number of Days to Delete Archive Number of days to keep archive files on local server and on FTP server
Frequency (milliseconds) Frequency, in milliseconds, at which sync server checks for incoming data
5. Default Area Code Area code used for Account History Requests if no area code is supplied by technician in Servman Mobile
Start Address If set to 1, the start address for mobile application driving directions is the home office. If set to 2, the start address for mobile application driving directions is the employees home address.
Timeout (seconds) Indicates amount of time that should elapse before Servman Mobile tries to reestablish a connection on the mobile device during a synchronization. This is designed to make sure a connection to the internet is present during a synchronization
Tech Pricing Level Security attribute for pricing level of material items. Set to 1 for full rights, set to 2 if technician can only change material price to 0
Credit Card Web Service URL URL for ServMan Web Service for Processing Credit Card Payments in the Field (Requires Merchant Account Setup)
10. Allow Credit Card Payments on Quotes If set to 1, allows User to Process Credit Card Payments on
Quotes
Allow User to Override Flat Rate If set to 1, allows user to override item description and pricing on flat rate items prior to saving, and allows user to modify the description and price on existing flat rate items
Max Scheduled Entries / Unscheduled Orders / Unscheduled Quotes Maximum number of
scheduled entries to deliver to ServMan Mobile (Quotes and Orders) / Maximum number of unscheduled quotes to deliver to ServMan Mobile / Maximum number of unscheduled orders to deliver to ServMan Mobile
Server Address Windows Mobile ONLY -- FTP site IP address used by synchronization server
Server UserName Windows Mobile ONLY -- Username for FTP site. User must have full write / read
rights to the ftp directories detailed below
Server Password Windows Mobile ONLY -- Password for username being used in SERVER_USERNAME
Use Passive FTP Windows Mobile ONLY -- Check if FTP Server Requires Passive FTP
Incoming Server Directory Windows Mobile ONLY -- Directory on FTP site in which incoming xml files
are saved and archived
Outgoing Server Directory Windows Mobile ONLY -- Directory on FTP site in which outgoing xml files are saved and archived
Images Server Directory Windows Mobile ONLY -- Directory on FTP site in which incoming image files are saved and archived
Local Images Directory Windows Mobile ONLY -- Directory on Local Server in which incoming image files are saved
Credit Card Pay Types If Credit Card Payments are taken using Mobile they are configured here
Card Type / Paid Flag Specification of each Credit Card Type configured in the Back Office ServMan
Application Settings and Defaults
Download Clients (Full Sync) -- Flag to determine whether clients should be downloaded to Servman mobile during full sync. Set to 1 to download to Servman Mobile, or 0 to exclude clients from full sync
Download Client Equipment --
Download Inactive Systems --
Download Quotes -- Flag to determine whether quotes are being utilized on Servman Mobile. 1 if
quotes should be downloaded during standard syncs, or 0 to exclude quotes
One Step Status Update -- Allows for syncing a status update immediately after setting the status on Servman Mobile. Set to 1 for on, or 0 for off
Show Prices Configuration to turn off all pricing and costing on Servman Mobile so user and customer do not see pricing on Servman Mobile screens. Set to 1 to show pricing (default), 0 to not show pricing, or 2 to hide pricing on the Signature screen only
Open System Automatically When Found in Search -- Allows system records to be opened
automatically when entered and found in the System List search feature
Append Item Extended Description Setting If set to 1, the extended description for items is appended to the item description in item database. If set to 2, only the extended description is present in the item description. If set to anything else, the extended description is not included in the item database
Client Info Read Only Sets all of the client information on Servman Mobile to read only so the user cannot change any client information within Servman Mobile
Set New Orders to Status Sent If set to 1, will use the order status sent up by Servman Mobile for new orders, if there is one sent up. If no status is sent with Order from ServMan Mobile, the order is set to the “Hold” status
Print Request If set to 1, will print the order request on the receipt print out
Print Tasks If set to 1, will print all systems attached to the work order and all tasks attached to those
systems
Show Unscheduled Setting to allow user to mark orders as unscheduled. Set to 1 (default) to show Unschedule check box or 0 to not allow for setting orders to Unschedule
Download Price Books During Standard Sync If set to 1, Sync Server downloads price books with orders during Standard syncs
Download Price Books During Full Sync If set to 0, Sync Server does not publish price books to Full Sync file
Update Items During Standard Sync Allows for items to be dynamically downloaded to Servman Mobile when modified in Servman
Delete Files After Amount of days to keep item update xml files on the sync server before they are deleted
Allow User to Log Time for Other Users Allows for user to changes the employee ID for any time detail of labor items in Servman Mobile. If set to 0, the user cannot modify employee ID for labor items
Use ServMan Mobile Route Features If set to 1, will enable ServMan Mobile route features. Will send full order back to ServMan during a status sync, and await a response from the Sync Server to update the statuses of all other orders in list to see if any were completed by other users
Use Time Clock Allows user to clock-in / clock-out to ServMan Time Clock Module
Use Task Billing Process Enables 'Update Task Items' menu option to update material and labor
items associated with tasks completed on order
Lock Downloaded Orders in Back Office This will Lock ServMan Orders/Quotes in the Back Office Application to prevent Back Office Users from making Changes to the Order while it is on the Mobile Device
Using GPS Flag to determine whether GPS is being utilized within ServMan and if GPS options should be turned on within ServMan Mobile. Set to 1 if GPS is being utilized, otherwise set to 0
Set New Quotes Created From Orders/Quotes Unscheduled
Android Only: Use Time Logging BETA Will enable the Time Logging feature
In the ServMan Back Office Application go to Tasks à System Procedures à ServMan Mobile à Servman Mobile Messages to setup PrePopulated Messages to be sent when the Mobile User uses the Android Print and Email Advanced function in ServMan Mobile Android
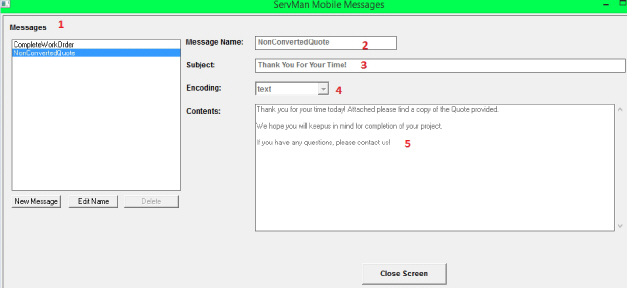
Messages The list of Mobile Messages
Message Name -- The Message Name that the Mobile User will see
Subject The Email Subject
Encoding The Email Text Format of Text for Plain Text or Text/HTML for Text/HTML
Contents The Email Message Sent
Employee Settings
For Each Employee Using ServMan Mobile the following MUST be Set on the Employee File (Master Files à Miscellaneous à Employee)
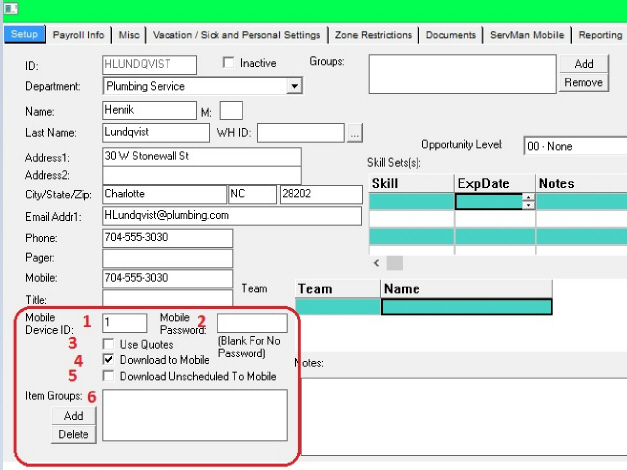
Mobile Device ID - Mobile Device ID Assigned to the Employee. Numeric and based on the Number of ServMan Mobile Licenses purchased. Ex. if you have 5 Licenses, your first Employee would receive a 1 here, the next Employee a 2 etc. until you have reached 5
Mobile Password - Mobile Password Assigned to the Employee - Not Required, but if set can be any combination of characters (alpha, numeric and/or symbols) up to 10, and is not case sensitive.
Use Quotes - If box is checked, then this employee can see Quotes on his device where he is marked as the Sales Rep (even if the quote is not scheduled).
Download to Mobile - If you have this box checked, then your employee ID appears in the list of employees that you can log time to on mobile. For example: There is a security setting that allows you to log time or not to other users. If you have the rights to do that, then the choices you have of employees to log time to are limited to employees that have this box checked on their employee file.
Download Unscheduled to Mobile - This setting is for Windows Mobile only. On Android, the way to control whether or not you see unscheduled orders is based on if you are set as the lead tech, and the global setting (or employee-level override setting) of how many unscheduled orders/quotes you can see.
Item Groups If set on ServMan Item File, Full Sync will Download ONLY the Items in the Specified Groups (Setup on the Item File on Page2 in the Groups section)
The Settings on this Tab are used to Allow Credit Card Processing and to Override certain Global ServMan Mobile Settings. Leave them As-Is unless otherwise instructed by ServMan Support or your ServMan Project Manager
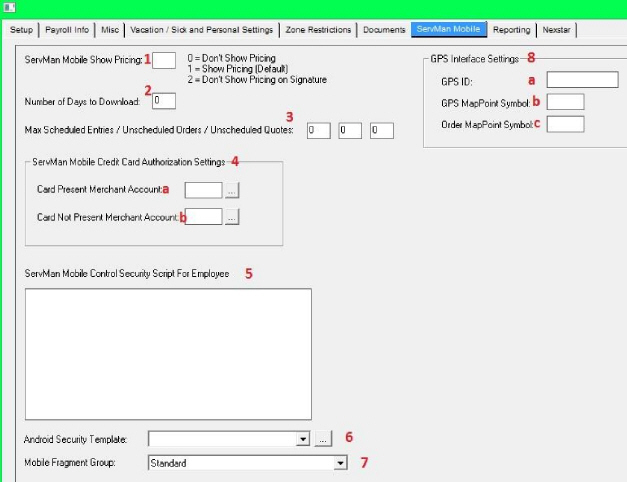
ServMan Mobile Show Pricing Overrides Global ServMan Mobile Show Pricing Setting
Number of Days to Download Overrides Global ServMan Mobile Number of Days to Download
Setting
Max Scheduled Entries / Unscheduled Orders / Unscheduled Quotes Overrides Global ServMan Max Scheduled Entries / Unscheduled Orders / Unscheduled Quotes Setting
ServMan Mobile Credit Card Authorization Settings These Settings MUST be set for all Employees using ServMan Mobile who will Process Credit Cards in the Field
Card Present Merchant Account Merchant Account for Swiping Credit Cards
Card NOT Present Merchant Account Merchant Account for Entering Credit Card Information
Manually
ServMan Mobile Control Security Script for Employee Setup by ServMan Development
Android Only: Android Security Template Security Template for Employee
Android Only: Mobile Fragment Group Mobile Fragment Group for Employee
GPS Interface Settings Used ONLY with Optional ServMan GPS Integration Module
GPS ID ServMan GPS Integration Module GPS ID
GPS MapPoint Symbol ServMan GPS Integration Module Employee Symbol in MapPoint
Order MapPoint Symbol -- ServMan GPS Integration Module Order Symbol in MapPoint
Setting Up Your Android Device
Follow the below steps to setup and configure your Android Device for use with ServMan Mobile Android
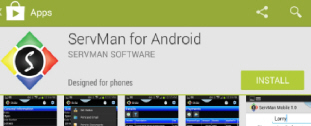
* Download the ServMan Mobile Android Application from the Google Play Store
Search for the ServMan for Android Application in the Google Play Store
Once you have found the application click on the Install Button to begin the installation
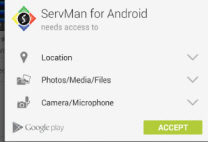
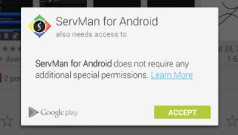
Accept the Permissions Request by clicking the Accept button
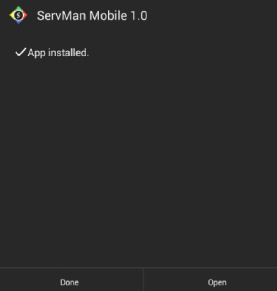
The application will begin installing on the Android Device
When the installation is complete, you will see the following screen
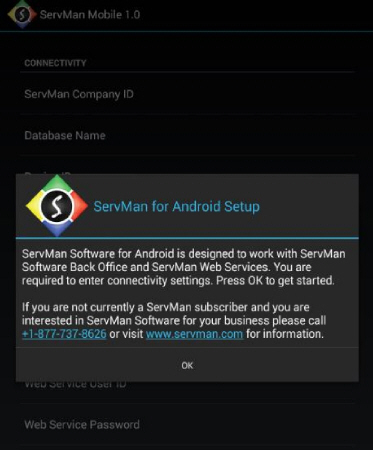
At this point you will enter the Connection information for the device as provided by ServMan Support
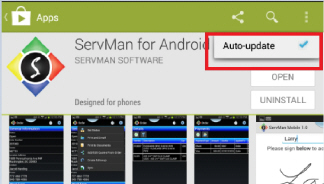
***Please Note: It is CRITICAL that you Disable the Auto-Update Feature***
This is done from the Google Play Store
Search for the ServMan for Android Application and while you are on the ServMan for Android screen find your Google Play Store Menu button
Remove the Check that appears next to the Auto-Update option
* Enter the Connection Information for the Device as provided by ServMan Support
From the Settings à Connectivity Screen Enter:
ServMan Company ID = Company ID to which the user is trying to Sync (ex. 01)
Database Name = The SQL Database Name that corresponds to the Company to which the user is trying to Sync (ex. Servman01)
Device ID = The Mobile ID that corresponds to the Employee who is using the Device
Device Password = The Password that corresponds to the Mobile ID that corresponds to the Employee who is
using the Device
Timeout in milliseconds for long processes = Leave As-Is
Timeout in milliseconds for short processes = Leave As-Is
URL for web service = The URL for the ServMan Web Service (ex.
https://xxx.xxx.xxx.xxx/servmanwebservice/servmansyncserver.asmx ) Web Service User ID = The User ID that corresponds to the Web Service User created in the Web Service Module of the ServMan Application
Web Service Password = The Password that corresponds to the Web Service User created in the Web Service Module of the ServMan Application This is case sensitive
* Perform a Configuration Sync
A Configuration Sync will Download all of the ServMan Mobile Settings (Security Templates and Custom Screens [Fragments]) to the Android Device
Go to Advanced Options à Configuration Sync
* Perform a Full Sync
A Full Sync will Download all of the Items with the Download to Mobile box checked on Page2 of the Item File to the Android Device
Go to Advanced Options à Full Sync
* Perform a Standard Sync
A Standard Sync will Download all of the Orders/Quotes for that Employee to the Android Device
Go to Advanced Options à Standard Sync or Press the Sync button on the ServMan Mobile Android Home Screen
Assigning Your Android Device to a Different Employee
If you are assigning an Android Device to a Different Employee you will need to:
Go to Settings à Connectivity and Change the Device ID to the Corresponding Employee
Perform a Clean and Start Over Sync to Wipe the Device and Prevent any Sync'ing of Incorrect
Information by going to Advanced Options à Advanced Options à Clean and Start Over Sync
Perform a Configuration Sync by going to Advanced Options à Configuration Sync
Perform a Full Sync by going to Advanced Options à Full Sync
Perform a Standard Sync by going to Advanced Options à Standard Sync or Press the Sync button on
Performing ServMan Mobile Android Updates
When there is an update available for the ServMan Mobile Android Software there are 3 ways to perform the update as outlined below. Release Notes regarding the application can be found: http://www.servman.com/android/version.htm
Method 1: Obtain Update from the GooglePlay Store
This method pulls the current release of ServMan Mobile Android from the Google Play Store. It will NOT erase your Connectivity Settings.
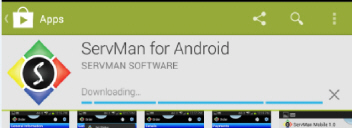
Go to the GooglePlay Store and search for the ServMan Mobile Android Application. If an update is available you will see the option to select Update:
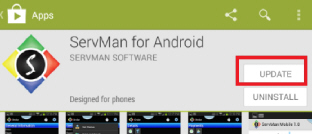
Click on Update and Accept the message
You will then see the update Downloading
And then Installing
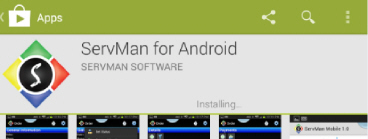
Once the Installation is complete you will see
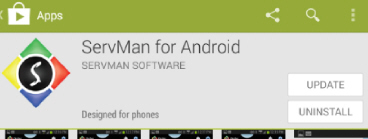
You can then verify that the current / correct version has been installed on the Android Device by going to Settings à Configuration à Version in the ServMan Mobile Android Application. Then look for the correct Build ID.
Method 2: Obtain Update from within the ServMan Mobile Android Application
This method pulls the current release of ServMan Mobile Android from the ServMan Software download web url. It will NOT erase your Connectivity Settings.
In order for this method of updating the ServMan Mobile Android Application to work you must be sure to do the following on the Android Device:
Go to the Device Settings à Security à and make sure the “Unknown Sources Allow installation of apps from sources other than Play Store” box is checked
In the ServMan Mobile Android Application go to Advanced Options à Advanced Options à
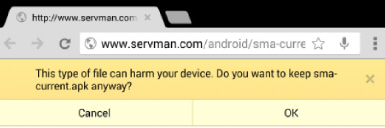
Download Current Release and say Yes to the prompt. You may see a message in your web browser

Say OK to this message
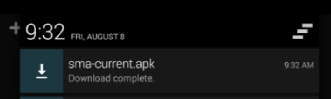
The .apk file will download to the Android Device's Downloads folder. Browse to that folder and touch the file named sma-current.apk to begin the installation. If you have notifications enabled for your web browser you will see a notification when the file has downloaded and you can touch the file from the notification center to begin the installation
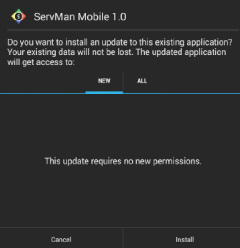
You will see a box asking if you want to install the update to the existing application. Select Install
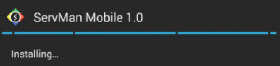
And then you will see a screen showing that the application is installing
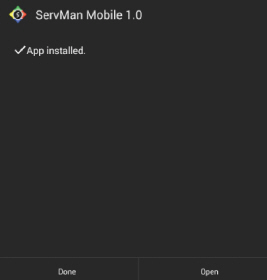
When complete you will see

If you select Open, you are brought back to the ServMan Mobile Android Home Screen. Once in the application, you can then verify that the current / correct version has been installed on the Android Device by going to Settings à Configuration à Version in the ServMan Mobile Android Application. Then look for the correct Build ID.
Method 3: Obtain Update from your Company Specific Download Location
This method pulls the current release of ServMan Mobile Android from a Company Specific / Maintained download web url. This method would allow your Company IT Administrator to maintain which version of the ServMan Mobile Android Application is available for download. It will NOT erase your Connectivity Settings. Please Contact ServMan Support for Pricing / Setup Information if you are interested in this option.
In order for this method of updating the ServMan Mobile Android Application to work you must be sure to do the following on the Android Device:
Go to the Device Settings à Security à and make sure the “Unknown Sources Allow installation of apps from sources other than Play Store” box is checked
Send an Email to the Mobile Users (This email account must be on the Android Mobile Device) with a link to the download web url
Upon clicking that download web url their web browser will open and they may see a message like the below screenshot. Click OK to allow the download
The .apk file will download to the Android Device's Downloads folder. Browse to that folder and touch the file named sma-current.apk to begin the installation. If you have notifications enabled for your web browser you will see a notification when the file has downloaded and you can touch the file from the notification center to begin the installation

You will see a box asking if you want to install the update to the existing application. Select Install

And then you will see a screen showing that the application is installing

When complete you will see
If you select Open, you are brought back to the ServMan Mobile Android Home Screen. Once in the application, you can then verify that the current / correct version has been installed on the Android Device by going to Settings à Configuration à Version in the ServMan Mobile Android Application. Then look for the correct Build ID.
Performing a ServMan Mobile Android Application Version Roll-Back
If for some reason you need to roll back to a previous release of the ServMan Mobile Android Software please contact ServMan Support to obtain the correct .APK file and follow the below instructions:
***Please Note: Performing a roll back to a previous release will ERASE your Connectivity Settings and they will need to be re-entered. This should only be done after discussion with ServMan Support***
Obtain the correct .APK file from ServMan Support
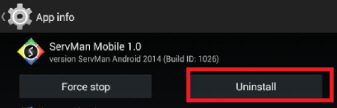
On the Android Device go to Settings à Applications and find ServMan Mobile Android
Uninstall the Application by clicking on Uninstall
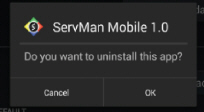
Say OK to the prompt
After the application has been Uninstalled, Plug the Android Device into a Computer with a USB cable
Browse to the Android Device using Windows Explorer and place the ServMan Support provided sma-
current.apk file into the Android Device Download folder
5. Browse to the sma-current.apk file on the Android Device from the Android Device and touch it to begin the installation
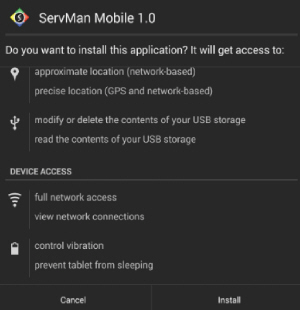
You will see a window asking if you want to Install the Application. If you do not see the option to select Install at the bottom right, scroll down through the access granted until you reach the end and then select Install
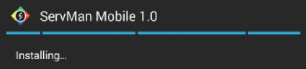
You will see a window showing the application is installing
When complete you will see:
d. Select Open to open the ServMan Mobile Android Application and re-enter your Connectivity Information
Once in the application, you can then verify that the current / correct version has been installed on the Android Device by going to Settings à Configuration à Version in the ServMan Mobile Android Application. Then look for the correct Build ID.
The following is an overview of the ServMan Mobile Android Screens and their functions. Please note the screenshots are subject to change as new versions of the application are released.

* Configuration = Settings such as:
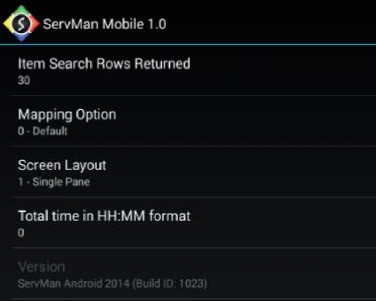
Item Search Rows Returned
30 Default Number of Rows Returned from Item Search Screen Customizable to your desired Number
or
Mapping Options
0 Default (Google Maps)
or
1 Waze for the default Mapping Application used
or
0 Default (3 Pane View) This option is best on Tablets

or
1 Single Pane (1 Pane View) This option can be used well on all devices
and
Total Time in HH:MM Format
0 Decimal Time (ex. 0.75 = 45 minutes)
or
1 HH:MM Format
* Connectivity = This is where the information specific to each Client's Installation are set to allow ServMan Mobile Android to connect to the ServMan Web Service and the ServMan Application Database
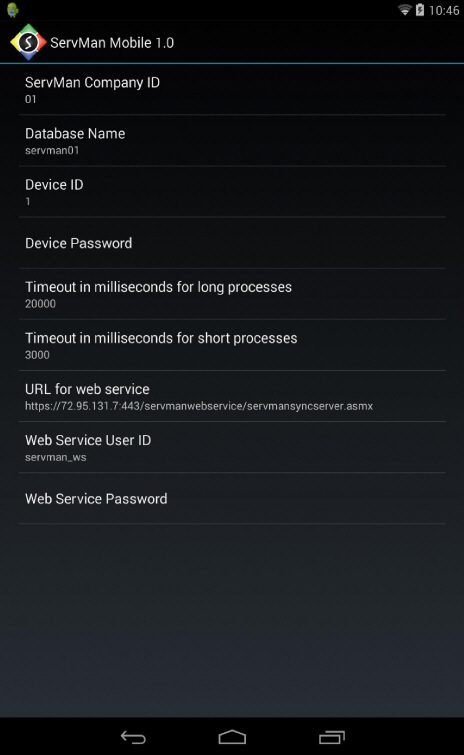
ServMan Company ID = Company ID to which the user is trying to Sync (ex. 01)
Database Name = The SQL Database Name that corresponds to the Company to which the user is trying to Sync (ex. Servman01)
Device ID = The Mobile ID that corresponds to the Employee who is using the Device
Device Password = The Password that corresponds to the Mobile ID that corresponds to the Employee who is
who is using the Device if applicable
Timeout in milliseconds for long processes = Leave As-Is
Timeout in milliseconds for short processes = Leave As-Is
URL for web service = The URL for the ServMan Web Service (ex.
https://xxx.xxx.xxx.xxx/servmanwebservice/servmansyncserver.asmx ) Web Service User ID = The User ID that corresponds to the Web Service User created in the Web Service Module of the ServMan Application
Web Service Password = The Password that corresponds to the Web Service User created in the Web Service Module of the ServMan Application This is case sensitive
* Secure Application = This screen allows a passcode to be set on the individual mobile device that will then be required to open the ServMan Mobile Android application
* Sync Information = This screen shows the devices last Sync information
* System Settings = This screen shows the system settings from the SyncServerSettings.ini
* Troubleshooting = This is where the password is set to enable ADMIN level debugging tools Used by ServMan Development/Support ONLY
Device Configuration Advanced Options
Advanced Options is where the different Synchronization options are located

* Ping Web Service = This option allows the device to ping the web service. Successful Pings will result in:
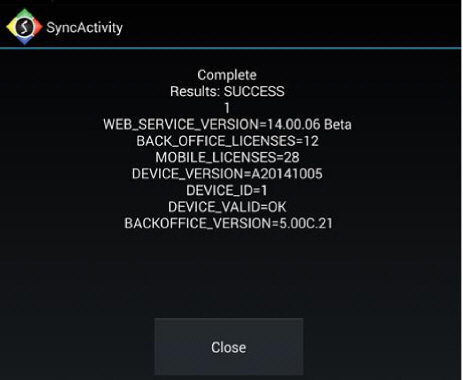
WEB_SERVICE_VERSION = The Version of the ServMan Web Service installed on the Client Web Server
BACK_OFFICE_LICENSES = The Number of ServMan User Licenses
MOBILE_LICENSES = The Number of ServMan Mobile User Licenses
DEVICE_VERSION = Version of ServMan Mobile Android Installed
DEVICE_ID = The Mobile ID that corresponds to the Employee who is trying to Sync
DEVICE_VALID = OK means that the Mobile ID is Valid
BACKOFFICE_VERSION = The Version of ServMan Installed
* Configuration Sync = This Sync brings down all of the ServMan Mobile Configuration Information such as Security Templates, Fragments and Schema and Credit Card Processing Information
* Full Sync = This Sync will obtain the items that are set to “Download to Mobile” in the Back Office
* Standard Sync = This Sync will obtain the Mobile Users current Orders/Quotes/Appointments
* Download Current Release = This will download the Current Release of ServMan Mobile Android Use
when notified by ServMan Support
* Error Log =
* Rebuild Database Indexes = Used by ServMan Support/Development ONLY
* Clean Start Over Sync = This option allows you to ensure that you are not pushing any erroneous information back to the database and pulls down all Configuration Settings for that specified Mobile ID. When prompted to “Wipe Data for clean reset?” say Yes. This will remove all Orders/Quotes/Appointments but leave the Connectivity Information as is.
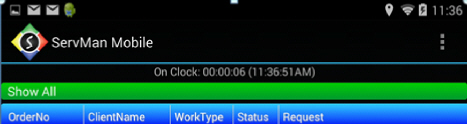
ServMan Mobile Android Screens Home Screen
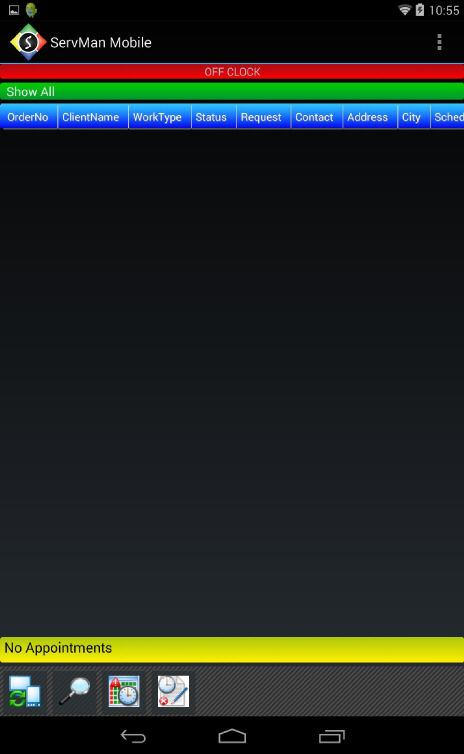
This is the ServMan Mobile Android Home Screen. All Downloaded Orders, Quotes and Appointments are visible from this screen
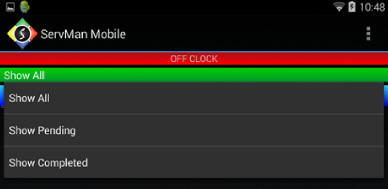
Touching the Green “Show All” bar allows you to select:
Show All = All Downloaded Orders
Show Pending = All Downloaded Orders that are NOT in a Complete Order Status
Show Complete = All Downloaded Orders that are in a Complete Order Status
When there are Orders/Quotes or Appointments for the Mobile User Downloaded to the Device you will see 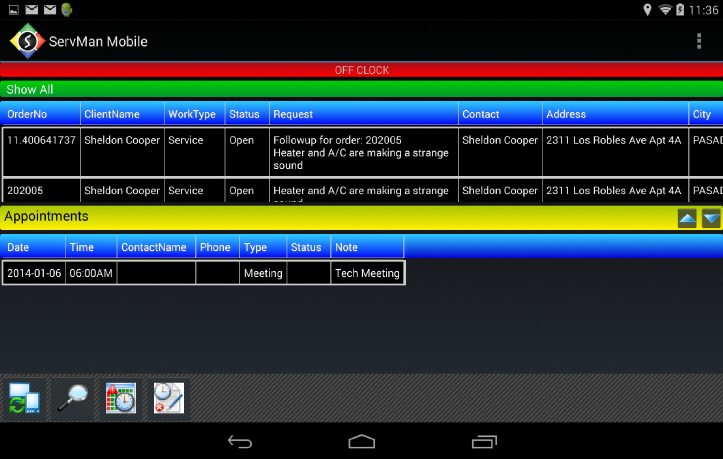
You can double-tap the column headers to sort the records ascending or descending by that column, otherwise the records will appear in order by scheduled date and time
 This is the Sync button. It will perform a Standard Sync. Once Daily, it will Perform a Configuration Sync
![]() This is the Client Search button. It allows the mobile user to search for a Client record
This is the Client Search button. It allows the mobile user to search for a Client record
![]() This is the Time Clock button. It allows the mobile user to enter Time Clock entries
This is the Time Clock button. It allows the mobile user to enter Time Clock entries
 This is the Log Time button. It allows the mobile user to perform Time Logging
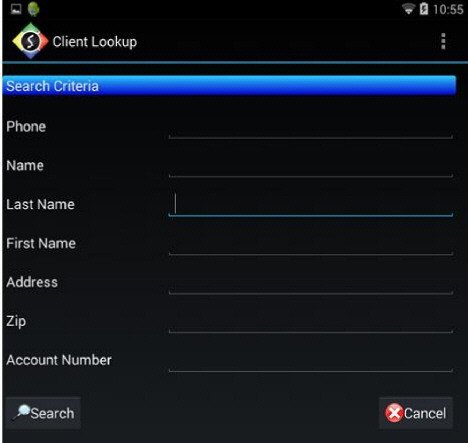
ServMan Mobile Android Screens Client Lookup Screen
The Client Lookup screen allows the mobile user to search for Client records by the Client Phone, Name, Last Name, First Name, Address, Zip or ServMan Account Number.
It is accessible from the ServMan Mobile Home Screen by pressing![]()
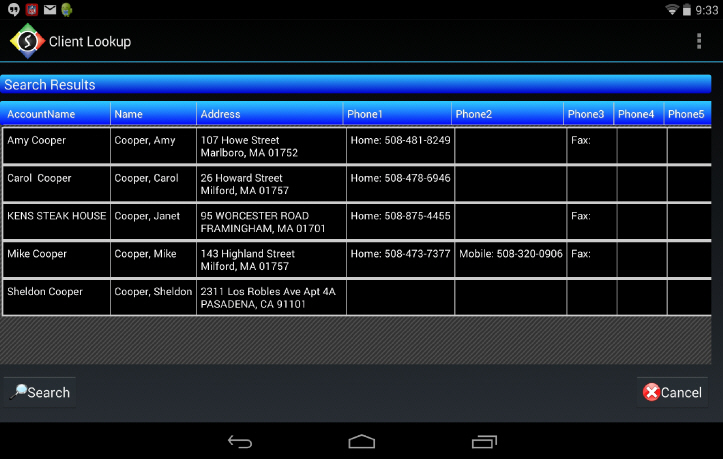
The results are returned in grid format
If you Long press on the Client Record a menu will appear that allows you to:
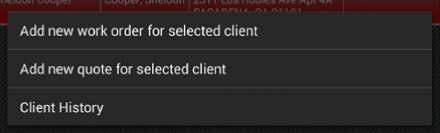
Add new work order for selected client = Create a New Work Order
Add new quote for selected client = Create a New Quote
Client History = View the Client History
ServMan Mobile Android Screens Time Clock
The Time Clock screen allows the mobile user to punch in and out of the ServMan Time Clock Module
It is accessible from the ServMan Mobile Home Screen by pressing![]()
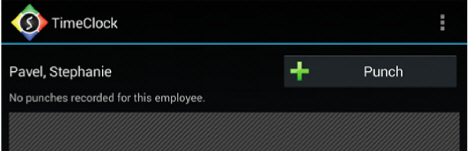
The Punch button Clocks the mobile user in or out of the ServMan Time Clock
From the top of the ServMan Mobile Home Screen the mobile user can see at the top if they are On or Off the Clock
Or Off the Clock

If the mobile user returns to the Time Clock screen after entering a Punch they will see the detail line
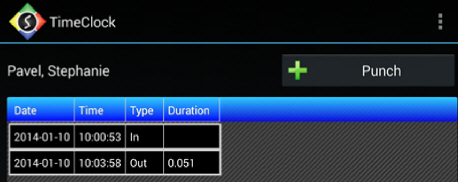
***Note: These entries are NOT editable from the Mobile Device
ServMan Mobile Android Screens Time Logging
The Time Logging screen allows the mobile user to log their time to Orders using Labor Items and will appear on the ServMan Back Office Schedule Board Log Time/Expenses screen.
It is accessible from the ServMan Mobile Home Screen by pressing ![]()
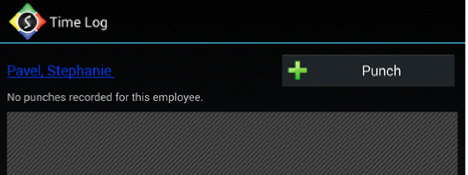
The Punch button creates a Time Log Entry
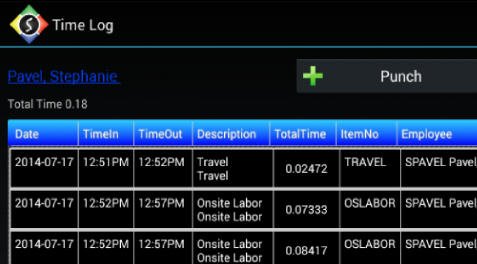
This entry is editable Note the Total Time is shown above the Time Entries. This can be shown in default decimal time or in HH:MM format under the Settings à Configuration screen.

Order = The Order Number to which the Time is Logged
Item Number = The Labor Item Number
Description = The Labor Item Description
Employee = The Employee to which the entry is associated
Date = The Date of the entry
Time Start / Time Stop = The Start and Stop Time of the entry
Total Time = The Total Time Logged
Department = The Department to which the Time is Logged
ServMan Mobile Android Screens Appointment Screen
The Appointment screen allows the mobile user to see detail regarding any Appointments on their schedule and is accessible by pressing on an Appointment from the ServMan Mobile Home Screen
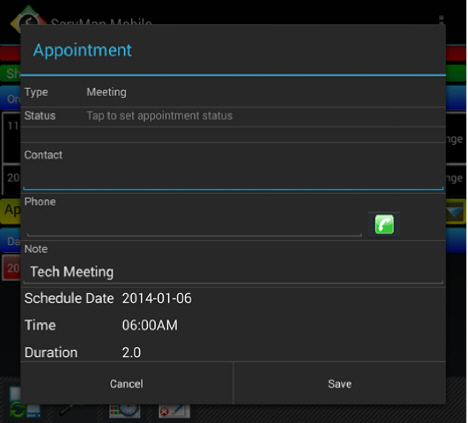
Type = The Appointment Type
Status = The Appointment Status (Configured in the Back Office Application Order Status Codes)
Contact = The Contact for the Appointment Record
Phone = The Phone Number for the Contact on the Appointment Record
Note = Notes associated with the Appointment Record
Scheduled Date = The Scheduled Date for the Appointment Record
Time = The Scheduled Time for the Appointment Record
Duration = The Duration of the Appointment Record
ServMan Mobile Android Screens Order/Quote Screens
The Order/Quote screen allows the mobile user to see detail regarding any Orders or Quotes on their schedule and is accessible by pressing on the Order/Quote from the ServMan Mobile Home Screen
***Note for the purposes of this documentation the Single Pane view will be used in all Screenshots***
 This button will open the Order/Quote General Information screen
 This button will open the Order/Quote Detail Screen
 This button will open the Order/Quote Notes Screen
 This button will open the Order/Quote Systems Screen
 This button will open the Client History Screen
 This button will open the Tasks Screen
 This button will open the Order/Quote Documents Screen
 This button will open the Order/Quote Signature Screen
 This button will open the Order/Quote Payment Screen
 This button will open the Order/Quote Contact Screen
![]() This button will open the Order/Quote Total Due Screen
This button will open the Order/Quote Total Due Screen
 This button will open the Map Screen
At the top of ALL Order/Quote Screens you will see:
![]()
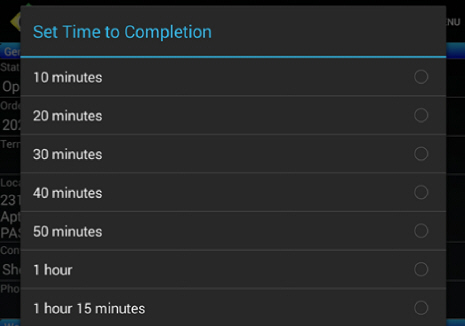
Set Time to Completion = = Allows the Mobile User to specify their estimated time to complete the Order/Quote based off of the CURRENT Time. This will be reflected in the Schedule Board Entry in the Back Office ServMan Application
![]()
Menu = This is the Order/Quote Menu which has different options based on whether or not the Mobile User is in an Order or a Quote
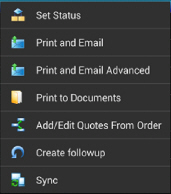
Order Menu
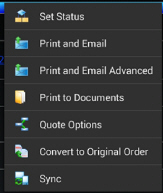
Quote Menu
Set Status = Allows the Mobile User to Set their Status. The Current Status, as well as the Time Spent in that Status will appear at the top of each ServMan Mobile Order Screen

Only Order Statuses configured for Technician Use will appear here
Print and Email = Allows the Mobile User to Email a Copy of the Back Office Work Order or Quote Print Format to the Client (Email is sent from the Email address specified in the Android Web Service Setup)
Print and Email Advanced = Allows the Mobile User to Email a Copy of the Back Office Work Order or Quote Print Format to the Client as well as the Order/Quote Signature Page using a pre-populated ServMan Mobile Message created in the Back Office ServMan Application (Email is sent from the Email address specified in the Android Web Service Setup)
Print to Documents = Allows the Mobile User to Print a Copy of the Back Office Work Order or Quote Print Format which is then added to the Order/Quote Documents
Add/Edit Quotes from Order = Allows the Mobile User to Create a Quote from the Work Order
Quote Options = Allows the Mobile User to Create Quote Options
Convert to Original Order = Allows the Mobile User to Convert Line Items from the Quote to the ORIGINAL Work Order for Completion
Create Follow Up = Allows the Mobile User to Create a Follow Up Work Order
Sync = Allows the Mobile User to Sync the information from their Mobile Device to the Back Office Application with a Standard Sync
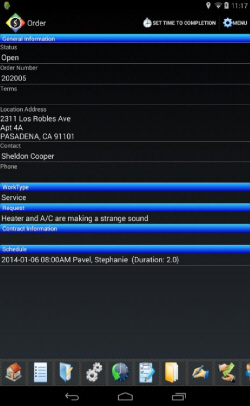
ServMan Mobile Android Screens Order/Quote General Information Screen
The Order/Quote General Information screen allows the mobile user to see the basic Order/Quote information and is accessible by pressing on the

Button while in an Order/Quote

Status = The Current Order Status
Order Number = ServMan Order/Quote Number
Terms = Order/Quote Terms
Location Address = Order/Quote Service Address
Contact = Order/Quote Contact Name
Phone = Order/Quote Contact Phone Number
WorkType = ServMan WorkType for the Order/Quote
Request = Request for the Order/Quote
Contract Information = If the Client has an Active Contract this will display the same information as the PIM Window in the ServMan Back Office Application
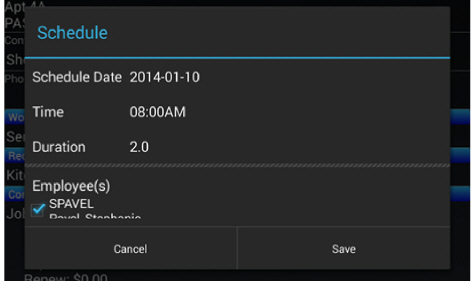
Schedule = The Order/Quote Schedule Information which when pressed opens a screen to allow the mobile user to edit this information and re-schedule the Order/Quote
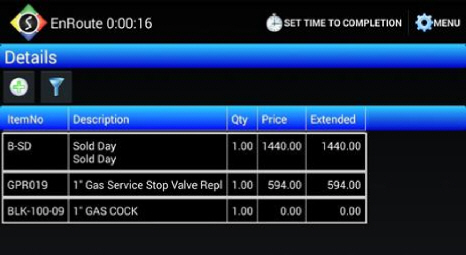
ServMan Mobile Android Screens Order/Quote Detail Screen
The Order/Quote Detail screen allows the mobile user to see and enter the item detail for the Order/Quote and is accessible by pressing on the

Button while in an Order/Quote
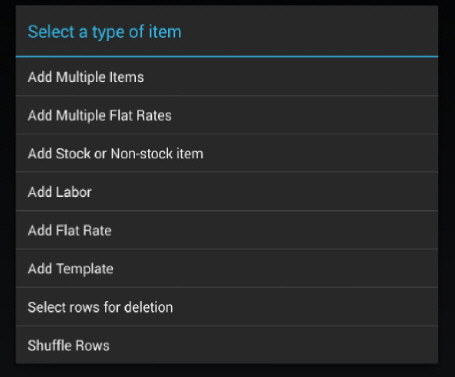
Clicking on the Plus button allows the mobile user to add item detail to the Order/Quote

Add Multiple Items = Allows the mobile user to add multiple Stock or Non-Stock Items at a time from the Item Search Screen
Add Multiple Flat Rates = Allows the mobile user to add multiple Flat Rate Items at a time from the Item Search Screen
Add Stock or Non-Stock Item = Allows the mobile user to add a Stock or Non-Stock Item from the Item Search Screen
Add Labor = Allows the mobile user to add a Labor Item from the Item Search Screen
Add Flat Rate = Allows the mobile user to add a Flat Rate Item from the Item Search Screen
Add Template = Allows the mobile user to add a Template Item from the Item Search Screen
If the mobile user long presses on the Order/Quote Detail screen they will access a menu with the following options:
Add Multiple Items = Allows the mobile user to add multiple Stock or Non-Stock Items at a time
Add Multiple Flat Rates = Allows the mobile user to add multiple Flat Rate Items at a time
Add Stock or Non-Stock Item = Allows the mobile user to add a Stock or Non-Stock Item
Add Labor = Allows the mobile user to add a Labor Item
Add Flat Rate = Allows the mobile user to add a Flat Rate Item
Add Template = Allows the mobile user to add a Template Item
Delete selected row = Delete the selected Order/Quote Detail Line
Select rows for deletion = Select multiple Order/Quote Detail Lines to delete
Shuffle Rows = Allows the mobile user to change the order in which the Order/Quote Detail items are displayed by using the up and down arrows
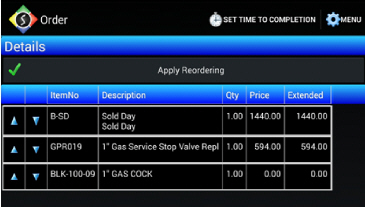
Selecting “Apply Reordering” will save the changes
After selecting the Item Type from the Order/Quote Detail screen the mobile user will see the Item Search Screen
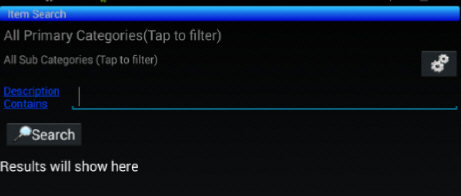
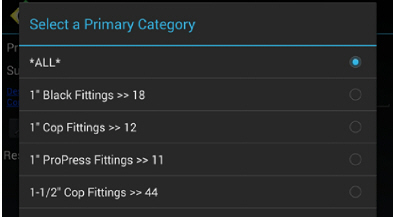
Primary/Sub Category = All Item Primary/Sub Categories by default. Selecting Tap to filter will open a menu allowing selection of a specific ServMan Primary/Sub Category
Mobile Users can search for an Item either by using the Item Description or the Item Number
Touch “Description Contains” to toggle between the two

Mobile Users can associate an Item (or Items) with a Client System Record by pressing the![]() button. This will bring up a listing of the Client Systems from which the Mobile User can then select.
button. This will bring up a listing of the Client Systems from which the Mobile User can then select.
Selecting Search will return the results in grid format
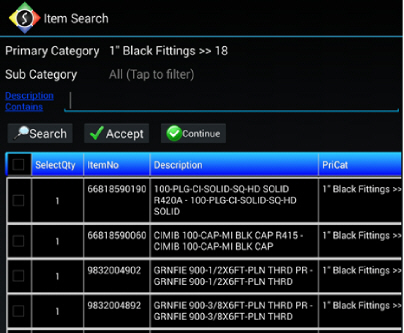
The mobile user can then select the item they want to add to the Order/Quote Detail (selected items will have a check next to them) and then select Accept
Searching for Flat Rate Items will return the Flat Rate Item Results Grid which contains information such as: Flat Rate Pricing, Materials Costs, Repair Time etc.

Adding Multiple Flat Rate Items at a time will return a similar grid where Flat Rate Item Pricing can be selected

Note: Selection of Multiple Flat Rate Items will NOT load any associated Components.
Based on the type of item selected, a different screen will appear to allow the user to edit the detail (apply quantities, pricing etc.)
For ALL Item Types the  will function like the ServMan Back Office Picker Button
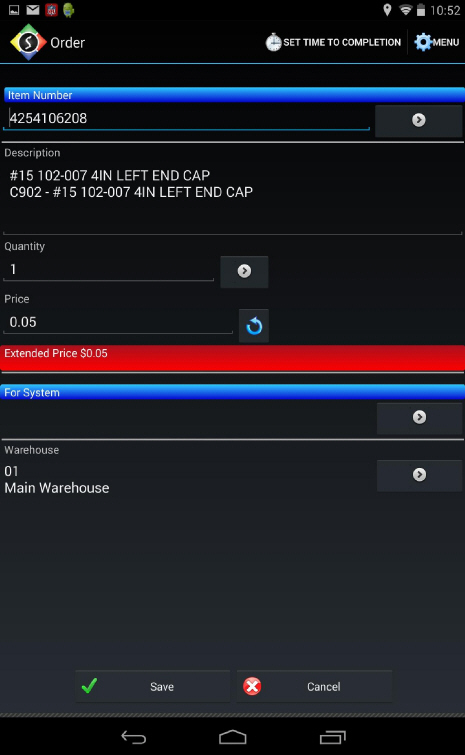
Item Number = The Item Number
Description = The Item Description
Quantity = The Item Quantity
Price = The Item Price
Extended Price = Quantity x Price
For System = Which System this Item should be applied to
Warehouse = The Warehouse stocking the Item
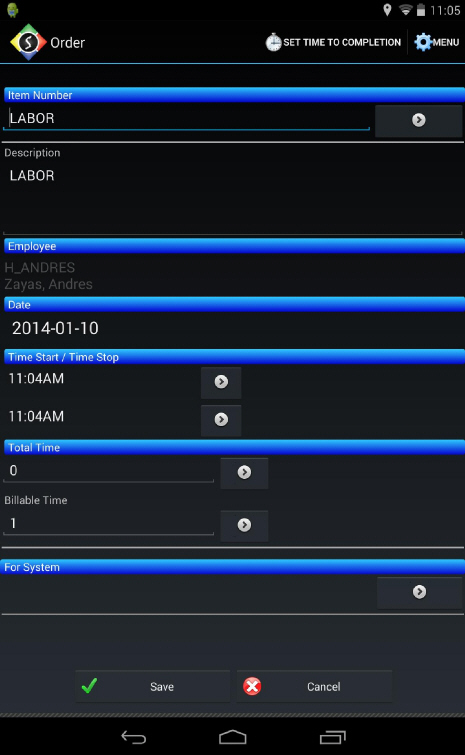
Item Number = The Item Number
Description = The Item Description
Employee = The Employee who is logging the Labor Item
Date = The Date the Labor Item was logged Will Default to Today's Date
Time Start / Time Stop = Allows the mobile user to select the Start and Stop time for the Labor Item
Total Time = The Total Logged Time for the Labor Item
Billable Time = The Total Billable Time for the Labor Item
For System = Which System this Item should be applied to
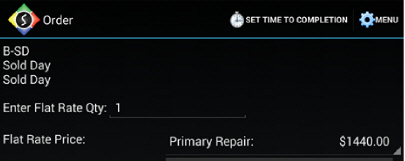
Enter Flat Rate Qty = The Flat Rate Item Quantity
Flat Rate Price = Where the Flat Rate Item Price can be selected. Touch the Price to see other Pricing Options
Select Components = If Checked Flat Rate Item Components will appear for Selection

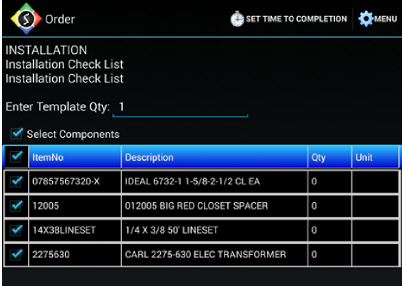
Enter Template Qty = Template Item Quantity is Specified
Select Components = Select Template Item Components to be used
ServMan Mobile Android Screens Order/Quote Notes Screen
The Order/Quote Notes screen allows the mobile user to add a Note to the Order/Quote that can be viewed by the back office on the Notes tab. It is accessible by pressing on the ![]() button while in an Order/Quote
button while in an Order/Quote
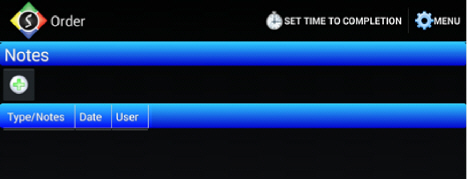
Press the Plus button to Add a Note
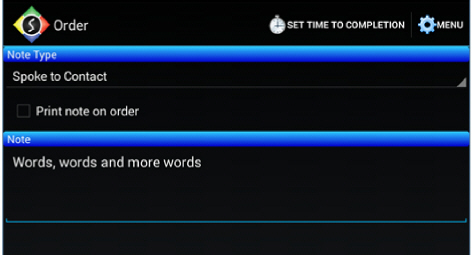
Note Type = Type of Note May be left blank
Print Note on Order = Include this Note on the Work Order/Quote Print Format if applicable
Note = The Text of the Note
ServMan Mobile Android Screens Order/Quote Systems Screen
The Order/Quote Systems screen allows the mobile user see the Systems attached to the specific Order. It is accessible by pressing on the

Button while in an Order/Quote
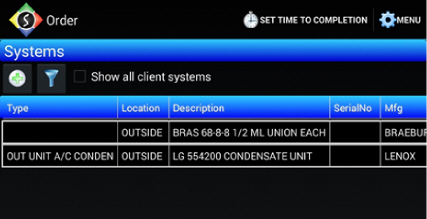
Note: As of Android Mobile 2.0 a check box to view All Client Systems has been added
Pressing the Plus Button allows mobile users to add a System record to the Client File
A Long press on this screen opens a menu with the options to:
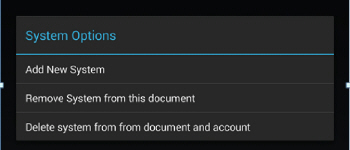
Add New System = Add a New System Record
Remove System from this document = Remove the System Record from the Order/Quote
Delete system from document and account = Remove the System Record from the Order/Quote AND the Client File
The System Information shown/captured is
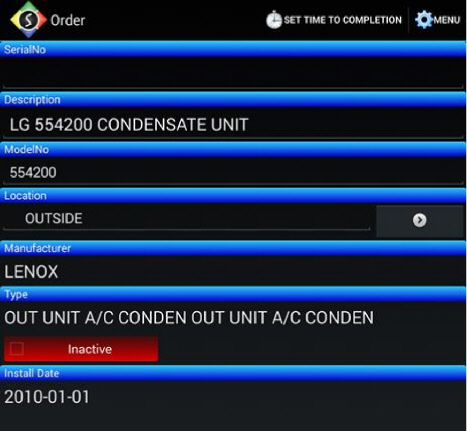
SerialNo = System Serial Number
Description = System Description
ModelNo = System Model Number
Location = System Location
The ![]() functions like the ServMan Back Office Picker Button
functions like the ServMan Back Office Picker Button
Manufacturer = System Manufacturer
Type = System Type
Inactive = If checked will mark the System Record as Inactive
Install Date = The Date the System was Installed
ServMan Mobile Android Screens Client History Screen
The Client History screen allows the mobile user see the last 20 of the Clients Orders. It is accessible by pressing on the
![]()
Button while in an Order/Quote
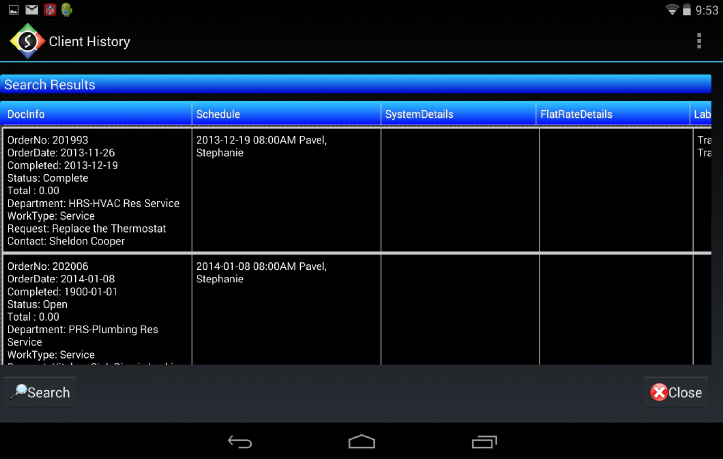
This screen shows the last Work Orders for the Client. If you Long press on an Order you have the option to download the order
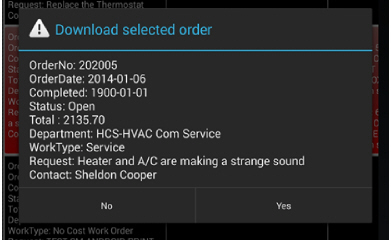
If Yes is selected then the order will appear on the ServMan Mobile Android Home Screen and the mobile user will have access to the order detail etc.
ServMan Mobile Android Screens Order/Quote Tasks Screen
The Order/Quote Tasks screen allows the mobile user see the Tasks attached to the specific Order. It is accessible by pressing on the
![]()
Button while in an Order/Quote
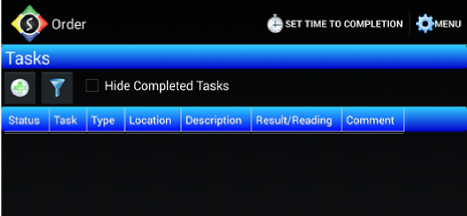
Selecting the Plus sign allows the mobile user to add a Task to a System on the Order/Quote
If tasks are assigned by default as a result of a maintenance tasking order the tasks will appear on the Tasks screen and the mobile user can select each one as they perform the tasks to enter the appropriate
information
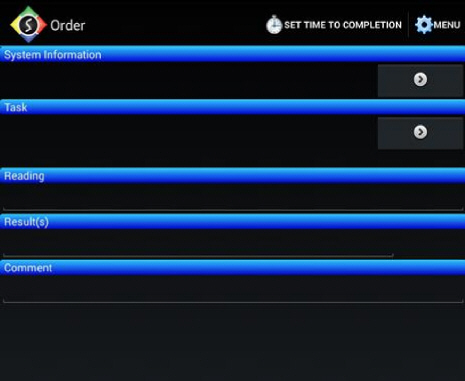
System Information = The System for which the Task is Performed
Task = The Task Code
Reading = The mobile user may add the Readings resulting from the Task performed
Result(s) = The mobile user may add the Results from the Task performed
Comment = Any Comments the mobile user would like to enter regarding the Task
ServMan Mobile Android Screens Order/Quote Documents Screen
The Order/Quote Documents screen allows the mobile user see and download any Documents attached to the specific Order/Quote. It is accessible by pressing on the
![]()
Button while in an Order/Quote
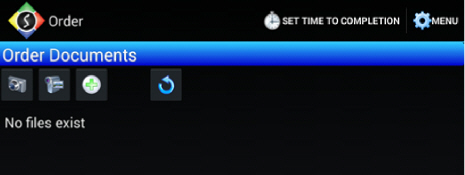
The Camera icon allows the mobile user to take a photograph that is then attached to the Order/Quote
The Video Camera icon allows the mobile user to take a video that is then attached to the Order/Quote
These buttons will bring up the Enter File Name screenThis screen will default to the standard file name nomenclature of YYYYMMDD_HHMMSS
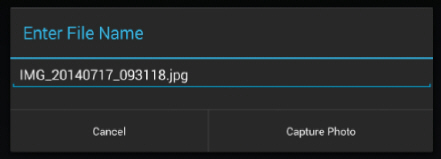
Or the Mobile User can enter a File Name which will be used for the Photo or Video Captured

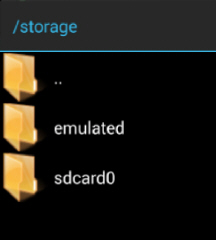
The Plus sign allows the mobile user to browse for a file to attach from their mobile device to the Order/Quote

Selecting File will allow the Mobile User to use other applications such as Dropbox to browse and attach files
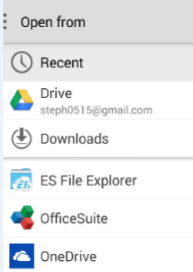
Selecting Browse will allow the Mobile User to use the Android file browser dialog to browse files on the device
When there are files on the Order/Quote Documents tab in the ServMan Back Office Application the mobile user will see “server\filename”. A Long press of the document name will open a menu with the options:
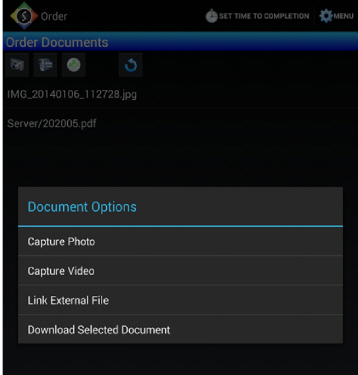
Capture Photo = Same action as pressing the Camera Icon
Capture Video = Same action as pressing the Video Camera Icon
Link External File = Same action as pressing the Plus sign
Download Selected Document = This will download the document to the mobile users device so they can then open and view it. After the download they will see “server\filename” as simply “filename”
ServMan Mobile Android Screens Order/Quote Signature Screen
The Order/Quote Signature Screen allows the mobile user to capture Client Signatures and attach them to the Documents associated with the specific Order/Quote. It is accessible by pressing on the
![]()
Button while in an Order/Quote
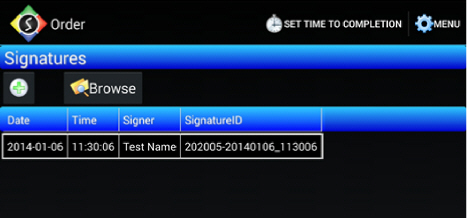
Selecting the Plus sign will allow the mobile user to capture a Clients signature
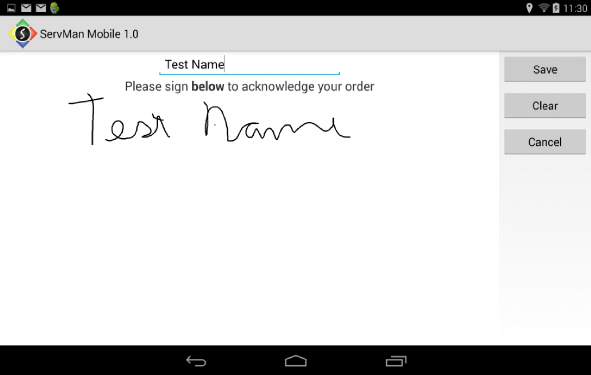
They will type their name and then use their finger or a stylus to sign their name
The signature image is saved to the Company “sigs” folder as <orderNo>.bmp and in the SQL database in the ordsig table.
![]()
will allow the Mobile User to select from any Non-Sync'd Signature Images on their Device.
ServMan Mobile Android Screens Order/Quote Payment Screen
The Order/Quote Payment Screen allows the mobile user to capture Client Payments for the specific Order/Quote or to be applied to the Client Account. It is accessible by pressing on the

Button while in an Order/Quote
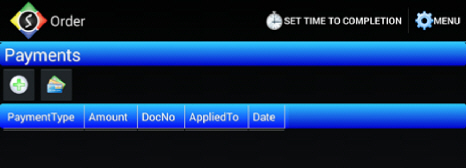
Selecting the plus sign will allow the mobile user to obtain a Cash or Check Payment
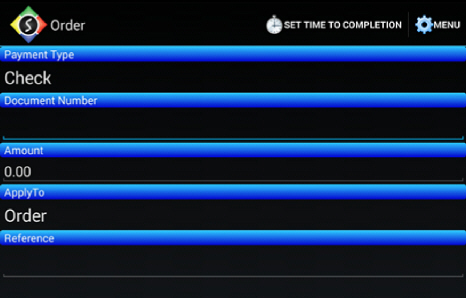
Payment Type = Cash or Check
Document Number = Check Number
Amount = The Amount of the Cash or Check Payment
ApplyTo = Payments can be applied to the Order or to the Client's Account. Touch this section to bring up a menu to select

Reference = The Payment Reference
![]()
Selecting the Credit Card Icon will allow Mobile Users to obtain Credit Card Payments (Note: ServMan Credit Card Module MUST be enabled in the Back Office Application)
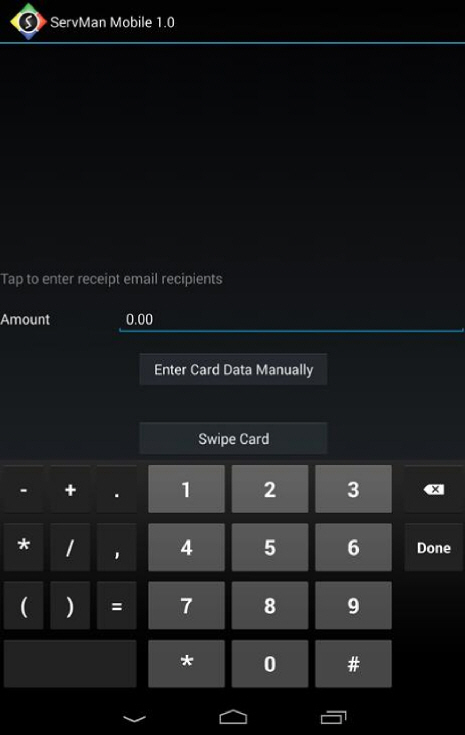
Tap to enter receipt email recipients = If the proper ServMan.INI setting has been applied this will send an email to the Credit Card Email from Authorize.NET
Amount = This will auto-fill with the Order/Quote Total. To edit, put your cursor at the end of the value and delete the existing value and then re-type the edited amount
Enter Card Data Manually = This will allow you to enter Credit Card Information Manually on another screen
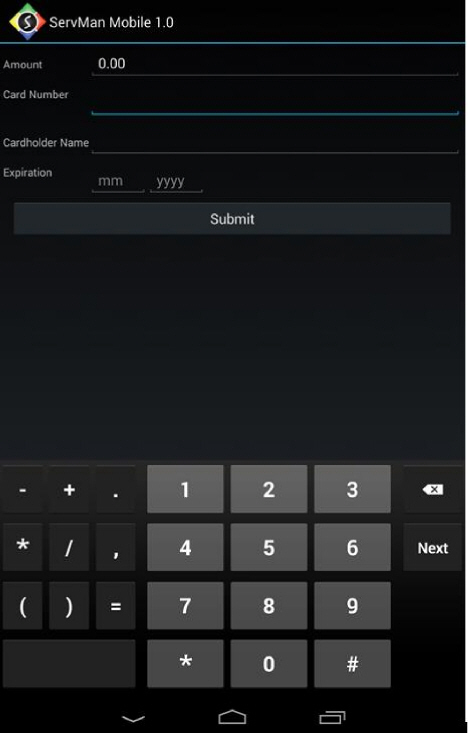
Amount = The Credit Card Charge Amount
Card Number = The Credit Card Number (Do Not Enter any Dashes or Spaces)
Cardholder Name = The Name Exactly as it Appears on the Credit Card
Expiration = The Credit Card Expiration Date (mm/yyyy format)
Submit = Press to Process the Payment
Swipe Card = This will allow the Mobile User to Swipe the Credit Card using the Unimag Pro Credit Card Swipe
http://www.idtechproducts.com/products/mobile-readers/126.html or the UniMag II Credit Card Swipe http://www.idtechproducts.com/products/mobile-readers/138.html If the Credit Card Swipe has NOT been configured
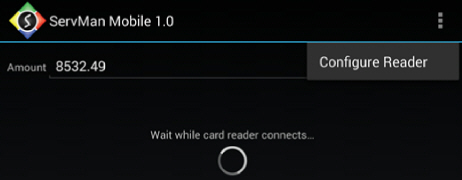
Press the button at the top right to show Configure Reader
This will bring you to the Auto Configuration Screen

Click Begin Autoconfig and follow the prompts
ServMan Mobile Android Screens Order/Quote Contact Screen
The Order/Quote Contact Screen allows the mobile user to edit and add Client Contacts. It is accessible by pressing on the
![]()
Button while in an Order/Quote
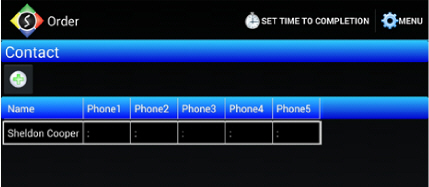
This screen will show the Order/Quote Contact
Selecting the Plus sign will allow a Mobile User to Add a Contact
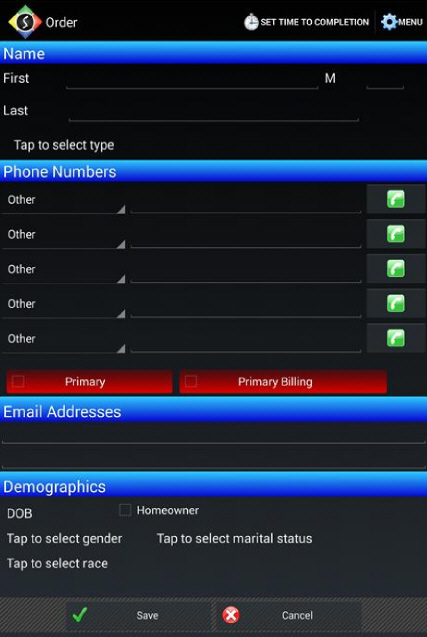
First = Contact First Name
M = Contact Middle Initial
Last = Contact Last Name
Phone Numbers = Contact Phone Numbers Touch Other to select the Phone Number Type
Primary = Check if the Client Primary Contact
Primary Billing = Check if the Client Primary Billing Contact
Email Addresses = Contact Email Addresses
Demographics = Contact Demographic Information (Gender, Race, Marital Status)
DOB = Date of Birth
Homeowner = Check if Homeowner
ServMan Mobile Android Screens Order/Quote Total Screen
The Order/Quote Total Screen allows the mobile user to see the Order/Quote Total based off of the items entered on the Order/Quote Detail Screen. It is accessible by pressing on the
![]()
Button while in an Order/Quote
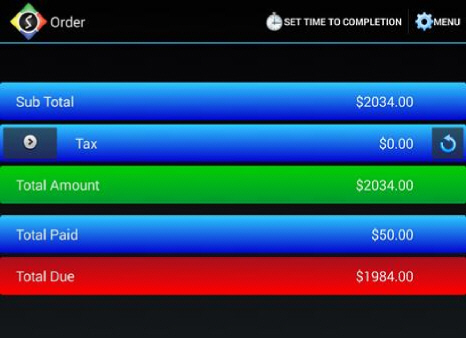
Sub Total = The Order/Quote Sub Total
Tax = The Order/Quote Tax Amount
The ![]() button will allow the Mobile User to select a Tax Code to apply to the Order/Quote if applicable
button will allow the Mobile User to select a Tax Code to apply to the Order/Quote if applicable
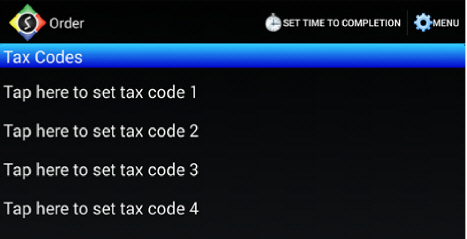
After selecting the Tax Code the Mobile User can then press the Refresh Button to Recalculate the
Order/Quote Tax Amount
![]()
Total Amount = The Order/Quote Total Amount Due
Total Paid = The Order/Quote Total Amount Paid
Total Due = The Order/Quote Total Balance Due
ServMan Mobile Android Screens Order/Quote Map Screen
The Order/Quote Map Screen allows the mobile user to map their route to the Order/Quote Address. It is accessible by pressing on the
![]()
Button while in an Order/Quote
Google Maps is used by default; however, in the Settings à Configuration you can set the default map
program to use the Waze Application instead
ServMan Mobile Android Basic Troubleshooting
The following is an example of common ServMan Mobile Android error messages and solutions. Please contact ServMan Support with any questions.
Device Connection (Sync) Issues
Issue: When User tries to perform any kind of Sync they receive the error” ERROR|050|SOAP HEADER AUTHENTICATION FAILED WITH ERROR CODE 1”
Troubleshooting Tips:
Verify the Device Connectivity Settings; specifically the Web Service User ID, and that it is correct
Issue: When User tries to perform any kind of Sync they receive the error” ERROR|050|SOAP HEADER AUTHENTICATION FAILED WITH ERROR CODE 2”
Troubleshooting Tips:
Verify the Device Connectivity Settings; specifically the Web Service User Password, and that it is correct
Issue: When User tries to perform any kind of Sync they receive the error” java.net.ConnectException: failed to connect to /XXX.XXX.XXX.XXX (port XXX) after 20000ms; isConnected failed: EHOSTUNREACH (No Route to host)”
Troubleshooting Tips:
Verify their Connectivity Settings; and that their Web Server is Online. This error means the Web Service is not running or the Web Server itself is not online
Issue: When User tries to perform any kind of Sync they receive the error” java.net.ConnectException: failed to connect to /XXX.XXX.XXX.XXX (port XXX) after 20000ms; isConnected failed: EHOSTUNREACH (Network is unreachable)”
Troubleshooting Tips:
Verify their Connectivity Settings; and that they are not using their Internal WiFi. Also verify that they can browse to the internet. This error means there is no Internet Connection
Issue: When User tries to perform any kind of Sync they receive the error” java.net.SocketTimeoutException: failed to connect to /xxx.xxx.xxx.xxx (port xxx) after 200000ms”
Troubleshooting Tips:
This error usually means one of 2 things there is a typo in their Connectivity Settings or they are using their Internal Company WiFi to reach the Web Server's External IP Address
Verify their Connectivity Settings;
Verify they are NOT using their Company WiFi
Issue: When User tries to perform any kind of Sync they receive the error below:

Troubleshooting Tips:
Verify their Connectivity Settings; and that their SQL Server is Online and there have been no changes to their Network; specifically the permissions to the account running the Application Pool for the ServMan Web Service.
Issue: When User tries to perform any kind of Sync they receive the error” ERROR: WEB SERVICE Root element is missing.”
Troubleshooting Tips:
Verify the Device Connectivity Settings; specifically the Device ID, and make sure there is an Employee Record with that Mobile ID assigned in the Back Office ServMan Application
Issue: When User tries to perform any kind of Sync they receive the error” ERROR|060|Device ID is not licensed. Contact ServMan Software at 1-877-SERVMAN to increase your mobile license count.”
Troubleshooting Tips:
Verify their Mobile License count by going to Help à About in the Back Office Application
§ Check the Mobile ID they are using as Licensing is sequential. If they have a 5 user license they should
use Mobile ID's 1, 2, 3, 4 and 5. Mobile ID 23 would return an error
Mobile Licensing is $25/month per License if you would like to increase please contact ServMan Support at 1-877-SERVMAN
Issue: When User tries to Ping the Web Service or perform any type of Sync they receive a connection error
similar to “Java.lang.nullpointerException”
Troubleshooting Tips:
Verify the Device Connectivity Settings; specifically the WebURL, and make sure that it is correct
Issue: UnimagPro Credit Card Swipe is NOT Recognized by the Android Device (ex. Errors like No Device Connected when trying to Swipe a Credit Card)
Troubleshooting Tips:
Verify the Android Device and Service Provider are supported by contacting ServMan Support.
Verify the Version of ServMan Mobile on the Client's Android Device They must be on ServMan Android 2014 Build1013 or later to process Credit Cards using the Swipe Device
Issue: Mobile User is NOT Able to Process Credit Cards with the Specific Error Below: 
Troubleshooting Tips:
Verify the Employee Setup in the Back Office ServMan Application and that the ServMan Mobile Credit Card Authorization Settings have been Entered Correctly
Verify that the Back Office ServMan Application Credit Card Merchant Accounts have been setup with the correct information
Issue: When taking a Credit Card Payment from the Mobile Device the error "server did not recognize the value of HTTP header soap action: https://localhost/servmancreditcardservice.asmx/processinvoicetransaction
" appears on the Device
Troubleshooting Tips:
Verify the Employee Settings and that they have both the Card Present and Card NOT Present Information set
Verify the ServMan Mobile Settings and that the Credit Card URL is specified
It should be https://XXX.XXX.XXX.XXX/servmanwebservice/servmancreditcardservice.asmx where XXX.XXX.XXX.XXX matches the XXX.XXX.XXX.XXX of their Web Service URL
Have the Mobile User perform a Configuration Sync and then attempt to process the Credit Card again
Issue: Mobile User is NOT Able to Process Credit Cards with the Specific Error Below:
"Error: Protocol Not Found: 0"
Troubleshooting Tips:
Verify the Employee Setup in the Back Office ServMan Application and that the ServMan Mobile Credit Card Authorization Settings have been Entered Correctly
Verify that the Back Office ServMan Application Credit Card Merchant Accounts have been setup with the correct information
Verify that the Back Office ServMan Mobile Settings have the correct Credit Card Web Service URL specified
Have Mobile User with issue go to Settings à System Settings and verify what they see under CARDPRESENTACCOUNT, CARDNOTPRESENTACCOUNT and CREDITCARDURL and verify that they match the Back Office Settings.
If they do NOT match have the user perform a Standard Sync to obtain the correct / updated Information
Issue: Mobile User Time Clock Punches are NOT appearing in any of the Time Clock related Reports or on the
Employee Clock Admin section of the Back Office ServMan Application
Troubleshooting Tips:
Verify the Mobile User's Punches are on the Time Clock Admin screen in the Back Office ServMan Application
Verify that the Mobile User is performing a Standard Sync to get their Time Clock Punches on Mobile to the Back Office
Verify the Back Office Version of ServMan
The Back Office ServMan Application Must Be Version C.26 or newer
Issue: When adding a Note on the Notes Screen the Note does NOT show after clicking Save
Troubleshooting Tips:
Verify If the Order/Quote has been created on the Android Device or not
If so Make sure the Mobile User performs a Standard Sync as an Order Must Exist in the Back Office ServMan Application for Notes to be Added
Issue: When using the Download Current Release option to Update the ServMan Mobile Android Version the Mobile User does not see Added Features (ex. They cannot view Client History from the Client Search Screen) or Turning Time Clock / Time Logging On/Off the ServMan Mobile Screen does not reflect the changes
Troubleshooting Tips:
Verify the Version of ServMan Mobile on the Client's Android Device They must be on ServMan Android 2014 Build1011 or later
Uninstall ServMan Android Mobile from the Device and then Download from the Google Play Store
ServMan Mobile Android Sample Workflow
The following is an example of common ServMan Mobile Android Screens workflows and required setup. Please note based off of your workflow, these options can be changed. Please speak with your ServMan Project Manager for more details.
Sample Residential Service Workflow Order Status Codes
This example explains our standard Order Status Codes for Residential Service Workflow on our Mobile Application:
Example 1 Service Technician going to their First Call of the Day
EnRouteFirst
OnSite
WrapUp
TechComplete
Complete
Example 2 Service Technician going to their Second or Later Call of the Day
EnRoute
OnSite
WrapUp
TechComplete
Complete
Example 3 Two Technicians going to One Call. “TechA” leaves First and “TechB” leaves Last
Tech A (Leaves First)
EnRoute (or EnRouteFirst)
OnSite
WrapUp
TechComplete
TechRelease
Tech B (Leaves Last)
EnRoute (or EnRouteFirst)
OnSite
WrapUp
TechComplete
Complete
Example 4 Service Technician needs a part to finish work and does NOT collect $$$ today
EnRoute (or EnRouteFirst)
OnSite
WrapUp
TechComplete
PartNeeded
Example 5 Service Technician performs repairs, collects $$$ and Customer wants to add Additional Work
EnRoute (or EnRouteFirst)
OnSite
WrapUp
TechComplete
Complete Then Notify Dispatch to schedule a “Follow-Up” Order
Page 68 of 72
Example 6 Service Technician on a Call cannot finish because 1) It's a Multi-Day Project or 2) They ran out of time
EnRoute (or EnRouteFirst)
OnSite
TechComplete
MustReturn or TechRelease
Note:
n Only the LAST Tech to leave (or only Tech on the Order) selects MustReturn
n Any other Tech leaving before the “Last Man Standing” selects TechRelease
n Last Technician or Dispatch should Reschedule the Order for another Day
|
Status |
Definition |
Download |
Tech Can |
Auto |
Override |
Tech |
LogTime |
LogTime |
Start |
Labor Item No. |
|
Standard |
Tech |
Status |
W/O |
Time |
||||||
|
to Tech |
Set |
|||||||||
|
Sync |
Status |
Only |
|
Prompt |
Status |
|||||
|
Open |
Signifies a work order has been established and assigned to a technician. This is the normal status code an order |
Y |
N |
N |
N |
N |
N |
N/A |
N/A |
N/A |
|
EnRouteFirst |
This is the status code for the technician to select when they are on their way to their first call. This code doesn't |
Y |
Y |
Y |
N |
Y |
N |
N/A |
N/A |
N/A |
|
EnRoute |
Select this code to log the drive time for any call EXCEPT the first call. This “starts the clock,” so to speak. This is a |
Y |
Y |
Y |
N |
Y |
N |
N/A |
N/A |
N/A |
|
OnSite |
This status completed the computation of the EnRoute travel time and begins the clock for on-site time |
Y |
Y |
Y |
N |
Y |
Y |
Y |
EnRoute |
TRAVEL |
|
WrapUp |
›Use this status code 10-15 minutes before you expect to be finished with your call. This step does not affect your |
Y |
Y |
Y |
N |
Y |
N |
N/A |
N/A |
N/A |
|
TechComplete |
Selecting this status code completed your on-site time and logs your hours to this Order / Quote. You MUST select |
Y |
Y |
Y |
N |
Y |
Y |
Y |
OnSite |
ONSITE |
|
Complete |
This status code is selected by the LAST tech who works on an Order / Quote after the work is finished. Select this |
N |
Y |
Y |
Y |
N |
N |
N/A |
N/A |
N/A |
|
TechRelease |
This status code is similar to “Complete” above, but is only used when the work order needs to stay open because other techs are still on-site, and you need to “release” the order from your device and retrieve your next order. |
N |
Y |
Y |
Y |
N |
N |
N/A |
N/A |
N/A |
|
PartNeeded |
Select this status code after “TechComplete” if you need to order or pick-up materials for this work order and |
N |
Y |
Y |
Y |
N |
Y |
Y |
OnSite |
ONSITE |
|
MustReturn |
Select this status code if we need to go back on another day to finish up on a work order for reasons OTHER than |
N |
Y |
Y |
Y |
N |
N |
N/A |
N/A |
N/A |
Sample Residential Service Workflow 1 Service Order
In this example Tech is scheduled to perform service at Clients home. Tech performs a Standard Sync on his
Android Device.
Next the Tech will set their Status to EnRoute. In the Back Office Application on the Schedule Board the Order will change color to match the EnRoute Order Status
Next the Tech will set their Status to OnSite. If you are logging time with status changes, this will status change completes the travel time calculation, posts a travel time entry to the order and automatically updates the dispatch board.
Upon arrival Tech will verify the Client System Information and enter any System Information onto the Order/Quote System Screen.
They will then perform their work and set their status to Wrap-Up. This will indicate to the dispatcher that they are completing their paper work and obtaining payment and about 15-20min from completing the call so the dispatcher can inform their next call they are on the way.
At this time they will add their Flat Rate Tasks and Parts/Materials to the Order/Quote Details Screen.
Once completed they will perform a Sync from the Menu to send all of their information to the Back Office.
Next they will obtain payment from the Client and then they will Print and Email a copy of the Back Office
Work Order Format to the Client.
Then they will set their Status to Complete to Sync all information to the Back Office and to This status change also completes the automatic calculation of an onsite time entry for the order. When the order is opened in the office all the detail is present and there is no need for a debriefing call or paperwork to be input in the system. We are done!
Sample Residential Service Workflow 2 Service Order to a Client Record NOT Found in the System (On-Call Technician Dispatching Themselves)
In this example the Tech is the On-Call Technician and Dispatches themselves. The Client Record is NOT in the System.
ServMan Mobile Windows and Android do NOT allow Mobile Users to enter new Client Records. This is to prevent “bad data” from getting into the Back Office Database.
In situations where the On-Call Technician Dispatches themselves and the Client Record is NOT in the System the Mobile User should do the following:
1. On the Client Search Screen search for the HOUSE ACCOUNT
a. This is setup in the Back Office as a Client Record with simply the Name field filled in as “HOUSE ACCOUNT”
2. Add a New Work Order using the HOUSE ACCOUNT and then schedule that Order to themselves
3. While completing the Order they will add a Note on the Order Notes screen that contains the following:
a. Client Name
b. Client Address with City, State and Zip
c. Client Phone Number and Email if applicable
4. Any Payments can be taken in the Field as well (Credit Card or Cash / Check) and applied to that Order
5. The Technician will Close the Order out as usual
6. The Back Office will then search for Orders where the Account Number is that of the HOUSE ACCOUNT
7. They would then open each Order and look at the Notes tab for the Note added by the Technician with the Client Information and then use that information to Create the New Client Record in Back Office ServMan
8. They would then change the Account Number on the Order from the HOUSE ACCOUNT to the newly created Client Account Number
9. They can then Re-Apply the Payment from the HOUSE ACCOUNT to the newly created Client Account Number