|
What's covered? Hide |
The A/R Detail Inquiry contains a complete history of invoices, payments, finance charges, and other transactions with a client. From the A/R Detail Inquiry, you can perform many functions, including issuing credit memos and debit memos, reapplication of transactions, payment reversals, and more.
The A/R Detail Inquiry screen is comprised of four (4) tabs. Each tab displays different information and allows different functionality.
Open Balances
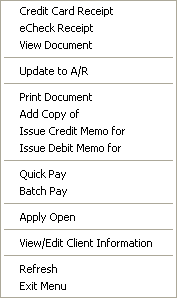
This tab displays open transactions for the client. You can filter the transactions to show only those billed in the select year using the filter menu. The following options are available when you right-click on a transaction. NOTE: All options may not be available because of security settings.
Contextual Menu Options
Transaction Detail
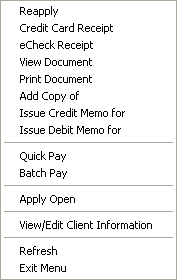
This tab displays a transaction history for the client. You can filter the transactions to show only those billed in the select year. The following options are available when you right-click on a transaction. NOTE: All options may not be available because of security settings.
Contextual Menu Options
Contacts
This tab shows the client contacts. This is useful when performing collections activities because you can quickly view contact information from the client's account. The following options are available when you right-click on a contact. NOTE: All options may not be available because of security settings.
Contextual Menu Options
Notes
This tab shows client notes. From this tab, you can review and add adds notes regarding your contact with the client. The following options are available when you right-click on a note. NOTE: All options may not be available because of security settings.
Contextual Menu Options
Every Accounts Receivable transaction as type. The transaction type is identified in the Type column by one of the following:
The source code identifies the source of the transaction. The transaction source is identified in the Src column on the Transaction Detail tab by one of the following:
This process is used to apply open credits to outstanding debits on a client's account. A credit may be on the clients account because of an overpayment, open payment, or credit memo.
You can change the post date on Accounts Receivable transactions to correct transactions with an incorrect post date.
Invoice transactions
NOTE: The post date on the invoice must be in an open accounting period for you to be able to save your changes.
Non-invoice transactions
You can change the date on Accounts Receivable transaction to correct transaction with an incorrect date.
Invoice transactions
NOTE: The post date on the invoice must be in an open accounting period for you to be able to save your changes.
Non-invoice transactions