Working with general journal entries
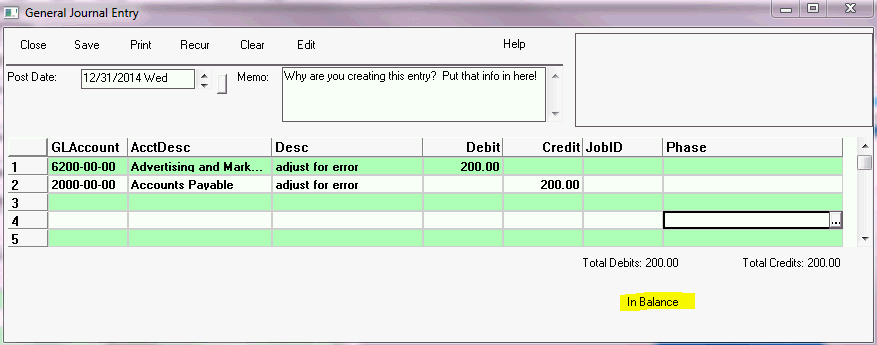
Add a general journal entry
- Click General Journal Entries on the General Ledger Navigator.
- Enter the requested information.
- If this entry is Job related, enter the job ID (and phase if applicable) on job related entries for proper job cost reporting
- Validate your entries are In Balance
- Select from the following options:
- Close: close the Journal Entry window without saving
- Print: print the General Journal Entry report
- Save: record the entry
- Recur: setup a recurring entry
- Clear: remove all selections/information
- Edit: select a different journal entry to edit
back to top
Edit a general journal entry
- Click General Journal Entries on the bottom left column of the General Ledger Navigator.
- Select the journal entry to edit and double click it.
- Change the information as required.
- Click Save, then Close.
back to top
Delete a general journal entry
- Click General Journal Entries on the General Ledger Navigator.
- Select the entry from the grid.
- Right click and select Delete Journal Entry
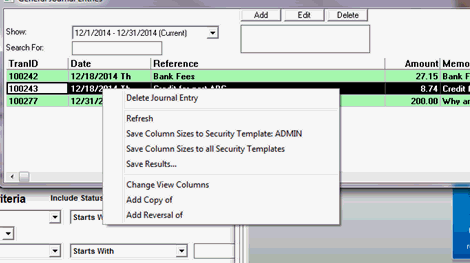
- Press Yes to delete the entry
back to top
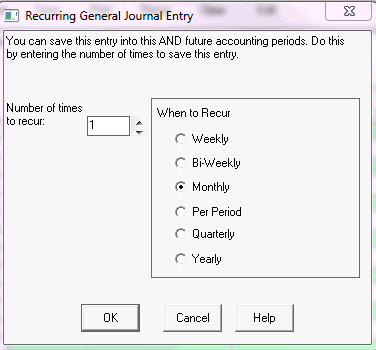
Setup a recurring general journal entry
- Add a General Journal Entry as normal.
- Click Recur in the tool bar.
- Enter the following information in the Recurring Payment dialog:
- Number of times the entry should recur
- Frequency the entry should recur
- Click OK.
- Click Save. This records a transaction in the General Ledger for each recurrence you set in step 3.
back to top
Delete multiple instances of a recurring general journal entry
- Select Modules > General Journal Entries.
- Locate and select the first instance of the recurring entry you want to delete.
- Right-click and select "Delete Series from This Date Forward".
back to top
Reverse a general journal entry
- Select the time period then the journal entry to reverse
- Right click and select "Add Reversal of" from the list
- A new entry will open with the debits and credits reversed.
- Review for accuracy then press Save then Close.